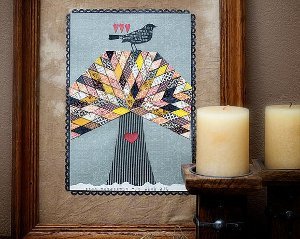
Quilted Paper Tree
Perfect for seasonal decorating, this Quilted Paper Tree is a wonderful way to add some character to your home. Use up leftover paper scraps to create this lovely wall hanging that mirrors a popular quilting design. This is a fun project for scrapbookers and those with a lot of extra paper on hand. You could also recycle old magazine pages, greeting cards, letters, and much more. Let your creativity soar with this lovely simple and easy paper project.

Materials:
- Cutting Mat (18" x 24")
- For the Birds Clear Stamps (4"x8")
- Fingertip Detail Knife
- Apron Lace Border Punch
- That’s Amore Squeeze Punch (Medium)
- Scraps of fabric and patterned paper
- 12 x 12 inch sheet of patterned paper
- Old book pages or scrap paper for the base of the treetop
- Fabric for tree trunk
- Fabric for background
- Fusible webbing
- Frame
Instructions:
- Start by using your Fiskars Rotary Paper Trimmer to cut 1/2 inch wide strips of patterned paper. If you want to add some fabric "leaves" to the mix, use your paper trimmer to cut 1/2 inch wide strips of fusible web and iron those to the back of your fabric prior to cutting the fabric strip.
- Using the corner of the Fiskars 18 inch by 24 inch Cutting Mat with the 30, 45, and 60 degree bias lines, align a paper strip with the corner. Using the 45 degree line, a Fiskars acrylic ruler, and the 45 mm Comfort Grip Rotary Cutter, cut the strip. An older blade that's no longer sharp enough to cut fabric can be saved and given a second life as a paper cutting blade.

- Flip the strip around so the angled cut you just made is on the right-hand end of the strip. Align the lower corner of the angled cut (the edge of the strip that appears to be shorter) with the point 1/2 way between 6/8 inch and 7/8 inch on the cutting mat. Using your rotary cutter, the 45 degree line, and acrylic ruler, cut the strip. This will leave you with a diamond. Continue cutting papers and fabrics into these diamond shapes until you have a collection of at least 105 diamonds.

- Using a piece of scrap paper, after inking the edges of the triangles if desired, begin staggering your diamonds to create your paper quilting. I used pages out of an old book so that any spaces between diamonds that didn't align perfectly would be filled with type and look intentional.

- The finished treetop is constructed of large triangles put together like a pie. Each triangle is made by lining a row of 6 diamonds along the top edge with the top half sitting above the scrap paper edge. For the next row, place a diamond in the spaces between the tips of the previous row. You will use 5 diamonds for this row, 4 for the next one, continuing with each row until the triangle has one diamond creating a tip. Make 5 of these large triangles and cut off the excess from the diamonds hanging over the top edge of the triangle.
- The finished triangles will look like this.

- Assemble (but don't adhere) the treetop on your background paper and cut the background paper to the width of the treetop. Cut to the desired length. Mine is 11 1/4 inches. If you will be using fabric (walnut stained muslin in my example) behind the background paper, remove the treetop and iron fusible webbing to the back of the background paper.
- I used the Apron Lace Border Punch to create a frame and the Medium That's Amore and Medium Heart Lever Punch for the final details.

- Create a pattern for your tree trunk, trace it onto a piece of fusible web cut slightly bigger than the trunk, and iron the fusible web to the back of your trunk fabric. Cut the trunk out, remove the backing paper from the fusible web, and iron the trunk to the background paper. After adhering the Apron Lace Border to the background, if mounting the background to fabric, remove the paper backing from the fusible web on the background paper and iron it to your fabric.

- Assemble the treetop over the top of the tree trunk and adhere it to the background paper.
- Using the Fiskars Compact Stamp Press, the For the Birds Stamp set, and the black High Density Ink Pad, stamp a bird image onto a scrap of paper that's the same as the background paper. When the ink is dry, cut out the bird image using the Fiskars Fingertip Detail Knife and adhere it atop the tree.

- Add a scrap of book paper beneath the tree to ground it, frame the collage (a frame with a 10 1/2 inch by 15 1/2 inch opening in my example), and it's ready to hang or add to a table-top display.
Read NextSummertime Family Road Trip Journal