Fold Up Memory Book
This Fold Up Memory Book, also known as an @book, is a great way to combine journaling and scrapbooking. Use this simple and easy paper craft from Maureen Wilson to create a mini scrapbook of a family vacation, a wedding, or birthday. These @books fold up nice and small, so you can easily store them on a shelf or in a drawer. When you fold them out, they can extend to be over a yard long! This is a great way to preserve photos and create a special gift that anyone would be lucky to receive.

Materials:
- Grafix Medium Weight Chipboard, (2) 12×12 pieces
- Washi decorative tape (1/3 – 1 inch wide)
- Patterned paper
- Double-sided adhesive
- Photos
- Journaling pen
- Pencil
- Embellishments
Supply Tip: First, it’s important that you choose the correct material for your base. You’ll need to use medium weight chipboard so the album will be durable and hold up to frequent handling. Since this will be a scrapbook, you want to select a chipboard that’s acid-free and safe for your photos. I recommend Grafix brand chipboard, since it’s archival quality, and it comes in the 12×12 size we need for this project.
Video:
Instructions:
-
Begin by cutting both sheets of chipboard in half, so you have four 6×12 inch pieces.
-
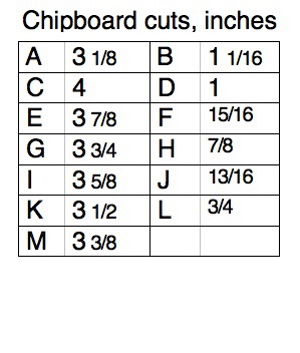
Cut your chipboard to the measurements indicated below. Label each piece with the correct letter as you go, using a pencil. (Scared of fractions? Don’t worry, you can handle this. With the exception of piece C, all the measurements in the left column are 1/8 inch less than the measurement before it. So, just move over two tiny lines on your paper cutter. For the right hand column, all measurements are 1/16 inch less than the measurement before it. So, just move over one tiny line on your paper cutter.)
-
Lay the pieces out in alphabetical order, spaced about 1/8 inch apart. You’re going to attach them with decorative washi tape. Since washi tape isn’t all that sticky, I highly recommend adding some adhesive beneath the tape for extra durability. Attach all the chipboard pieces in alphabetical order.
-
Test out your @book by folding the pages inward from right to left, beginning with the last page (M). When you’re done, (A) should be on top. Now that your book is properly assembled, you can erase the letters.
-
Decorate your @book by adding patterned papers to each page. I chose to cut mine 1/4 inch smaller than each page, so the chipboard acts as a border.
-
Add photos and journaling blocks to your album. Add embellishments as desired. Punches are a great way to to make good use of small paper scraps.
- Add journaling in your own handwriting to make the album special. Put your own personal touch on the book with a little doodling.

Thanks for your comment. Don't forget to share!
Report Inappropriate Comment
Are you sure you would like to report this comment? It will be flagged for our moderators to take action.
Thank you for taking the time to improve the content on our site.