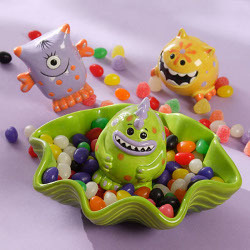
Cute Creatures Candy Bowls
Cute Creatures Candy Bowls from I Love to Create will please kids almost as much as the candy inside. This site will show you how to make ceramic crafts with brilliant colors like lime and purple. You can't help smiling when painting these silly little creatures.

Materials:
- Duncan® Concepts® Underglazes for Bisque and Majolica
- CN 013 Dark Straw
- CN 052 Bright Tangerine
- CN 181 Light Kiwi
- CN 182 Bright Kiwi
- CN 183 Dark Kiwi
- CN 253 Dark Black
- CN 261 Light Grape
- Duncan® Concepts® Underglazes for Bisque and Majolica
- CN 013 Dark Straw
- CN 052 Bright Tangerine
- CN 181 Light Kiwi
- CN 182 Bright Kiwi
- CN 183 Dark Kiwi
- CN 253 Dark Black
- CN 261 Light Grape
- Dinnerware Bisque Designs
- Small Shell Bowl 8.5" x 7.25" x 2.5"
- Signature Brushes
- SB 802 No. 1 Liner
- SB 806 No. 6 Round
- SB 807 No. 6 Fan Glaze
- SB 812 No. 10 Round
- Tween/Children Bisque Designs
- Tiny Tot Cyclops
- Tiny Tot Spike
- Tiny Tot Wiggles 3.85" x 3" x 2.75"
- Duncan® Pure Brilliance® Clear Glaze
- Pencil with unused eraser
- ¼” Masking tape
- Foil or foam plate for palette
- Circle template
- Container for water
- Paper towels
- Potter’s sponge
Instructions:
Shell Bowl:
- Wipe all ware with a damp sponge to remove bisque dust.
- Using the Fan Glaze, brush three coats of Light Kiwi inside bowl, letting dry between coats.
- Using the No. 10 Round, apply a coat of Light Kiwi around top section (approximately an inch) on outside of bowl
- Load brush in Bright Kiwi and add in the section below the Light Kiwi, blending up into the Light Kiwi. While Bright Kiwi still damp on bowl, load brush in Dark Kiwi and brush one coat on the bottom section of bowl, blending into the Bright Kiwi. Continue the Dark Kiwi on base of bowl.
- Repeat process twice more, making sure to blend colors as you gradate to the bottom of bowl.
Cyclops:
- Use the No. 1 Liner and No. 6 Round to brush three coats of Light Grape on body, avoiding horns, hands, feet, spots and facial features. Let dry between coats.
- Brush three coats of Bright Tangerine on the tips of horns, hands, feet and spots, using the No. 1 Liner and No. 6 Round as needed. Let dry between coats.
- Add fingernails and toenails with Light Grape as shown.
- Use the No. 1 Liner to paint in eyeball with three coats of Black. If desired, add a few eyelashes along the top of eye, then pull in a few lines on the top of head for hair. Fill in smile line. Let dry completely.
Wiggles:
- Using the No. 6 Round or the No. 1 Liner as needed, brush three coats of Dark Straw on body, avoiding facial features, spots and feet. Let dry between coats.
- Use the No. 6 Round to fill in spots on body with Light Grape, then dip pencil eraser in Light Grape and add a spot to the center of forehead. Create smaller dots randomly around body with the No. 1 Liner brush handle dipped in Light Grape.
- Use the No. 6 Round to brush three coats of Bright Tangerine on feet, letting dry between coats. Pull in petal shapes around dot on forehead and extending from random dots on body, using the No. 6 Round and No. 1 Liner as needed.
- Fill in the eyes and mouth (avoiding teeth) with three coats of Black, using the No. 6 Round and No. 1 Liner as needed. Let dry completely.
Spike:
- Brush three coats of Light Kiwi onto body, avoiding the lips and horns. Let dry between coats.
- Paint lips, horns and spots with three coats of Light Grape, letting dry between coats. Add fingernails and toenails as shown.
- Make sure eraser on pencil is clean, then dip in Bright Tangerine and dab dots randomly onto body.
- Paint in eyes and background of mouth with three coats of Black and the No. 1 Liner. Add eyebrows above eyes if desired.
Finishing:
- Use the Fan Glaze to brush two coats of Pure Brilliance® Clear Glaze onto each piece, letting dry between coats.
- Stilt pieces in kiln and fire to witness cone 06.
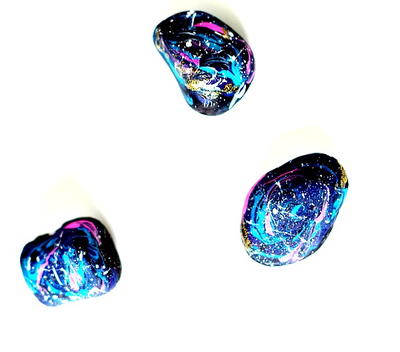
Read NextDiy Marbled Seashells