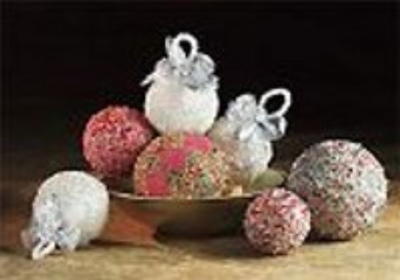
Rose in the Snow Ornament
By Elizabeth Vernier for AMACO
In only 6 simple steps, you can create this elegant Rose in the Snow Holiday Ornament for your tree.
Materials:
- Glass Ornament
- FIMO® Soft Polymer Clay — (1) Metallic Red, (1) Metallic Green, (2) Gold
- Liquid FIMO® Decorating Gel
- FIMO® Lacquer — Gloss
- AMACO® Design Push Molds — Roses
- AMACO® Pasta Machine
- AMACO® Needle Tool
- Ultra Fine Prism Glitter
- Ribbons and Cord (as desired)
- Small Disposable Cups
- Cornstarch Baby Powder
- Plain Paper (for work surface)
- Ruler
- Sharp Knife
- Paint Brushes
- Scissors
Steps:
- Condition small amount of Metallic Red FIMO® Soft. Roll eight pea-sized balls, four slightly larger balls and five slightly smaller balls. Dust rose mold cavities with baby powder. Make eight medium, four large and five small roses. Bake on paper-covered cookie sheet in preheated oven at 265°F (129°C) for 15 minutes.
- Condition Metallic Green FIMO® Soft. Roll into ten small, sixteen medium and eight large balls. Flatten balls, pinch into leaf shapes. Dust leaf cavities on mold with baby powder. Press clay into molds to make leaves. Attach leaves to backs of roses. If leaves do not adhere to roses, attach with small amount of Liquid FIMO® Decorating Gel. Set aside.
- Condition Gold FIMO® Soft (between two and four ounces). Measure diameter of glass ornament. Roll conditioned Gold FIMO® Soft through pasta machine on thickest setting.
- Roll out strip at least two-inches wide and several inches longer than diameter measurement. Use ruler to mark strip two-inches wide and the same length as diameter. Cut strip with sharp knife. Wrap strip around ornament and press gently to seal. Edges should meet but not overlap. Blend seams together with fingertips. At top and bottom of ornament, pinch folds of excess clay together and trim away with scissors. Smooth clay with fingertips.
- Cut circle of clay to cover bottom of ornament. Blend edges together with fingers. Cut circle to fit top. Cut slit for ornament hanger. Press in place and blend seams with fingertips. Make ornament as smooth as possible. If air bubbles form, slice open with sharp knife, then seal with fingertips.
- Attach roses with Liquid FIMO® Decorating Gel. Bake ornament at 265°F (129°C) for 35 minutes. Let cool completely. Mix FIMO® Lacuqer with the ultra fine prism glitter and brush onto ornament. Let dry.
Read NextInitial Homemade Ornaments


Thanks for your comment. Don't forget to share!
Marilyn B
Nov 15, 2017
Thank you for the great detailed instructions which provides great inspiration for such a beautiful ornament. This does take a bit of doing, but it is so pretty and unique that I suspect the results are well worth it! You could change it up a bit by adding a tiny glass or plastic crystal bead here and there on each little rose or on the ornament itself for a little bit of an extra glitter of reflection and sparkle. Very creative and special, and would make a lovely hostess gift too!
Report Inappropriate Comment
Are you sure you would like to report this comment? It will be flagged for our moderators to take action.
Thank you for taking the time to improve the content on our site.