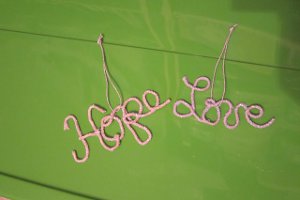
Sparkly Word Art
Have some yarn scraps left over? Turn them into these cute Sparkly Word Art ornaments from Becky Meverden! You can make these ornaments say whatever you'd like...you could even write the names of gift recipients and attach them to gift packages. This is a fun and easy project that anyone can do, and it makes lovely decor for any time of year. Make larger words to hang on the wall, display in a bedroom or bathroom, or keep things organized in your home (I'm thinking Whites and Darks for my laundry room!).
Materials:
- Twine
- Elmer's Glue
- Glitter
- Lame or ribbon for hanging
- Scissors
- Small bowl and plastic wrap
- Wax paper
Instructions:
-
Choose the word you want to make. You can make anything.
-
I wrote the word in my cursive handwriting style. You will notice that doing a word like "Hope," I write the "H," lift my pen and write the rest of the word. This means that I cut the pieces for the "H" first. Decide how large you want the word and cut the three pieces of twine for the "H." If you use a word like "Love," you won't need this step.
-
Using the twine, write out the rest or entire word. Use your fingers to mark the end of the word and and add an extra inch or two and cut.
-
Take a small bowl and cover with two layers of plastic wrap so that when you are finished you just remove the wrap and throw it away.
-
Fill the bowl with some glue.
-
Take the twine for the first letter (if doing a word like "Hope") and place into glue. Make sure it is thoroughly covered and soaked. Remove each piece and use your fingers to remove excess glue and position on a piece of wax paper in the shape of the letter needed. It's messy so don't worry.
-
Place the rest of the word (or the whole word if you are doing a word like "Love") into the glue and shape into the rest of the word making.
-
Sprinkle glitter all over letters and let dry.
- Carefully peal from the wax paper. Reglue any areas that how come apart. String with lame or ribbon and it's ready for the tree.