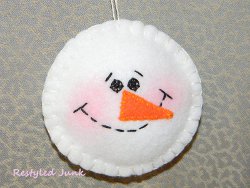
Fuzzy Felt Snowman Ornament
Everyone loves the look of homemade Christmas ornaments during the holiday season. Create a Fizzy Felt Snowman Ornament from Cyndee Kromminga and add it to your tree this year. This is a simple project that sewers will love to make or give as a seasonal gift.
Materials:
- Card stock
- Coffee cup
- Marking pen
- Scissors
- Ruler
- White felt
- Orange felt
- Blush and cotton ball
- Straight pins
- Black embroidery floss
- Embroidery needle
- Orange embroidery floss
- White embroidery floss
Instructions:
-
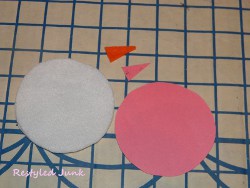
Trace a standard-size coffee cup on card stock. My coffee cup measured approximately 3 inches across. Cut out the shape. This is your snowman's head pattern. Trace 1-inch tall triangle with a 1/2-inch bottom base on card stock and cut out. This is the nose pattern.
-
Trace the head pattern three times on white felt using a marking pen. Cut out each circle just inside the marked line. This will eliminate ink lines showing on your finished ornament. Trace the nose on orange felt and cut out in the same way.
-
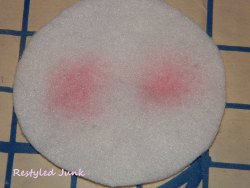
Apply two round cheeks to one circle using blush and a cotton ball.
-
Place the blushed circle on top of another circle with the cheeks facing up. Pin the two circles together. Note: The circle on the back will be inside the finished ornament. Its purpose is to hide the shadow of the stitches caused by the facial features.
-
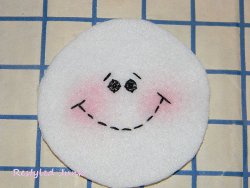
Using a marking pen, place a dot in the center of the face. This will mark the placement of the nose. Using three strands of embroidery floss, stitch two black snaps above the nose for the eyes. Sew a stitch over each eye for the eyebrows. Stitch the shape of a mouth using a running stitch. Knot the floss on the back and cut.
-
Pin the orange nose over the center mark on the face. Using three strands of orange floss, whip stitch around the nose. Knot the thread on the back and cut.
-
Place the remaining circle on the back of the face and pin. Your head will now have three layers. Using three strands of white embroidery floss, stitch a blanket stitch around the edge. When you have approximately 2 inches left, lightly fill the ornament with stuffing. Continue to blanket stitch the opening closed. Knot and cut the floss.
- Using white floss, attach a simple loop hanger to the top of the ornament.
Read NextInitial Homemade Ornaments
Your Recently Viewed Projects

Thanks for your comment. Don't forget to share!
SissieSass
May 17, 2017
What a sweet little craft to do with the kids. I can see making these for the children to give away to their parents and grandparents during the holidays because who does not love getting a cute little snowman that they can hang on their tree or from the rear view mirror.
Sue What
Dec 02, 2016
This looks like a great project that I could do with my older granchilren. It's cute, it would make a great present for them to give to their other grandmother and their mother. And-very important- it wouldn't be messy!
Report Inappropriate Comment
Are you sure you would like to report this comment? It will be flagged for our moderators to take action.
Thank you for taking the time to improve the content on our site.