New Year's Mini Album
Make a New Year's Mini Album from Spellbinders to celebrate a fantastic year. This paper craft idea is completely unique and very fun.
Materials:
- Grand Nestabilities
- LF-114 Grand Circles #6
- LF-124 Grand Scalloped Circles #4
- Tape
- Shaken not Stirred patterned paper by KaiserCraft
- Copic Marker
- S4-124 Classic Scalloped Circles Lg #6
- S4-124 Classic Scalloped Circles Lg #5
- S4-124 Classic Scalloped Circles Lg #3 and #1
- Season of Love-Tags stamps by Waltzingmouse
- S4-114 Standard Circles Lg #2
- S7-018 Big Scalloped Border Grand
- Black patterned paper
- S4-124 Classic Scalloped Circles #1
- S4-295 Lacey Squares #4 and #3
- S7-018 Big Scalloped Border Grand
- Black ribbon
- SCRAPBOOK ADHESIVES By 3L E-Z Runner
- Kaleidoscope Borders and Sentiments Round 2 3/8″ sentiment by JustRite Stampers
- S4-124 Classic Scalloped Circles Lg #3
- Black tulle
- Red velvet scalloped ribbon
- Hole punch
Instructions:
- Grand Nestabilities retail for $49.99, making each die template approximately $8.31 each. This is a great value compared to buying a pre-made mini album that you can only use once.
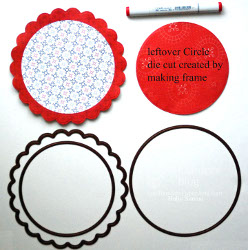
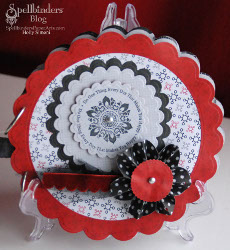
- I started the cover and pages by making a Circle Scallop frame die cut. To do this, nest LF-114 Grand Circles #6 (#1 being the smallest) inside the LF-124 Grand Scalloped Circles #4 and cut/emboss. I used a piece of tape to secure the die templates on the A-Base Plate. This assures a consistent width all the way around the frame.
- The leftover Circle die cut is a result of making the frame. I used those for pages as well. Shaken not Stirred patterned paper by KaiserCraft was used for the entire album.
- Cut/emboss LF-114 Grand Circles #6 out of white patterned paper. Adhere the white Circle die cut to the red Scalloped frame die cut.
- I photographed the die cuts next to a Copic Marker so you can get a feel for the “Grand” size of these fabulous Grand Nestabilities.
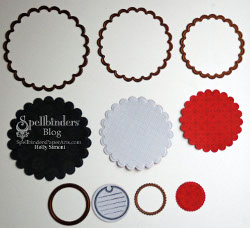
- Cut/emboss S4-124 Classic Scalloped Circles Lg #6 out of black patterned paper, S4-124 Classic Scalloped Circles Lg #5 out of grey patterned paper, and S4-124 Classic Scalloped Circles Lg #3 and #1 out of red patterned paper.
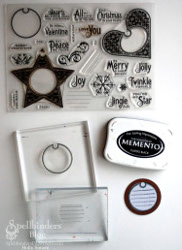
- I used Season of Love-Tags stamps by Waltzingmouse. I found that stamping the journaling lines first, then lining up the circle tag stamp works well. Next, line up S4-114 Standard Circles Lg #2 around the stamped image and cut/emboss.
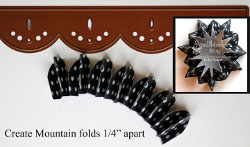
- Cut/emboss S7-018 Big Scalloped Border Grand out of black patterned paper. Create mountain folds every 1/4″. Adhere the ends of the Scalloped Border Grand die cut. This will create a wonderful accordian pleated embellishment.
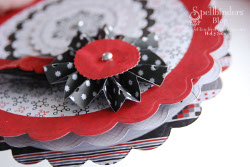
- I adhered the S4-124 Classic Scalloped Circles #1 into the center, along with a silver tear drop by The Robin’s Nest.
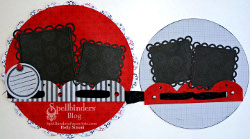
- Here are 2 finished pages I created quickly by cutting/embossing S4-295 Lacey Squares #4 and #3 out of black patterned paper. I also cut/embossed S7-018 Big Scalloped Border Grand out of grey striped and red patterned paper. I threaded black ribbon by Creative Impressions through the Scalloped Border Grand.
- A red sparkling brad by Creative Impressions secures the journaling tag. I adhered all elements in the album with SCRAPBOOK ADHESIVES By 3L E-Z Runner.
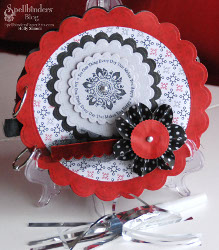
- Stamp Kaleidoscope Borders and Sentiments Round 2 3/8″ sentiment by JustRite Stampers onto grey S4-124 Classic Scalloped Circles Lg #3. Adhere silver tear drop to the center of the stamped image. Assemble the cover of the mini album as shown. I used a bit of black tulle and red velvet scalloped ribbon as well.
- I chose to punch two holes in the lefthand side of the album and use rings to bind it.