Hedgehog Cross Stitch Pattern Keychain
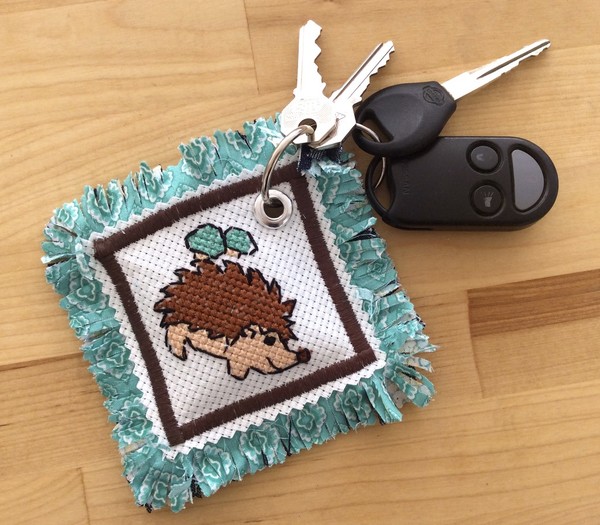
This Hedgehog Cross Stitch Pattern Keychain makes clever use of the Dimensions Learn-A-Craft Counter Cross Stitch Kit. Learn how to cross stitch and create this adorable project that you can carry with you wherever you go. Combine this cross stitch design with other materials to make an adorably functional keychain! This cute project will make you smile even when you're having a bad day. If you're new to the world of free cross stitch patterns, never fear. This project is super simple and easy to complete. Once you complete this project, you'll want to make more cute cross stitch crafts and share them with loved ones.
Project TypeLearn a Technique
Time to CompleteWeekend project
Sewn byBoth Hand and Machine

Materials:
- Dimensions Learn-A-Craft Counted Cross Stitch Kit – Hedgehog
- Coats Dual Duty XP Thread
- Fairfield World Poly-Pellets Weighted Stuffing Beads
- Denim
- Printed Cotton Fabric
- Grommet
- Metal Keyring
- Scissors
- Pinking Shears
- Simplicity EZ Quilting Mini Square
- Brother Sewing Machine
Instructions
-
Cross Stitch design as per the kits instructions, using the included hoop, needle and embroidery floss. Once completed, use the mini square to draw a line in percil around the cross-stitched design.
-
Layer the piece on top of 2 layers of printed cotton fabric, placing the denim layer last on the back. Pin the assembly in place. Stitch around the pencil line on 3 sides with a wide concentrated zig zag stitch, remembering to backstitch at the beginning and end.
-
Remove the piece from the machine and stuff the inside with the pellets to give the keychain a nice weighted feel. Pin the opening closed making sure to not let any of the pellets cross over into your stitching area.
-
Stitch the 4th side closed to secure the pellets inside the pouch, remembering again to backstitch. Trim the perimeter of the cross stitched layer around the stitch line with pinking shears. Then trim around the entire assembly with pinking shears.
-
Then you are ready to snip all along the edges to make a fringe effect. Work the fringe with your fingers to make it nice and fluffy. Apply the grommet as per the manufacturers instructions and run the key ring though the hole.
Read NextAngel Finger Puppets