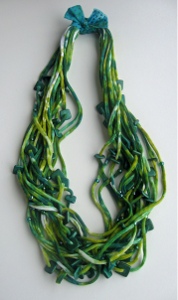
Tissue Knit Necklace
The Tissue Knit Necklace is a funky spin on the traditional T-shirt necklace, from Hilary Frye. Add a pretty color and some beads to your necklace to make it truly one of a kind with these beaded necklace patterns.
Materials:
- 1/4 yd. of 60” width tissue knit fabric in white (100% rayon, or 95% rayon/5% lycra)
- 1/4 yd. coordinating batik fabric
- Rotary cutter
- Rotary cutter mat
- Quilting ruler
- Thread
- Sewing machine
- Scissors
- Jacquard Dye-Na-Flow in 2-3 colors (light/medium/dark values of a coordinating color, they will blend to make Additional colors)
- Rubber bands
- 1” sponge brush
- Paint shirt
- Rubber gloves
- Hair dryer
- Plastic drop cloth
- 2/0 Czech glass seed beads
- Semi-large hole ceramic, polymer clay, or wood beads (approx. 2-3mm inner diameter hole)
Instructions:
- Using your rotary cutter, ruler, and mat; cut your 1/4 yd. of fabric into 18, 3/4” x 30” strips.
- Hold each strip lengthwise by the ends and give it a good full stretch. This will cause the long sides of the strip to curl and roll inwards.
- Put your paint shirt and rubber gloves on. Set-up a plastic drop cloth covered workstation.
- Randomly grab the entire set of 18 strips and scrunch them into a ball shape.
- Take 10 rubber bands and wrap each one around the ball in a random pattern, overlapping as needed to cover the entire ball somewhat evenly.
- Take your lightest color of Dye-Na-Flow and a 1” sponge brush and apply the liquid paint in a random, polka dot fashion over the entire scrunched ball. Remove the rubber bands when done.
- Redistribute the strands into a newly formed scrunched ball. Apply the 10 rubber bands in the same fashion. This time use your medium color of Dye-Na-Flow and the sponge brush to apply a second coat of randomly placed polka dots. (This time you will be covering some white spots and some light colored spots.) Remove the rubber bands when done.
- This step is optional. If you have a third, dark color of Dye-Na-Flow, you can repeat the process.
- Take the painted strands and hang them over the base of a wire hanger to dry. The Dye-Na-Flow should be thoroughly absorbed into the knit fabric. If you have paint dripping from the strands, you’ve used too much paint. Either way, for precaution, put the plastic drop cloth below the strands while they dry. You do not want a permanently stained floor or counter-top.
- The drying process can be done overnight if time allows. Otherwise, to speed-up the process, you can use a hair dryer on a medium heat and air flow setting to dry the strands hanging on the hanger. The strands must be thoroughly dry before you add any beads.
- Bead stringing is done in a random pattern. Using 5-8 beads per strand spaced out somewhat evenly is enough. Clip one end of each strand on a small, 1/2” diagonal to allow for threading the beads. Use a blunt tip needle or tool to poke the pointed end of the strand through the bead. Pull the bead down the length of the strand. Repeat for each bead and each strand until done. (The knit should hold the bead in place. Otherwise, add an overhand knot on each side of the bead to secure it in place.)
- Gather all the pointed ends of the strands together. On the other end gather all the blunt ends.
- Lay these ends flat and facing each other. Push one set of ends 1” in front of the other. (We want the sets overlapping side by side by 1” each side.)
- Using a straight or zig zag stitch, securely sew all the ends together in the center of this overlapping area. You can go over the area repeatedly for extra strength. (Make sure there are no beads in the way of the presser foot and needle before sewing.)
- After sewing, trim the edges clean a 1/4” away from the stitching on each side. Fold one set of ends on top of the set other to form two layers.
- Tear a strip of batik fabric approximately 3” x 12” to wrap over the stitching and bind and hide the edges. (This will become the back of your necklace.) The necklace will be slipped over the head when worn.
- Properly store the necklace by laying it flat in a drawer in acid free tissue paper. Do not wear it while swimming or in the shower. The Dye-Na-Flow should not run. To extend the life and beauty of the necklace, you must take good care of it, just like any of your handmade jewelry.
Read NextChic Bohemian DIY Necklace
Your Recently Viewed Projects

Thanks for your comment. Don't forget to share!
garvi97 3902942
Apr 24, 2012
What purpose does the 1/4 yd batik fabric have? Instructions refer to 1 pcs 3 x 12" to cover the seam. Why buy 1/4 yd? And is the batik fabric also supposed to be knit fabric?
Tackynut
Sep 02, 2011
I could not find the tissue knit fabric locally, but had a Tshirt that was well worn and soiled. I was planning on throwing it away, but instead, cut it into 1/2" strips, sprayed blues and purple fabric dyes on it and followed the instructions. I did have to use a little larger beads, but think it turned out great. I can't wait to show it off. Wish I could post a picture of it on here.
CRAFTDESIGNS
Sep 02, 2011
Wanted you to know I posted a link to this tutorial today. Nancy Ward PaperFriendly http://www.nancywardcrafts.com
Ravin Jewelry
Jul 01, 2011
Beautiful necklace, directions reminds me of tye-dye...i have never heard of jacquard dye-na-flow.
Report Inappropriate Comment
Are you sure you would like to report this comment? It will be flagged for our moderators to take action.
Thank you for taking the time to improve the content on our site.