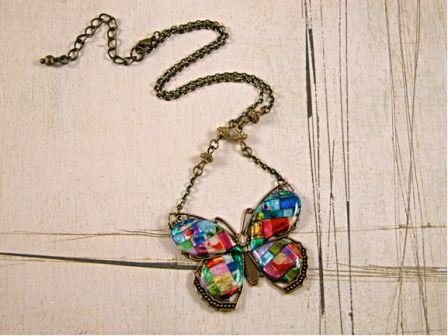
Colorful Butterfly Necklace
This colorful butterfly necklace from AMACO is a fantastic example of friendly plastic crafts. Follow the easy steps in this butterfly craft how-to for a lovely jewelry piece.
Materials:
- Teardrop shaped cutters: I changed the shape slightly to fit the shape of the filigree butterfly wings.
- Small dish of cold water with a few drops of olive oil
- Friendly Plastic 7” sticks: orange/black, red/red, fuchsia/black, light blue/black, swirl/blue, gold/black, avocado/black, turquoise/blue, royal blue/black
- Mat knife
- Acrylic ruler
- Cutting mat
- Craft knife
- Scissor
- Needle tool
- Griddle set at 200-300 degrees
- Non-stick baking sheet that fits flat on griddle surface
- Heat tool
- Sealer: I used Envirotex Lite, but any high gloss acrylic sealer will work.
- Disposable mixing container and stir stick
- Straw
- Non-stick cookie sheet
- Round nose and needle nose jewelry pliers
- Filigree Butterfly
- E6ooo glue
- Jewelry findings: brass beads, eye pins, chain, clasp, and jump rings
Directions:
- Fracture: Using a cutting mat, ruler and blade, cut the plastic sticks into random sized triangle shaped strips. Then cut the strips in half using a scissor.
- Fusion: Pre heat the griddle. Place the baking sheet onto the griddle. One at a time, in the color pattern shown, or one of your own. place the plastic strips onto the baking sheet. Make sure each strip is stuck in place before adding the next. Try to press each strip tightly against the one before, to prevent any gaps. Continue until all of the strips have been added. Allow the plastic to soften and seal together. If any gaps do appear, simply tap over them with your finger pressing the softened plastic together. When all the strips have softened and sealed together, remove the baking sheet from the griddle and allow the plastic to cool. Use the needle tool to press under the edges of the cooled plastic and remove it from the pan.
- Fracture: Place the cooled plastic back on the cutting mat and trim off the two uneven edges. Continue to cut the plastic into random widths, until the entire piece has been cut apart.
- Flip every other strip in reverse, revealing what the finished fractured pattern will look like. Play around with the different size strips until you have the desired pattern. The finished piece only needs to be larger enough to accommodate two large circles cut-outs and four small circles cut-outs.
- Fusion: Place the baking sheet back onto the griddle. One at a time, in the pattern you have arranged, place the plastic strips onto the baking sheet. Make sure each strip is stuck in place before adding the next strip. Try to press each strip tightly against the one before, to prevent any gaps. Continue until all of the strips have been added. Allow the plastic to soften and seal together. If any gaps do appear, remember to tap over them with your finger pressing the softened plastic together. When all the strips have softened and sealed together, remove the baking sheet from the griddle.
- While the plastic is still warm, cut 2 large teardrops (wings) and 2 small teardrops (wings) by pressing the cutter into the softened plastic. Dip the cutter back into the cold water after each cut. This will help keep it from sticking to the plastic. Allow the plastic to cool. You may place the pan under cold running water to speed the cooling process along. Use the needle tool to press under the edges of the cooled plastic and remove it from the pan. Pop out the teardrop (wings). If needed use the craft knife to cut around each one.
- Mix the Envirotex lite sealer following the manufactures instructions. Application: I like to place my pieces on a non stick cookie sheet. This way if there is any run off, it will be easy to remove later. Once I have the Envirotex mixed, I like to pour it into a small squeeze bottle. The application will be more precise and much easier. Once the resin has been applied, blow softly through a straw over each piece to pop any bubbles that remain. Allow the pieces to dry at least 12 hours. If there has been any run off. Remove the piece from the pan by pressing the needle tool under it and lifting. The resin is still soft enough that you can cut the excess off with a scissor. Envirotex cures completely in 24 hours.
- Position and glue the friendly plastic wings into place on the filigree butterfly. Allow the glue to dry.
- Assemble the necklace and attach to the butterfly wings using jump rings. Variation: Try using different color combinations to create your very own unique look.
More Friendly Plastic Crafts: