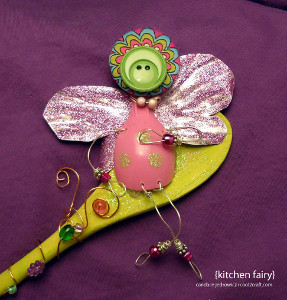
Odds and Ends Kitchen Fairy
Add a little magic to your kitchen by making this creative Odds and Ends Kitchen Fairy from Candace Jedrowicz. Recycled crafts like this fairy make good homemade gifts. Anyone who loves their kitchen could surely use a little extra help. This DIY home decor project will add some inspiration for the kitchen boss. You might want to add this to your list of homemade Mother's Day gifts or make it for yourself. Whether you have a big meal to make or a big mess to clean up, you’ll whistle while you work because the Odds and Ends Kitchen Fairy is on your side.

Materials:
- Aleene's Jewelry and Metal Glue
- 20 gauge wire
- Round nose pliers
- Chain nose pliers
- Wire cutters
- Soda can
- Scissors
- Plastic spoon
- Buttons - one large for the hair and one smaller 2 holed button for the face
- 1/16" hole punch
- Stylus or pencil
- Glitter
- Assorted beads
Instructions:
-
Cut fairy wings from the soda can. The wings can be any shape, so try several to see what you like.
-
Lay the wings on a soft surface with the printed side up. Draw lots of lines using a stylus or pencil to texture the wings. This will cause the metal to curve toward the printed side. Turn the wings over and draw a few more lines so that the wings are more or less flat.
-
Spread Aleene's Jewelry and Metal Glue onto the silver side of the wings with a finger. Sprinkle glitter on and set aside to dry.
-
Use wire cutters to cut the handle off the spoon and trim off the tip of the spoon's bowl.
-
Use the hole punch to make a hole in the trimmed neck of the spoon, as well as holes on the sides for arms and on the trimmed end of the spoon for legs.
-
Cut four 8" pieces of wire. Fold one in half leaving a small loop at the end. Slide a couple of beads over both wire ends. They should rest above the loop. Bend one wire end down and wrap around the other wire just above the beads. Wrap a small loop on the loose end and slide through an arm hole. Close the loop. Repeat for the 3 other limbs.
-
Punch a hole in the top center of the wings. Use a 6" wire to go through both holes on the large button, front to back. Bend the wire ends flat toward the bottom of the button. Feed the wire ends through the wings and the neck of the spoon, back to front. Spread the wire ends and wrap them around to the back side. Twist them together to secure.
-
Glue the face button on. At this point you can add details like beads around the neck and glittery polka dots on the body.
- You can string up the fairy as is, or mount it on something. For instance, you can decorate a wooden spoon with wire wrapping and beads and glue your fairy onto the bowl of the spoon and added a wire for hanging.
Read NextMother's Day Perler Bead Pattern