Mother's Day Tea Party Decorations
 Give mom a celebration she'll never forget with these Mother's Day Tea Party Decorations from Fiskars. Complete with ideas for favors, decorations, cards, and more, this easy decoration collection is one that any mom would love to see on her special day. These cute favors and decorations would also make an adorable theme for a bridal shower. Let your imagination run wild with this cute and festive tea party decoration theme.
Materials:
- Pretty Scallops Lever Punch XXXX-Large
- Kaleidoscope Border Punch
- Round ’n Round Squeeze Punch Extra-Large
- Round ’n Round Squeeze Punch Medium
- Ultra ShapeXpress Shape Cutter
- Razor-edge Softgrip Scissors 8
- Fingertip Detail Knife
- Premier No. 5 Micro-Tip Scissors
- Mix of tea cups and plates
- Tissue paper
- Stapler
- Book pages (for table runner)
- Adhesive
- Cardstock
- Fabric
- Glue Gun
- Bamboo skewers
- Candies to fill favors
Instructions:
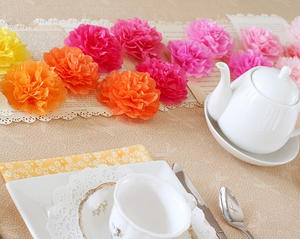
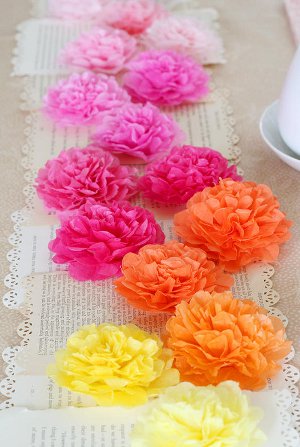
- You can find an eclectic mix of tea cups and plates inexpensively at thrift stores, the more mixed-and-matched the better. These set a beautiful table which take care of half of the decorating already. A dramatic table runner made from book pages and tissue paper flowers completes the whimsical look. This easy runner adds a big punch with little money or time.
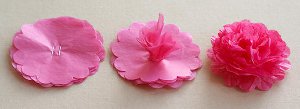
- The key to this runner is randomness. This is definitely a no-stress project. The XXXX-Large Pretty Scallops Lever Punch makes ridiculously easy flowers. I love its 3.5 inch size. I used around eight sheets of tissue paper for each flower and punched all eight layers at once. I have a really random collection of tissue paper I have collected from previously received gifts. If I came across particularly soft or thin tissue paper, I would punch only four layers at a time sandwiched with a sheet of printer paper. This gives the punch something to grab onto without ripping the delicate tissue.
- Staple together your stack of flowers. I have found that I lack the particular skill of centering staples! Whenever I stapled slightly off-center, I simply added another staple beside it to even it out. Scrunch up your first flower layer to the center. Repeat with each layer and then fluff back out to form flower. It’s really just that easy and takes seconds.
- Adhere the flowers to a base of book pages border punched down each side to add to the elegant feel. Be sure to adhere both the pages and flowers altogether, especially if your party will take place outside. Play around with different color combinations. I love the gradient look with flowers flowing from one color to the next.
- With the table easily knocked out, I needed to add something up higher for visual interest. A fabric banner immediately came to mind. When deciding between triangle or scalloped pennants, a vision of tea cups came to mind, but I had also intended to keep the banner after the party to hang in my daughter’s room. I came up with a plan to create a themed banner that could afterward transform generically. It’s wonderful to get extra mileage out of crafts we make!
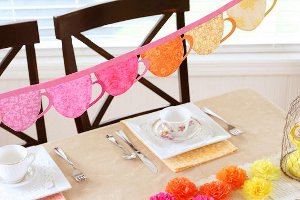
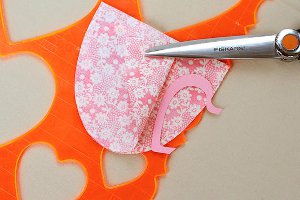
- To accomplish this, I created cardstock tea cup handles to insert between the pennant layers before sewing right sides together. After the party, I would simple snip the handles off with scissors leaving a regular scalloped banner! Two projects in one. Using the Ultra ShapeXpress on a craft mat, use the hearts template to cut out two nested hearts centered. Trim off a third of the heart as shown to leave a handle shape.
- After sewing right sides together leaving the tops open, turn the pennant right side out and press with an iron being very careful around the cardstock handles. Pin into bias tape centered and sew closed to secure.
- I love the little teacup rings I keep seeing and thought they would be a perfect little fun touch for a tea party. Since I didn’t have any miniature teacups just laying around, I decided to see if I could recreate this idea with cardstock. Making things with paper is just plain fun!
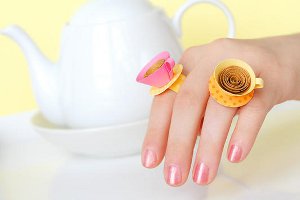
- Insert cardstock halfway into a medium circle squeeze punch. Repeat with an XL circle as shown to end up with half of a circle which can be rolled into your cup. I recommend using a low-temp hot glue gun for this project to adhere strongly and quickly. Then trim a thin strip for a handle and another medium circle punched for the saucer. To fill the cup with tea, punch an XL circle from brown cardstock. Spiral cut to the center being sure to keep the width of each pass narrower than the height of your cup. Before rolling into a spiral (beginning from outside and ultimately adhering to the center circle of spiral to secure), trim off any parts that are uneven to keep a smooth end product. Adhere the saucer to a strip of paper or ribbon to create a ring, or use a premade ring base.
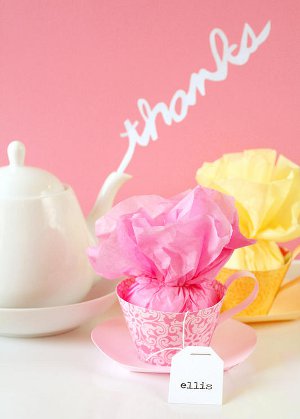
- Keeping with the paper teacup idea, send guests home with a little thank you favor presented in this fun way. I love favors that double as a decoration. For a creative presentation, display the cups alongside a tea pot (99 cent thrift store find) with a cardstock “steam” thank you. I lightly drew out a cursive “thanks” onto light gray textured cardstock and whimsically cut around it with micro-tip scissors and/or a craft knife leaving a beginning tail to adhere to a piece of bamboo skewer to insert into spout.
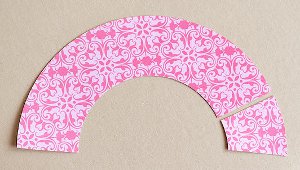
- These cups follow the same ideas as the rings. Using the Ultra ShapeXpress with Super-Sized Circle Template on a craft mat, cut the inside of the smallest circle and the outside of the largest circle template nested centered to create a ring. (Hold onto those inside circles as they are the perfect size for the saucer.) Cut the ring in half and trim off a little extra as shown. Roll and adhere and add a cardstock handle over seam. Glue to a cardstock circle saucer around bottom interior of cup and adhere a piece of tissue paper to bottom of cup to cover glue. Add goodies inside the tissue paper and tied closed. You can give the saucer some dimension by cutting a few small slits evenly around plate and overlapping slightly at cuts with your glue gun.
- Keep tea parties in mind for your next celebration or gathering with friends. This versatile theme is not only beautiful, it’s fun for DIY crafting!
Read Next"Prayers of a Righteous Mother" Art