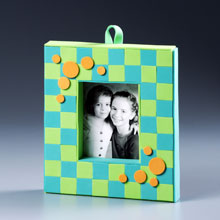
Mosaic Mod Frame
This is a great picture frame project for kids. They will have a great time making new, funky frame to display in their bedroom or give to friends as a gift. Make your own cool picture frame in just a few simple steps with a foam base and self-stick craft foam shapes!
Materials:
- STYROFOAM™Brand Foam:
- Block, 12" x 6" x 1"
- Self-stick craft foam shapes: 5/8" squares, 26 each of two different colors; assorted small circles in contrasting color, 11
- Craft foam sheets, one each of two different colors to match craft foam squares
- Serrated knife
- Paraffin or candle stub
- Fine-line black permanent marker
- Pencil
- Ruler
- Scissors
- Optional: straight pins
- White, thick craft glue
Steps:
(NOTE: Adults only should handle knives, and this project requires adult supervision.)
- Wax serrated knife with candle stub or paraffin. Measure and cut a 5" x 5 5/8" piece from foam block. Measure and cut a 2 1/2" x 3 1/8" piece from exact center of larger piece; discard or save for future project. Note: Resulting frame should be 1 1/4" wide all around.
- Stick one row of foam squares to front of frame around opening, alternating colors. Stick second row of squares to frame outside first row, alternating colors once again. Refer to photo to stick craft foam circles to two opposite corners of frame.
- Cut two 1" x 5" strips from first craft foam sheet. Cut two 1" x 5 5/8" strips from second craft foam sheet. Glue strips to corresponding outside frame edges.
- Cut two 1" x 2 7/16" strips from first craft foam sheet. Cut two 1" x 3 1/16" strips from second craft foam sheet. Glue strips to corresponding inside frame edges, butting ends together as shown.
- Cut a 3/8" x 3" strip from one craft foam sheet. Bend strip into loop and glue ends to top center back of frame for hanger. Pin hanger in place until glue dries; remove pins.
- If desired, glue photograph directly to back of frame. To allow changing of photo, cut 4 1/2" x 5" piece from craft foam and glue to center back of frame over opening; apply glue only along three edges of craft foam and let dry. Slide photo into unglued edge of craft foam.
®™ Trademark of The Dow Chemical Company ("Dow") or an affiliated company of Dow.
For more project ideas, please see styrofoamstyle.com.
Read NextMason Jar Lid Jewelry Dish
Your Recently Viewed Projects

Thanks for your comment. Don't forget to share!
Zoe Silverman
Mar 19, 2014
What a fun Mother's Day gift idea! I know from my experience working with children at a homeless shelter that foam shapes are always an exciting and user friendly material to work with. I may even suggest this idea to my colleagues at the Homeless Children's Playtime Project in Washington, DC. I would add, though, that you can even buy discount frames and use that instead of Styrofoam, which would save a step. Overall, this sounds very easy. And Mom can be involved without too much work. Thanks for the tip!
Report Inappropriate Comment
Are you sure you would like to report this comment? It will be flagged for our moderators to take action.
Thank you for taking the time to improve the content on our site.