This project was submitted by one of our readers, just like you.
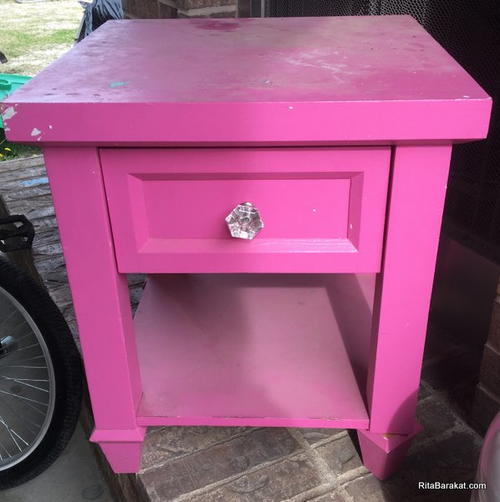
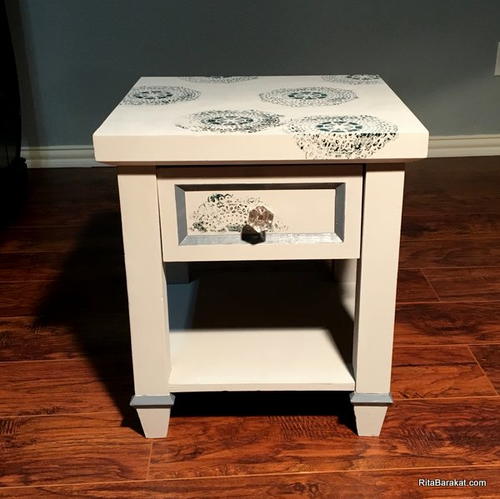
Brilliant Nightstand Makeover
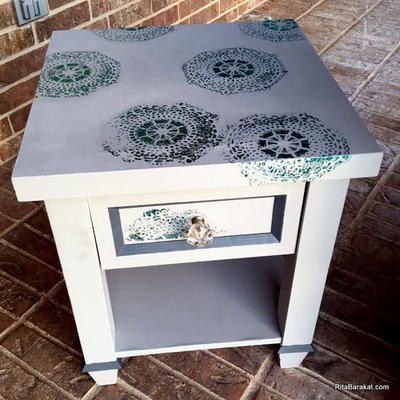
Grab an outdated nightstand and use your favorite crafting materials to learn how to upcycle furniture.

Brilliant Nightstand Makeover
In the Designer's Words: "DIY projects are fun and don't have to be complicated and you don't have to prime anymore! This project takes an old beat up nightstand from drab to fab in 6 easy steps!"
Just because a piece of furniture no longer matches your home décor or chic, trendy aesthetic does not mean you have to toss it or donate it. Crafters have the choice to make all things new again with just a few coats of paint. This Brilliant Nightstand Makeover is no different. Using beautiful paint colors and Deco Foil to add shining accents, this piece of DIY home décor is a lovely way to add brand new furniture to your home without having to step into a furniture store.
Estimated Cost$21-$30
Time to CompleteIn an evening
Primary TechniquePainting

Project TypeMake a Project
Materials List
- Nightstand or other wood piece to make over
- Plaid chalk paint
- Therm O Web Deco Foil
- Repositionable Adhesive
- Testors Enamel paint
- DCWV Stencil
- Painters Tape
- Paint brush
- Sandpaper
- Wood filler
Instructions
-
Remove any hardware, fill any cracks or holes with wood filler, allow to dry and sand down
-
Sand entire piece, wipe off dust
-
Paint entire surface with Chalk paint, no need to prime! This paint covers!Allow to dry completely before the next step.
-
Tape off small areas and paint accents with enamel paint, remove tape.
-
Use a paint brush, stencil and repositionable glue to add the design on your piece
-
When to glue is dry add Deco foil and replce the hardware

Read NextRags-to-Rugs Craft
Your Recently Viewed Projects
Thanks for your comment. Don't forget to share!
flowergirl
Jul 06, 2018
This is the cutest nightstand makeover I've come across. It's super easy and doesn't require many materials to create. Chalky paint makes it easier to work with so you don't need any primer. I love the colours used in this project, it makes the teal stencil pop.
princess6860504
Mar 29, 2018
Wow, what a beautiful looking refurbished/upcycled nightstand. That teal colored foil design against the white paint makes it look so chic! You know, you really help our environment and help keep junk out of the landfills when you decided to do a little bit of work yourself. This chalk paint must be something fairly new. I am seeing it everywhere. I have two dining room chairs that I need to refurbish for my mom! I'll use that paint!
Report Inappropriate Comment
Are you sure you would like to report this comment? It will be flagged for our moderators to take action.
Thank you for taking the time to improve the content on our site.