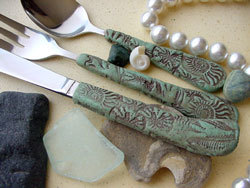
Remake Old Silverware
Do you have some silverware that is looking a little boring, banged up or you just need a facelift in your kitchen? Recycling and reusing is oh so vogue right now and the Cernit nature colors make this a fun project with little cost, and you are using the old stuff again instead of buying more silverware. This is a very easy project from Jacquard Products with dramatic results and you probably have some stamps already. We are using the stamps mostly for texture anyway, not really for the image, but some do show up.

Materials:
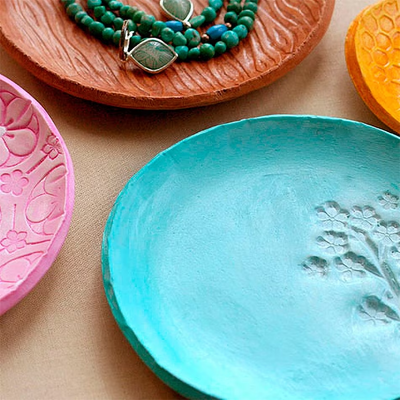
- Cernit Clay: granite, basalt, or sienna (nice thing about the granite color is that it can be tinted with the regular colors of Cernit for a colored granite. Shown here is 1 part of granite mixed with 1/4 part of color.
- Clay Blade
- Silverware: old and use or metal handled dollar store stuff is best
- Neopaque acrylic paint: black or in the color of your choice, or you could even use the Lumiere colors for a metallic effect
- Rubber Stamps: shells or any other shape you prefer
- Pasta machine or a rolling pin or brayer
- 3/4" stencil brush
- Old piece of towel or toweling
Steps:
- Condition and roll out the Granite on the 3rd thickest setting, this will be less than 1/8" thick. Trim off one end of the sheet of clay for the straight edge. Place the handle of the silver ware on the sheet of clay and trim around the one side of the handle.
- Fold the rest of the sheet of clay over the handle and press the edges together, make sure the sheet is tight on the handle with as few of air bubbles as possible.
- Press the sheet down to the trimmed edge and cut off the excess and smooth the seam.
- Now take your stamps and impress into the clay on the handle. Hold the utensil by the working end, not the handle to press the stamps on it. Continue to impress different stamps in to the clay. I usually work on the back of the handle and then go to the front of the handle. If you don't press it in far enough, it is ok. You go back and press another stamp over that until it is all covered. Don't forget the sides of the handle also.
- Bake in a preheated 275 degree oven for 30 minutes, shut off oven and let cool in the oven.
- When the silverware is cool, load up the stencil brush with the black paint and "punch" in the paint on the handle to make sure you get paint in the indents. Dampen the towel with a little water and wipe of the excess paint. If you take too much off, place paint on the handle again and then wipe away excess. I do all the handles by antiquing them with the black paint one at a time.
Read Next41 Clay Crafts for Adults


Thanks for your comment. Don't forget to share!
mychellem
Mar 12, 2016
We've got fairly run-of-the-mill flatware in our kitchen. These pieces look gorgeous. Are they durable enough for daily use, or better saved for special occasions?
barbaragies 717570 2
Jan 08, 2011
I am intrigued and think this is great but I too wonder and question the following issues. 1. Is this dishwasher safe? 2. What prevents the water from getting between the clay and handle then molding? 3. Is the clay safe around food? I notice there are no answers for the other 2 comments
cyn
Apr 24, 2010
First of all I think this idea is beautiful. I have some flatware with porcelain handles, which I've really enjoyed but the color no longer matches my other dinnerware. However I am wondering about not only washing but using this type of clay on an item with food. Any help is appreciated!
Report Inappropriate Comment
Are you sure you would like to report this comment? It will be flagged for our moderators to take action.
Thank you for taking the time to improve the content on our site.