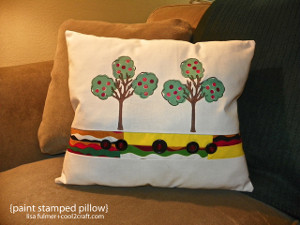
Stamp Your Style Pillow
For both easy pillow instructions and a diverting craft, check out this Stamp Your Style Pillow tutorial from Lisa Fulmer. Don't confine your home decor to whatever is in stores. Instead, make a pillow that reflects your style. If you're a fan of stamping, you'll love making this craft almost as much as you love the finished product. While you're making one for yourself, have the goodness to make one of these tasteful throw pillows for a friend as well. They're too fun to make not to share.

Materials:
- Claudine Hellmuth Studio acrylic paints
- Claudine Hellmuth Studio foam/acrylic stamp set (includes a tree)
- Ranger Inkssentials Non-Stick Craft Sheet
- Large pieces of muslin or other neutral cotton fabric
- Scraps of printed fabrics
- 12" x 16" pillow form
- Paint brush and cosmetic sponge
- Pencil with eraser tip
- Paint palette tray
- Stamp ink pad (dark color)
- Iron
- Parchment paper
- Rotary cutter, large ruler and cutting mat
- Sewing machine
- Buttons
- Regular needle and thread
Instructions:
-
Measure and cut four pieces of muslin to match the size of the pillow form with 1/4" seam allowances: 7.5" x 16.5" and 3.5" x 16.5" for the front; 8.5" x 16.5" and 6.5" x 16.5" for the back.
-
To create a 2.5" x 16.5" patchwork strip, sew 3-4 rectangles (3"x5") of printed fabrics together end-to-end. Slice this long strip in half vertically, then flip one strip head to foot, and sew the two strips back together. Trim the length of the resulting patchwork strip to 16.5" and sew it in between the two front panels and press (place right sides of the fabrics together with each step).
-
Test stamp your desired tree design on paper first, then decide where to position your two trees above the strip.
-
Choose and/or blend your paint color (click here for a blending chart) for the tree leaves. Dab a little paint on the foam stamp with a cosmetic sponge and stamp each cluster of leaves in position on the muslin. Fill in extra color with a brush as needed; allow to dry.
-
Use the matching acrylic stamp and a dark ink pad to add an outline to each cluster of leaves; allow to dry.
-
Stamp the tree trunks in position the same way; allow the paint from the foam stamp to dry before stamping the inked outline.
-
Use the tip of a pencil eraser to paint-stamp little polka dots in the trees (like cherries or apples); allow to dry.
-
Heat-set the paint-stamped image with a medium hot iron over a sheet of parchment paper.
-
Hand-stitch buttons in matching colors along the patchwork strip for a finishing touch to the front of the pillow.
- Fold over and stitch a nice 1/4" edge on one side of each of the back panels of muslin, then sew each of the back panels to the front panel (right sides together), flip the pillow cover right side out, and insert the pillow form through the overlapping opening in the back.
Read NextBeautiful Flea Market Coffee Table