Pink Ribbed Knit Vest
This warm and practical vest from Authentic Knitting Board is knit in 2 pieces with a shaped neckline. Mohair blend yarn adds warmth and softness.
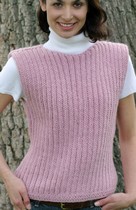
Stitches: Rib and Zigzag for hemline
Materials:
- Yarn: Lion Brand mohair and wool blend worsted weight.
- 28” knitting board
- Knit hook
- Crochet hook for edges
- Large sewing needle
SIZE LENGTH CHEST SKEINS
Small 20” 32” 4
Medium 20” 36” 5
Large 22” 38” 6
X-Lge 22” 45” 7
Gauge is 3.2 sts=1” 4 rows=1”
Knit (2) pieces, front of sweater and back of sweater are the same.
Stitches:
Zig-Zag Stitch
Instructions:
- Cast On (52), (56), (62), (72) Stitches. Lay anchor yarn.
- Knit in ZigZag Stitch for (6) rows.
- Change to Rib Stitch.
- Knit in Rib stitch for (48), (48), (52), (52) rows.
ARM SHAPING:
- Decrease (1) stitch each end. Knit row in Rib starting with needles #2 and #4 to maintain rib pattern.
- Decrease (1) stitch each end. Knit row in Rib st starting with needles #1 and #3 to maintain rib pattern.
- Decrease (1) stitch each end. Knit row in Rib st starting with needles #2 and #4 to maintain rib pattern.
- Decrease (1) stitch each end, Knit row in Rib st starting with needles #1 and #3 to maintain rib pattern.
VEST CONTINUE:
- Knit in Rib pattern for another (22), (22), (25), (25) rows.
NECKLINE AND SHOULDERS:
- Starting at back end, bind off center (12) stitches with crochet hook:
- Pick up two loops of first center stitch and one loop of next stitch. Pull two loops thru one loop on crochet hook. This leaves one loop on crochet hook. Now, pick up one loop and pull one thru one. Continue this process of picking up one loop until you have closed off the (12) center stitches of the neckline. Place remaining loop on hook on next needle on board at left side of knitting.
- Knit in rib stitch starting with needles #1 and #3 up to bound off stitches. Return for complete circular.
- Tie in another ball or skein of yarn to opposite shoulder at bound off stitches at neckline.
- Knit this side of shoulder as separate piece starting with needles #1 and #3. Hook over all stitches on both sides, and when you come to the needle with (3) loops, lift (2) over (1). This should bring you to (1) loop on each needle on both shoulders.
- Next Row-Decrease (1) stitch at each side of neckline. Knit each section in Rib. Start first shoulder in rib starting with needles #1 and #3. On other shoulder (right side) start on needles #2 and #4 to maintain the rib pattern. When you hook the stitches next to neckline, be sure to lift (2) over (1). Hook both sides.
- Repeat this decrease on both sides of neckline. Weave both sides starting with needles #1 and #3.
- Each row that you decrease for neckline, start out with needles #1 and #3 for the first section. The other side which starts with decrease stitch will always need to alternate with starting needles #1 and #3 or needles #2 and #4.
- Continue the decrease neckline row and shoulder shaping until you have (20), (20), (24), (24) open in center of piece. This will be your neck opening.
- Next row will be to shape the outer shoulders.
- Decrease (1) stitch each end of board.
- Knit in Rib. Adjust first section to start at needle #2 and #4 and second section to begin with needles same start as last row. (#1 and #3)
- Repeat this decrease row starting first section with needles #1 and #3. Start the second section with same needles as used with the last two rows. (#1 and #3)
- Next row-bind off both shoulders. Bind off loosely at anchor yarn.
- Knit second piece same as first for back of vest.
SEWING IT ALL TOGETHER:
- Lay both pieces together. Using invisible stitch, sew side seams from hemline to under arm. Be sure to make knots about 1” from edges. Tuck in tails of yarn.
- Sew shoulder seams to neckline with invisible stitch.
- Tuck in all tails of yarn for a finished vest, ready to wear.
Your Recently Viewed Projects

Thanks for your comment. Don't forget to share!
Member 14523
Jun 05, 2010
Authentic Knitting Board provides photo tutorials for how to do these stitches on the knitting board. You will see links above to open pdfs.
Member 18605
Mar 02, 2010
ummm helloo?? I was wondering if anyone can tell me what the "zig zag" stitch is...thank you so much June
Report Inappropriate Comment
Are you sure you would like to report this comment? It will be flagged for our moderators to take action.
Thank you for taking the time to improve the content on our site.