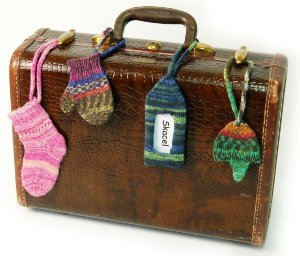
Knitted Luggage Tags
Make and personalize your own luggage tag with this tutorial for adorable Knitted Luggage Tags. Free cute knitting patterns like this will ensure that you never lose your luggage again!

Materials:
- Sock Yarn -- Suggested Yarns: Trekking XXL, etc.
- 6” addi Natura© double pointed needles in size 2.5 mm (approx US 1) or size needed to obtain gauge; tapestry needle.
- One 2" business / ID card (for Name Tag)
- One plastic page protector cut to dimensions of ID card. (for Name Tag)
Skill Level: Intermediate
Yarn Weight: Sock (1)
Gauges for All Tags:
36 sts and 40 rows = 4” (10 cm) in St st in the round after blocking.
Sizes for Each Tag:
Name Tag: 2 1/2” x 5 1/4”
Hat: 3 1/2” x 2 1/2”
Mitten: 3 7/8” x 2 1/8”
Sock: 2 1/4” X 5 1/4”
NAME TAG
Instructions:
Place long edge of business card along RS of page protector (folded edge) and cut to same measurements as business card.
Cast on 40 sts onto 3 needles as follows: 10 sts on needle #1; 20 sts on needle #2 and 10 sts on needle #3. Join, being careful not to twist work. Knit 10 rnds.
Front Opening:
Rnd 11: Knit across needle #1, knit first 6 sts on needle #2, then tightly bind off center 8 sts and knit to end of needle; knit across needle #3 = 32 sts.
Switch to Rows
Row 1 (RS): Knit across needle #1 and the first 6 sts on needle #2, placing all 16 sts onto needle #1.
Row 2: Purl the 16 sts on needle #1; then purl across 10 sts on needle #3 and the 6 sts from needle #2 onto needle 3.
Row 3: Knit across both needles (16 sts on each).
Row 4: Purl.
Repeat last 2 rows 10 more times.
Switch to Rounds
Rnd 1: Knit across first 6 sts (needle #1); then knit next 20 sts for needle #2; knit next 6 sts for needle #3, then cast on 8 sts onto same needle = 40 sts.
Rnd 2 (Joining rnd): Knit 6 sts on needle #1; then slip last 4 cast on sts from needle #3 onto beginning of needle #1; knit across needles #2 and #3 (beginning and end of rnd is between needles #1 and #3).
Knit 10 rnds.
Rnd 13: Knit to last 3 sts on needle #1, k2tog, k1; on needle #2, k1, SSK, knit to last 3 sts, k2tog, k1; on needle #3, k1, SSK, knit to end of needle = 36 sts.
Rnd 14: Knit.
Rep last 2 rnds until 8 sts remain.
With needle #3, knit across needle #1 = 4 sts each remaining 2 needles.
Using 4 sts on needle #3 only, knit 6” I-Cord.
Bind off; cut yarn, and weave in tail. With RS facing, attach yarn to remaining 4 sts and repeat as for first I-Cord.
Finishing:
Block piece, making sure front opening edges lie flat. Once dry, insert I.D. card and sew cast on edges together. Weave in all yarn tails. Secure well with several knots to luggage.
HAT
Instructions:
Ear Flaps (make two): Cast on 5 sts.
Row 1: Purl.
Row 2: Knit
Row 3: P1, M1, p3, M1, p1.= 7 sts.
Row 4: Knit.
Row 5: Purl.
Repeat rows 4 and 5.
Row 8: K1, M1, k5, M1, k1 = 9 sts.
Rows 9 & 11: Purl
Row 10: Knit.
Cut yarn, leaving 5” tail and set aside (leave on needle). Repeat for second earflap.
Hat Body:
On needle #1, cast on 18 sts; with needle #2, knit across 9 sts of earflap, then cast on 10 sts; with needle #3, knit across 9 sts of remaining earflap; join, being careful not to twist work = 46 sts.
Rnds 1 - 6: *K1, p1; repeat from * around.
Rnds 7 -13: Knit.
Rnd 14: K2, *k2tog, k3; repeat from * to last 4 sts, k2tog, k2 =37 sts.
Rnds 15 - 18: Knit.
Rnd 19: *K1, k2tog; rep from * to last st, k1 = 25 sts.
Rnds 20 - 23: Knit.
Rnd 24: *K1, k2tog; repeat from * to last st, k1 = 17 sts.
Rnds 25 & 26: Knit.
Rnd 27: *K2tog; repeat from * to last st, k1 = 9 sts.
Rnd 28: Knit around, decreasing 1 st. = 8 sts.
Place last 4 sts on to one needle and the remaining 4 sts on to another needle. With first 4 sts and using third needle, knit a 5” I-Cord. Bind off and cut yarn. With second 4 sts and using a third needle repeat as for first I-Cord.
Finishing:
Weave in all yarn tails and block. Secure with
several knots to suitcase.
MITTEN
Instructions:
Cast on 36 sts on to 3 needles; PM and join, being careful not to twist work.
Rnds 1 & 2: *K1, p1; repeat from * around.
Next rnd: YO, p2tog; *k1, p1; repeat from * to end of rnd.
Continue in established rib pattern for 10 more rnds.
Next rnd: Change to St st and increase 6 sts evenly around = 42 sts.
Knit 1 rnd.
Thumb Gusset:
Next rnd: Knit 20 sts, PM, M1, k2, M1, PM, k 20 sts = 44 sts.
Next rnd: Knit even.
Repeat last 2 rnds 4 more times, until there are 12 gusset sts between stitch markers = 52 sts.
Next rnd: Knit 20 sts; place 12 gusset sts on to spare needle or waste yarn and do not work; cast on 2 sts; knit remaining 20 sts = 42 sts.
Work even for 8 more rnds.
Next rnd: *K2, k2tog; repeat from * to last 2 sts, k2 = 32 sts.
Work even for 3 rnds.
Next rnd: *K2, k2tog; repeat from * around = 24 sts.
Work even for 3 rnds.
Next rnd: *K2tog; repeat from * around = 12 sts.
Next rnd: Repeat last rnd = 6 sts.
**Cut yarn, leaving a tail. Using a tapestry needle; run tail through 6 sts and pull tightly to close.**
Thumb:
Attach yarn and knit 12 thumb sts onto 2 needles; with a third needle pick up 4 sts along side of mitten; PM and join = 16 sts.
Work even for 7 rnds.
Next rnd: *K2tog; repeat from * around = 8 sts.
Next rnd: Repeat last rnd = 4 sts.
Close thumb as for top of mitten from **-**.
Cast on 4 sts and knit 10” I-Cord. Bind off and cut yarn.
Finishing:
Weave in all loose yarn tails and block. Once dry, insert I-Cord into YO (eyelet) near top of cuff and along side edge. Secure with several knots to luggage.
SOCK
Instructions:
Cast on 40 sts onto 3 needles; PM and join, being careful not to twist.
Rnds 1-3: *K2, p1, k1, p1; rep from * around.
Next rnd: YO, k2tog, p1, k1, p1; *k2, p1, k1, p1; rep from * to end of rnd.
Rnds 5-7: Repeat Rnds 1-3.
Knit 4 rnds.
Purl 2 rnds.
Knit 4 rnds.
Next rnd: *YO, k2tog; rep from * around.
Knit 4 rnds.
Purl 2 rnds.
Knit 2 rnds.
Heel:
Knit 10 sts; turn and purl 20 sts. Place remaining unworked 20 sts on to 2 needles for instep to be worked later.
Working on first 20 sts only, work back and forth in St st for 6 rows.
Turning Heel:
Row 1: K12 sts, SSK, k1, turn work.
Row 2: Sl1, p5, p2tog, p1, turn.
Row 3: Sl1, k6, SSK, k1, turn.
Row 4: Sl1, P7, p2tog, p1, turn.
Row 5: Sl1, k8, SSK, k1, turn.
Row 6: Sl1, p9, p2tog, p1, turn.
Row 7: Sl1, k10, SSK, turn.
Row 8: Sl1, p10, p2tog, turn. (12 sts)
Gussets:
Set Up Rnd: K12; with same needle pick up 8 sts along right side of heel; knit next 20 instep sts on to needle #2; with a spare needle, pick up 8 sts along left side of heel, then knit 6 sts from first needle.
There are now 14 sts on needles #1 and #3 and 20 sts on needle #2 = 48 sts.
Rnd 1: Knit to last 3 sts on needle #1, k2tog, k1; knit across needle #2; k1, SSK then knit to end on needle #3.
Rnd 2: Knit.
Repeat these 2 rnds until 40 sts remain = 10 sts on needles #1 and #3 and 20 sts on needle #2.
Knit even for 20 rnds.
Toe Shaping:
Rnd 1: Knit to last 3 sts on needle #1, k2tog, k1; k1, SSK, knit to last 3 sts , k2tog, k1 on needle
#2; k1, SSK, knit to end on needle #3 = 36 sts.
Rnd 2: Knit even.
Repeat last 2 rnds until of 16 sts remain.
With needle #3, knit across 4 sts on needle #1 = 8 sts on each needle.
Close toe using Kitchener Stitch. Weave in all yarn tails.
Knit 10” long I-Cord.
Finishing:
Block sock. Insert I-cord into YO near top of cuff along center back seam to form the tie. Secure to your suitcase using several knots.
Read NextSoft Breeze Shawl
Your Recently Viewed Projects
Thanks for your comment. Don't forget to share!
lcarr
Dec 31, 2016
Oh how adorable! I remember making little native beaded mitts and moccasins out of leather to hang on our coats as children. My hands dont work as well as they used to and I missed that. These I can do, and I am looking forward to making many. These can be used on so many things decorations, gift tags, luggage tags, etc. Thank you for including so many different patterns.
ronmetevier 951120 7
Mar 21, 2014
What do you mean by l-cord??? Is that just knitting a to a certain length or is it something special?? I want to make some of these soon & need an answer! Anne
BHerb
Mar 21, 2014
Hi Ronmetevier, For this project, the i-cord is the cord which the tags hang from. There's a helpful tutorial on AllFreeKnitting.com for i-cords How to Make Hair Ties with i-cords. Happy knitting!
m10j30t 0140211
Dec 12, 2011
I think these are positively charming. I'll try some after Christmas--they'll be easy to store for next year's gifts!!
Report Inappropriate Comment
Are you sure you would like to report this comment? It will be flagged for our moderators to take action.
Thank you for taking the time to improve the content on our site.