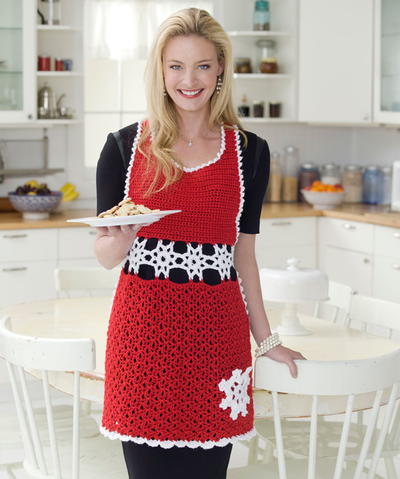
Snowflake Hostess Apron

Bring the Christmas spirit to the kitchen with a Snowflake Hostess Apron. Whether you're the cook in the house, or you'd like to make this Christmas crochet pattern from Red Heart Yarn for someone you love, it'll be perfect. Instead of buying a generic looking apron, you can finally learn how to make an apron using your crafting, and this apron pattern is high quality. No matter who receives this crochet apron for Christmas, they'll be touched that they received something so professional-looking from a special friend.
Adding a touch of Christmas crochet patterns to your holiday wardrobe really helps you spread cheer wherever you go. Even if your first batch of snickerdoodles doesn’t turn out to be doodly enough, wearing this crochet apron pattern will remind you of the true Christmas spirit. This crochet pattern looks stunning in red, but you could easily tone it down with a light grey colored yard, as well.
Check out our full collection of festives crochet patterns for Christmas!
Materials:
- RED HEART® Shimmer®: 2 (2, 3, 3, 4, 4) balls 1929 Red A; and 1 (1, 2, 2, 3, 3) balls 1010 Snow B.
- Susan Bate® Crochet Hooks: 5mm [US H-8] and 6mm [US J-10].
- Yarn needle.
- (4 Medium) RED HEART® Shimmer®, Art. E763 available in 3.5 oz (100 g), 28 yd (256 m) balls.
GAUGES: 3 V-sts and 2 sc = 4" (10 cm); 7 rows = 4" (10 cm) in skirt pattern; 13 sts = 4" (10 cm); 15 rows = 4" (10 cm) in sc; snowflake = 3¼" (8 cm) across. CHECK YOUR GAUGE. Use any size hooks to obtain the gauges.
Special Abbreviations
V-st = (dc, ch 2, dc) in same space or st.
sc2tog = [draw up a loop in next st] twice, yo and draw through all 3 loops on hook.
Picot = ch 3, slip st in 3rd ch from hook.
J3 (join ch-3 spaces) = ch 1, remove hook from loop, insert hook from the right side into corresponding ch-3 space and into loop, drawing loop through, ch 1.
Directions are for size Small; changes for sizes Medium, Large, X-Large, XX-Large and XXX-Large are in parentheses.
To Fit Bust: 32-34 (36-38, 40-42, 44-46, 48-50, 52-54)", [81-86 (91-97, 102-107, 111-117, 122-127, 132-137) cm].
Bodice Width: 13¼ (15¾, 18¼, 20¾, 23, 25½)", [34 (40, 4653, 58, 65) cm].
APRON
Waistband
Snowflake [Make 6 (7, 8, 9, 10, 11)]
NOTE: After the first snowflake, all others are joined while working Round 3.
With B and smaller hook, ch 8; join with a slip st to form a ring.
Round 1: Ch 1, 2 sc in each ch around; join with a slip st in first sc – 16 sc.
Round 2: Ch 1, sc in first sc, ch 5, skip next sc, [sc in next sc, ch 5, skip next sc] 7 times; join in first sc – 8 ch-5 spaces.
First Snowflake ONLY
Round 3: * Slip st in next 2 ch, (slip st, ch 3, slip st) in next ch, slip st in next 2 ch **, slip st in next sc; repeat from * around, end at **. Fasten off.
Remaining Snowflakes
Joining Round 3: [Slip st in next 2 ch, joining to previous snowflake, (slip st, J3, slip st) in next ch, slip st in next 2 ch, slip st in next sc] twice, * slip st in next 2 ch, (slip st, ch 3, slip st) in next ch, slip st in next 2 ch **, slip st in next sc; repeat from * around, end at **. Fasten off.
Tie
Row 1: With right side facing and smaller hook, join B in right-hand ch-3 space of short end of snowflake strip; ch 6 (counts as dc, ch 3), dc in same space, (dc, ch 3, dc) in next ch-3 space; turn.
Rows 2-25 (2-26, 2-27, 2-28, 2-29, 2-30): Ch 1, (slip st, ch 6, dc) in first ch-3 space, (dc, ch 3, dc) in next ch-3 space; turn. Fasten off after last row.
Skirt
Foundation Row: With right side facing and larger hook, join A with sc in ch-3 space on first snowflake; ch 3, sc in next ch-3 space, * ch 7, sc in ch-3 space on next snowflake, ch 3, sc in next ch-3 space; repeat from * across; turn – 12 (14, 16, 18, 20, 22) sc and 6 (7, 8, 9, 10, 11) ch-3 spaces and 5 (6, 7, 8, 9, 10) ch-7 spaces.
Row 1: Ch 1, sc in each sc and ch across; turn – 65 (77, 89, 101, 113, 125) sc.
Row 2 (Right Side): Ch 1, sc in first sc, * skip next sc, V-st in next sc, skip next sc, sc in next sc; repeat from * across; turn – 17 (20, 23, 26, 29, 32) sc and 16 (19, 22, 25, 28, 31) V-sts.
Row 3: Ch 5, dc in first sc (ch-5 and dc counts as V-st), * sc in next ch-2 space, V-st in next sc; repeat from * across; turn – 17 (20, 23, 26, 29, 32) V-sts.
Row 4: (Slip st, ch 1, sc) in first ch-2 space, * V-st in next sc, sc in next ch-2 space; repeat from * across; turn.
Rows 5 and 6: Repeat Rows 3 and 4.
Row 7: Repeat Row 3.
Row 8: Ch 5, dc in first dc (increase made), sc in first ch-2 space, * V-st in next sc, sc in next ch-2 space; repeat from * to end; V-st in 3rd ch of ch-5 (increase made); turn – 18 (21, 24, 27, 30, 33) V-sts.
Row 9: Repeat Row 4.
Rows 10-13: Repeat Rows 3 and 4 twice.
Row 14: Repeat Row 3.
Row 15: Repeat Row 8 – 19 (22, 25, 28, 31, 34) V-sts.
Rows 16-22: Repeat Rows 9-15 – 20 (23, 26, 29, 32, 35) V-sts.
Row 23: Repeat Row 4.
Rows 24-27 (24-27, 24-31, 24-31, 24-31, 24-31): Repeat Rows 3 and 4 two (2, 4, 4, 4, 4) times.
Row 28 (28, 32, 32, 32, 32): Repeat Row 3. Do not turn or fasten off after last row but pivot to work over post of sts at row ends.
Skirt Border
First Side
Ch 1, 2 sc in each dc row and sc in each sc row up to waistband, slip st in ch-3 space on last snowflake – 42 (42, 48, 48, 48, 48) sc. Fasten off.
Second Side
With right side facing and larger hook, join A in outside ch-3 space of last snowflake on opposite end of waistband; ch 1, 2 sc in each dc row and sc in each sc row to lower edge. Fasten off.
Skirt Edging
With right side facing and larger hook, join B in same ch-3 space as Second Side of skirt border; * skip next sc, (slip st, picot) in next sc; repeat from * to corner; working in sts of last row of skirt, (slip st, 5 dc) in first ch-2 space, ** slip st in next sc, 5 dc in next ch-2 space; repeat from ** to next corner; (slip st, picot) in next sc on First Side of skirt border, skip next sc, *** (slip st, picot) in next sc, skip next sc; repeat from *** to waistband; slip st in ch-3 space on snowflake. Fasten off.
Bodice
Row 1: With right side facing and larger hook, working in ch-3 spaces on opposite side of snowflakes, join A with sc in first ch-3 space, * ch 3, sc in next ch-3 space; repeat from * across; turn – 12 (14, 16, 18, 20, 22) sc and 11 (13, 15, 17, 19, 21) ch-3 spaces.
Rows 2-4: Ch 1, sc in each sc and ch across; turn – 45 (53, 61, 69, 77, 85) sc.
Row 5: Ch 1, sc2tog, sc in each sc to last 2 sc; sc2tog; turn – 43 (51, 59, 67, 75, 83) sc.
Rows 6-17: Repeat Rows 2-5 three more times – 37 (45, 53, 61, 69, 77) sc.
Rows 18-20: Repeat Rows 2-4.
Row 21: Ch 1, sc in first 10 (14, 18, 22, 26, 30) sc, 4 sc in next sc, sc in next 15 sc, 4 sc in next sc, sc in each sc to end; turn – 43 (51, 59, 67, 75, 83) sc.
Rows 22-25: Ch 1, sc in each sc across; turn.
Row 26: Ch 1, sc in first 21 (25, 29, 33, 37, 41) sc, sc2tog, sc in each sc to end; turn – 42 (50, 58, 66, 74, 82) sc.
Rows 27-28 (27-28, 27-30, 27-30, 27-32, 27-32): Repeat Row 22.
Row 29 (29, 31, 31, 33, 33): Repeat Row 5 – 40 (48, 56, 64, 72, 80) sc.
Row 30 (30, 32, 32, 34, 34): Ch 1, sc in first 14 (18, 22, 26, 30, 34) sc, slip st in next 12 sc, sc in each sc to end; turn.
Row 31: Ch 1, sc in first 12 (16, 20, 24, 28, 32) sc, slip st in next 2 sc, slip st in next 12 slip sts, slip st in next 2 sc, sc in each sc to end; turn.
First Neck Strap
Row 1: Ch 1, sc in first 8 sc; TURN leaving remaining sts unworked.
Row 2: Ch 1, sc2tog, sc in each sc across; turn – 7 sc.
Row 3: Ch 1, sc in first 5 sc, sc2tog; turn – 6 sc.
Row 4: Repeat Row 2 – 5 sc.
Rows 5-91: Ch 1, sc in each sc across; turn. Fasten off after last row.
Second Neck Strap
Row 1: With wrong side facing, skip next 24 (32, 40, 48, 56, 64) sts of last long row; join A with sc in next sc, sc in each sc to end; turn – 8 sc.
Row 2: Ch 1, sc in first 6 sc, sc2tog; turn – 7 sc.
Row 3: Ch 1, sc2tog, sc in each sc across; turn – 6 sc.
Row 4: Ch 1, sc in first 4 sc, sc2tog; turn – 5 sc.
Rows 5-91: Ch 1, sc in each sc across; turn. Fasten off after last row.
Bodice Border
With right side facing and larger hook, join A with slip st in ch-3 space on last snowflake; working over row ends, sc in each sc row up to tie, slip st in each row of tie and in each sc across last row of tie and in each row end of second side, working in sts across last row of bodice, sc in each st, slip st in each row of second tie and in each sc across last row and in each row of second side, working over row ends of second side of bodice, sc in each sc row, slip st in ch-3 space on snowflake. Fasten off.
Bodice Edging
With right side facing and larger hook, join B with slip st in same ch-3 space on snowflake as border; skip next st, * (slip st, picot) in next st, skip next st; repeat from * to end; slip st in same ch-3 space on snowflake. Fasten off.
Pocket
Round 1: With larger hook and B, ch 8; join with slip st to form ring; ch 1, (sc, ch 1) in each ch around; join with slip st in first sc – 8 sc and 8 ch-1 spaces.
Round 2: Ch 1, sc in first sc, ch 5, [sc in next sc, ch 5] 7 times; join in first sc.
Round 3: Slip st in next ch-5 space, ch 3 (counts as dc), 5 dc in same space, 6 dc in each ch-5 space around; join in top of ch-3 – 48 sts.
Round 4: Slip st in next 2 dc, * ch 3, slip st in next 3 dc, ch 1 **, slip st in next 3 dc; repeat from * around, end at **; join.
Round 5: Working over slip st of previous round, slip st in next 2 sts, * (slip st, [picot, slip st] twice) all in next ch-3 space, slip st in next 3 sts, slip st in next sc of Round 2 **, slip st in next 3 sts; repeat from * around, end at **. Fasten off.
With yarn needle and B, tack edges of pocket to skirt leaving top two points open using photo as guide for placement.
ABBREVIATIONS: A, B = color A, B; ch = chain; dc = double crochet; mm = millimeters; sc = single crochet; st(s) = stitch (es); tog = together; * or ** or *** = repeat whatever follows the * or ** or *** as indicated; [] = work directions in brackets the number of times specified.
If you'd like to see more holiday patterns, take a look at the new "Have a Red Heart Holiday: 20 Knit & Crochet Gifts and Decorating Ideas" eBook from Red Heart Yarn.