Funky DIY Doll House from Duct Tape
 Visit Kerry at Kid Giddy.
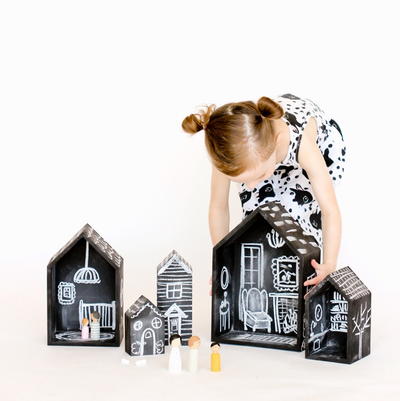
Help your kids learn how to make a doll house from duct tape with this Funky DIY Doll House from Duct Tape tutorial. Not only can they create their doll's dream home, but furnish it as well. Using a variety of different duct tape patterns and colors, your kids can become architects and build their own homemade doll house. They'll have just as much fun making their house as they will playing with it when they're done.
You can find this project, as well as many other fabulous blogger projects, in our new eBook, The Best Blogger Craft Ideas 2014: Decoupage, Sewing, Jewelry Making, and More free eBook. Download your own free copy today!

Materials:
- Duck Tape
- Cardboard
- Cording
- Chalkboard Stickers
- Podgeable Papers
- Fabric
- Glue
- Paint
- Scissors
- Razor
- Pencil
- Cutting Mat
Instructions:
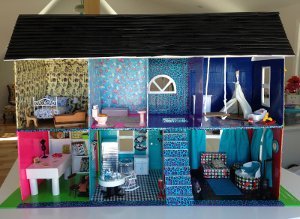
- The beauty of this project is that just about anyone can make it. It can be made on an enormous scale (making a whole house) or a very small scale (making just one room). It can also be made into modular rooms where you make one room at a time and connect them all later. The amount of Duck Tape and cardboard you will need, will depend on how big or small you want to make "house". To make your own Duck Tape Doll House (or Play House) you will need: Duck Brand Duck Tape Rolls (for house as shown in picture: 3 rolls of one color for exterior siding, 2 rolls for roof shingles, 1-2 colors/rolls per room - less for single room, and at least 2 rolls of white) Cardboard (thicker boxes are best for the foundation, and walls, thinner cardboard for furniture) Non-stick scissors Pencil These items are useful when building an entire house, but not necessary for a single box room unless cutting a door and windows. Cutting Mat Acrylic Ruler Razor Graph Paper.
- Print out the dollhouse plans (Stairs and House) as provided for measurements. Find a piece of cardboard that is 1-2" larger around on all sides for use as the foundation.
- Begin by measuring and cutting the frame of the house. The front piece and the sides of the house should be one piece of cardboard for stability if possible. The "master bedroom" and the "studio" pictured is an extension. Add pieces where needed, preferably at a connecting wall.
- Measure and cut out the second floor piece (cut all second floor pieces for any added extentions).
- Cut out a front door and as many windows on sides as preferred. Use graph paper to help keep sizes consistent, or to map out everything prior to cutting.
- Select duck tape for each room. Tape the interior walls accordingly, laying each piece of tape side by side. Avoid overlapping the pieces.
- Use a razor to cut the tape from the door and window openings away from the edge. Cut diagonal into the corners, and fold these tabs over to the front or sides of the house. This will cover the inside edges of the cardboard, and the front will be covered with siding.
- Measure the length of the house front and both sides. Cut a piece of duck tape 1-2" longer than this measurement. Lay the tape sticky side up on your cutting mat to use as a guide. Fold up the bottom edge in small segments. Place the first strip of siding along the bottom of the house exterior and work up to the top. (The sticky portion of the tape is now approx . Place the folded edge so it sits below the sticky edge. Overlap the folded portion of the next piece of siding on top of the sticky edge of the first piece of siding.)
- Cut out the siding from the door and window openings (Trim the siding right to the edge of the door or window frame, as it will not wrap around to the other side.)
- Cut out the stair opening on the second floor the same as done for windows.
- Select duck tape for the floor in each room. Tape the floor accordingly.
- Flip the second floor cardboard over to tape the ceiling that will show on the first floor. Trim edges accordingly.
- Tape the dollhouse frame together using duck tape that matches the color of the wall, floor or ceiling, depending on which edge is being taped. Thin strips of tape can be cut to cover any non-matching tape edges.
- Tape the first level flooring, after securing the house to the foundation from both the interior and exterior sides.
- If there is a second floor, use the template provided to cut the sides of the stairs. There should be one step for every inch. Adjust the top and bottom steps as necessary if the floor height is in between inches.
- Cut 1" width strips of cardboard for the treads and risers. Trim the strips to 3 .
- Tape the Stairs together and cover with duck tape, using all one color, or one color for the risers and a different color for the treads, as shown in picture. Stairs can be taped to the second floor opening once completed.
- Measure and cut dividing walls accordingly (the dividing walls do not need to be extended from the front of the house to the back edge of the foundation. Mix it up, making sure to use certain walls as supporting wall, as others as decorative).
- Cut out doorways as desired. Tape doors on both sides. Lighter tape colors are best used first and wrapped around the door edges, than darker colors. Place a piece of tape on one side of the door to act as the hinge. Attach the hinge to the opening of the doorway on the wall.
- Tape walls accordingly and attach inside the house.
- Choose a piece of cardboard for the roof, and follow the same instructions for the siding, to make the roofing. After all the strips are placed, mark a staggering brick pattern with a ruler and pencil on the tape. Each shingle should measure 2 long. Use scissors to cut the shingles as marked.
- Add trim to the windows using a 1 strip approx., leave of the trim on one side and wrap the tape to the other side. Cover the inside of the window trim with a strip to even out.
- To make the furniture and other accessories, use what you can from around your space. Toilet paper rolls can be great for side tables, while empty gift boxes can make great couches, chairs, tables or beds. Crochet hooks and Knitting needles make great curtain rods.
- Look around your craft room and see what you have. Mix handmade furniture and accessories with store bought pieces as desired. Use graph paper to map out the layout and sizes of the furniture needed in each space, to prevent making pieces that are too large or too small. Here are some things I made with various products/materials for the house pictured.
- Kitchen Table: Darice Round paper mache box lid and toilet paper roll with extra pieces of cardboard for the feet.
- Kitchen Appliances: pieces of cardboard and silver Duck Tape give the kitchen a modern flare. Use Sharpie markers to add details as desired.
- Kitchen Dcor: Darice Chalkboard labels and White Plaid All Purpose Paint makes great mini wall art.
- Living Room Couch: Leftover cardboard pieces.
- Living Room Chair: Darice round paper mache box base, and an extra piece of cardboard for the chair back.
- Living Room Rug: David Tutera Self Stick shimmer sheet (4x6) adds bling to any room.
- Living Room Clock: Plaid Mod Podge Podgeable Papers sits on top of a larger round piece of cardboard covered in duck tape.
- Living Room Newspaper: Plaid Mod Podge Podgeable Papers cut and folded in half.
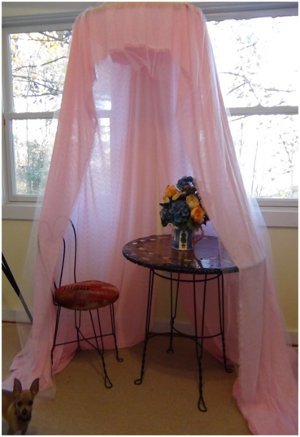
- Living Room Curtains: Freespirit Solids fabric cut into panels, and hung on Coats and Clark Knitting Needles and Crochet Hook. Edges can be sewn or glued as preferred/able.
- Kids Play Room: 4 Triangle Pennant banners (provided by Krylon) sewn together to make an indoor hideaway tent on cardboard with a paint brush to hold it up.
- Kids Play Room: Swing made with cardboard and Dritz Home Cording.
- Bathroom: Plaid Podgeable papers make great bath mats/rugs.
- Studio Space: Use small pieces of cardboard 1x 2 and wrap small pieces of fabric around it to look like small bolts of fabric (2x6).
- Studio Space: Instead of regular doors, make inspired sliding barn doors.