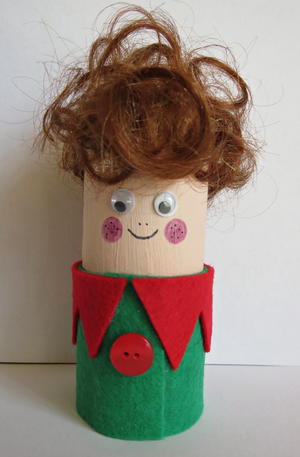
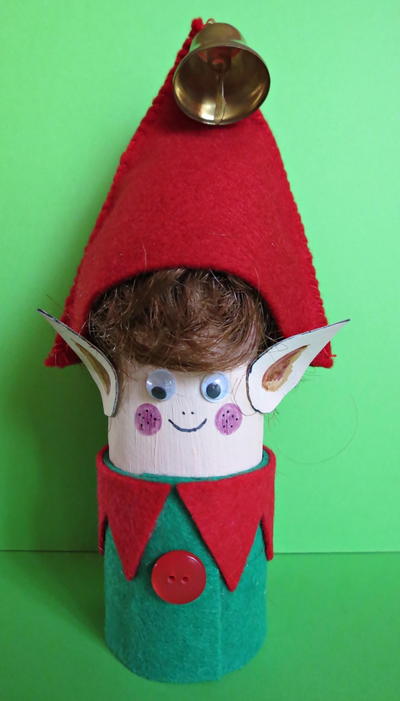
Little Elf Toilet Paper Roll Craft

There's really nothing cuter than this Little Elf Toilet Paper Roll Craft, so don't even try to look elsewhere. If you like to make toilet paper roll crafts or just want to try something new, this is the perfect project for you. Use materials use as paint, synthetic hair and googly eyes to bring your elf to life. Once you start making Christmas crafts with toilet paper rolls, you may not be able to stop. Start by making a single elf and then start working on the next one. Soon you'll have enough of these little helpers to fill Santa's workshop.
Primary TechniqueGreen Crafting

Materials:
- Printout of provided pattern sheet
- Empty toilet paper roll
- Empty egg carton tray
- Piece of cardstock for the ears
- Curly brown synthetic doll hair
- 6.2” x 2” strip of green felt
- Piece of red felt for the hat and collar
- One 10mm wide red button
- Pair of 8mm wiggle eyes
- 0.7” high copper bell
- Flesh acrylic paint
- Artline 210 Fineliner black pen
- Pink and brown felt-tip pens
- Paintbrush
- Standard scissors
- Needle
- Red thread
- Quick-drying craft glue (such as Bostik Clear)
Instructions:
- From the egg tray, cut a circle that would fit on top of the toilet paper roll.
- Paint both the circle and the toilet paper roll with the flesh paint and allow to dry thoroughly.
- Glue the circle to the top of the toilet paper roll and cut off any protruding edges.
- Add hair to the top of the toilet paper roll. Use the scissors to shape the hair neatly.
- Glue the wiggle eyes in place.
- Use the pink felt-tip pen to add rosy cheeks, and the black pen to add a mouth, nose and freckles.
Make a coat for the little elf:
- Glue the strip of green felt around the bottom of the toilet paper roll the two ends must meet in the front.
- Cut a zig zag collar that would fit around the toilet paper roll and glue it to the top of the coat. The ends of the collar must meet in front.
- Add the coat’s button.

Make the elf‘s hat:
- Cut the hat from the pattern sheet and trace it onto the red felt. Repeat, so that you will have a front and back panel for the hat. Cut the two panels out.
- Use the needle and thread to stitch the sides of the two panels together.
- Use needle and thread to affix the bell to the end of the hat.
- Glue the elf’s hat in place.
- Trace and cut two ears from the cardstock. Paint the ears with the flesh paint and allow to dry. Turn the ears over and paint them on the other side as well, and allow to dry thoroughly.
- Add some detail to the ears with the brown and pink felt-tip pens.
- Slightly bend the ears and then glue in place, putting glue only to the bottom part of each ear.
Read NextEasy Pinecone Christmas Craft
Your Recently Viewed Projects
Thanks for your comment. Don't forget to share!
SissieSass
Dec 05, 2016
I see what you mean about toilet paper roll crafts getting addicting. I already see myself making several projects. Could you create some sort of game or elf collection with this craft? I think kids would love to use them as a game on Christmas Day or maybe to decorate the center of the table for dinner. Each grandchild or child could make their own elves for all the guest so everyone had a customized elf seating chart. Great inspiration!
Report Inappropriate Comment
Are you sure you would like to report this comment? It will be flagged for our moderators to take action.
Thank you for taking the time to improve the content on our site.