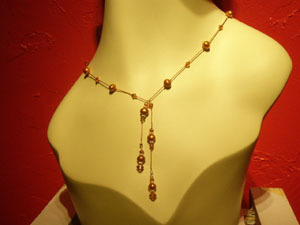
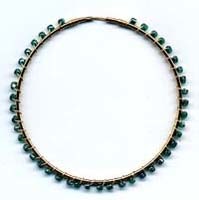
Tin Cup Lariat
This simple necklace from The Bead Studio can be made in a jiffy and looks great dressed up or with casual wear! What a great gift for friends and family. This can be made long or short depending on the look you want. We wrote the instructions for a 20” lariat.
Materials:
- 11 6-8mm Pearls
- 14 4mm Crystal bicone beads
- 2 6mm Crystal bicone beads
- 8 Spacer beads
- 1 pkg. #4 Griffin needle end silk cord
- 2 - end tips
- 2 - 24g headpins
- Scissors
- Awl
- cocktail straw
- Round Nose Plier
- Chain Nose Plier
- Wire Cutter
- Clear Nail Polish
Steps:
- Determine the amount of distance you want between the beads and cut the straw to that length.
- Unwind the silk cord and tie a knot at the end. Place the bead tip on the cord with the cup facing the knot and slide onto the knot.
- Slip the straw onto the cord until it is resting against the end tip. Tie a simple overhand knot and put the awl into the center of the knot, slide the knot down until it hits the straw. Pull the knot tight while removing the awl, remove the straw.
- Place a bead or a grouping of beads onto the cord until it is resting against the knot. Tie a simple overhand knot and put the awl into the center of the knot, slide the knot down until it hits the bead. Pull the knot tight while removing the awl. It is important to keep the tension tight on the cord, especially at the tip of the awl, so the knot does not relax allowing a space between the bead and the knot. (This takes practice so do not get discouraged if your first few knots are loose)
- Continue to Alternate steps 3 and 4 until you reach the desired length.
- Tie a knot after the last bead and slip the other end tip onto the cord with the cup facing out. Slip the straw onto the cord and tie a knot. Slide the straw off and pull the end tip up to the knot.
- Trim the excess cord and put a drop of nail polish onto each of the knots.
- Stack a few beads onto each of the headpins and wire wrap closed.
- Slip the loops of the headpins onto the end tips and gently close the loops on the end tips.