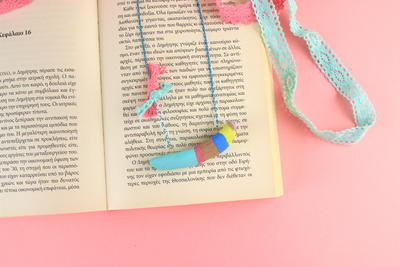
Simple Unique Clay Necklace
This simple unique clay necklace from Jacquard Products is a beautiful piece of jewelry that you will be proud to have crafted yourself. Homemade clay jewelry hardly gets easier than this.

Materials:
- Pearl Ex powders: I've used Spring Green, Misty Lavender, True Blue, Flamingo Pink and Super Copper
- Jacquard Gold Lumiere
- Black Premo Sculpey polymer clay: three 2 oz. packages, conditioned and ready to use.
- Small foam-type brush
- Bamboo skewers: medium & large (about the size of a chopstick)
- Clay dedicated pasta machine or something to roll the clay flat.
- Sculpey Clay blade or craft blade.
- Small pieces of medium sandpaper
- Gap filling instant glue
- Buna Rubber Cording material (or any black cording): 14".
Steps:
- Roll black clay about 3/8" thick (#1 on pasta machine).
- Cut out basic forms, roll clasp bead.
- Set aside about 1" ball for coils.
- Roll rest of clay out very thin (#6 or 7 on pasta machine).
- Finger paint on the Pearl Ex.
- Tear small pieces of this and press into place on forms, overlapping each piece and the edges.
- Poke holes with skewers for linking and add small pieces of clay to back of top edge to allow for holes for cording.
- Roll thin tubes of clay and wrap around the large skewer about an inch. Make 3 coils on the medium skewer.
- Bake according to package directions.
- Using water-wet brush, dip into Lumiere and wash the top surfaces. Use towel to daub excess. Allow to dry.
- Cut 3" piece of cording, thread large coil onto it and pass each end through one of the necklace pieces. Add small amount of glue to each end and quickly thread back through the coil.
- Cut the remaining cord so one side is two inches longer than other side. Glue into place at top parts of necklace pieces.
- Allow to dry and adjust cord lengths for desired wearing length.
- Thread coils onto each length to slide down and cover where the cord is glued into clay shapes.
- Thread last coil onto the loop side of the closure. Trim end at an angle, dot with glue and push back into coil to form a loop to fit the clasp bead.
- Glue other end of cord into clasp bead.
- To Assemble: Take a 3" piece of cording and thread through one of the holes in your clay. Thread the large coil onto this clay and thread through the other clay piece you are attaching. Add a small amount of glue to each end and pass the ends back through the coil. I chose to leave the excess cording ends, but you can trim them.
- Cut the remaining cording in half, leaving 2 extra inches on the loop side of the necklace, and glue into the wedged holes at the tops of each piece. When these are dry, determine how long you wish the piece to hang when worn and trim the cord, (leave 2 extra inches on the loop side). Thread a coil on both pieces of cording to slide down and cover the junction of the cord and the top of the clay piece.
- Trim the end of the loop end at an angle and thread a coil on it, holding the coil about 3 inches from the end of the cord. Add a drop of glue to the angle-cut end, and loop it back into the coil forming the loop for your clasp.
- Glue the clasp bead onto the other end of cord. I glued the glass pieces into place - and waited PATIENTLY for the glue to dry before trying on my new necklace!
Read NextGarage Sale Necklace Makeover
Your Recently Viewed Projects

Thanks for your comment. Don't forget to share!
Report Inappropriate Comment
Are you sure you would like to report this comment? It will be flagged for our moderators to take action.
Thank you for taking the time to improve the content on our site.