This project was submitted by one of our readers, just like you.
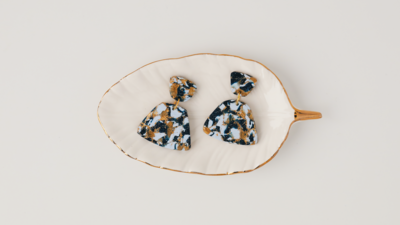
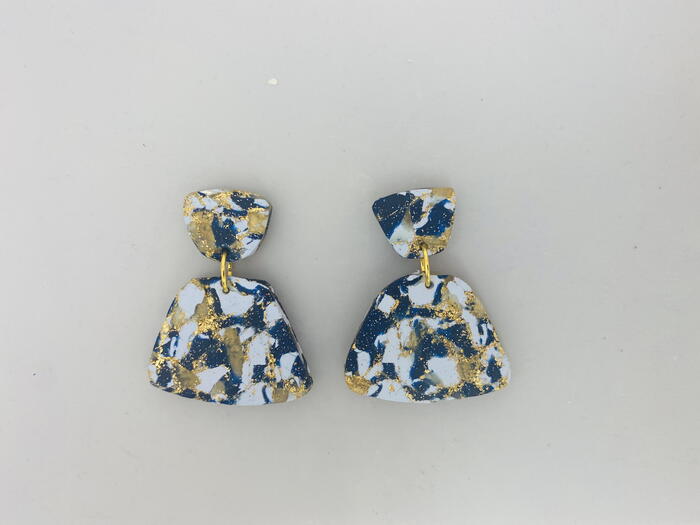
Sculpey Premo Chunky Terrazzo Earrings

Sculpey Premo Chunky Terrazzo Earrings
"This fun technique incorporates gold leaf into the tiny cracks and crevices of the clay chunks giving you a totally random and unique look every time. This project is great for a more advanced (or adventurous) clayer, but it's such an easy technique to learn! You'll be amazed how easy it is to add the gold leaf for such a dramatic effect, plus chopping up the pieces and creating something beautiful is such a satisfying result!"

Materials List
-
Sculpey Premo™ Translucent 2 oz
-
Sculpey Premo™ Galaxy Glitter 2 oz
-
Sculpey Tools™ 8-Inch Acrylic Clay Roller
-
Sculpey Tools™ Clay Blades
-
Sculpey Tools™ 5-in-1 Clay Tool
-
Sculpey® Jewelry Designs Template Pack
-
Liquid Sculpey® Translucent
-
Sculpey Premo™ Pale Blue 2 oz
- Composite gold leaf
- 8 mm Gold tone jump rings (2)
Instructions
-
Getting Started: Please make sure your work area is covered and you are not working on an unprotected surface. We recommend working on the Sculpey® Oven-Safe Work Mat, wax paper, metal baking sheet, or disposable foil. Uncured clay may damage unprotected furniture or finished surfaces. Be sure to cover your crafting area appropriately. Start with clean hands, unwrap and knead clay until soft and smooth, or condition by running clay though a Pasta Machine. We recommend using a designated machine for clay purposes only. When working with multiple colors, clean hands with soap and water or baby wipes (we have found that baby wipes work best) before switching colors. Shape clay, pressing pieces firmly together. Wash hands after use. Baking: Begin by preheating oven to 275 °F (130 °C). After you are done creating; for best results bake clay on an oven-proof surface such metal, aluminum foil, an index card or the Sculpey® Clay Mat at 275°F (130 °C) for 30 minutes per 1/4" (6 mm) thickness according to package directions. Oven safe glass or ceramic surfaces are also acceptable for baking; however please note that the baking times may take longer as the glass or ceramic surfaces take longer to heat up. For best baking results, use an oven thermometer. DO NOT USE MICROWAVE OVEN. DO NOT EXCEED THE ABOVE TEMPERATURE OR RECOMMENDED BAKING TIME.
-
Use 1/8 bar of each of the Premo™ colors. Chop the colors into bits randomly with a Clay Blade. Chopping all three colors together at once will help keep them randomly mixed. Keep chopping until the chunks are between 1/8” and 3/16” in size.
-
Carefully cover the lump of chunks with a piece of composite gold leaf.
-
Gently work the composite gold leaf into the clay so that it sticks to the sides of the pieces.
-
Carefully flip the lump of clay over.
-
Add more composite gold leaf to the back side as well.
-
Keep working the composite gold leaf into the cracks and crevices between the clay pieces.
-
Crumble the clay up again loosely.
-
Add a bead of Translucent Liquid Sculpey® (TLS) over the top of the clay bits.
-
Work the TLS into the areas between the bits so that they stick together. Form the bits into a ball.
-
Form the ball into a rectangular loaf 1/4” thick.
-
Slice the loaf open with a Clay Blade to make two halves that are more rectangular in shape each 1/8” thick. Lay the halves open on your work surface revealing the inside of the loaf which shows a network of colors with gold veins throughout. Use the large and small shapes shown from the Jewelry Design Templates to create the earring design. Lay the shape that you want on top of the clay and carefully cut around the template using the Clay Knife in the 5-in-1 Tool.
-
Cut two sets of the shapes from the clay slices. Smooth rough edges with your fingertips.
-
Poke holes using the Needle Tool (as shown) so that the earrings can be assembled with jump rings. Bake the pieces following the baking instructions for Sculpey Premo™. Allow to cool completely before handling.
-
Assemble the earrings as shown with jump rings using flat nose pliers. Glue the ear posts to the back of the top pieces and allow to dry completely.

Read NextNo Sew Fabric Necklace