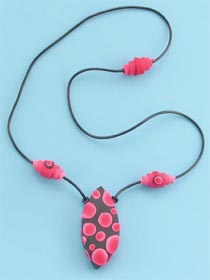
Polka Dot Pendant
Create a quirky pendant necklace from AMACO with rolled beads and red polka dots.
Materials:
- AMACO® Pasta Machine
- AMACO® Bead Making Tools Set
- FIMO® Soft Polymer Clay — One 2 oz. Block Each of Black (09), White (0), Cherry Red (26)
- AMACO® PolyRoller™
- AMACO® Flexible PolyBlade
- AMACO® Polymer Clay & Craft Oven (or home oven)
- AMACO® Professional Bead Baking Rack with Pins Wooden Kitchen Skewer
- Oven Thermometer
- Index Cards or Card Stock
- 30" Length 1.7 mm Black Rubber Tubing for Jewelry Making — Available in Coil Packs and/or Necklace Kit Packages
- Scissors
- 2-Part Epoxy Adhesive
- Toothpick
- Hot Pad
Tip: Always begin with lightest colors first; washing hands before working with a new color. This will help prevent trace bits of color on hands from corrupting lighter colors.
Cover work surface with parchment paper. Corners can be taped down to hold in place.
Materials:
- Preheat oven to 265ºF (130ºC). Knead White, then Cherry Red FIMO® Soft polymer clay to condition then roll through pasta machine set at thickest setting to create separate sheets of clay. From each sheet cut a 4" x 6" rectangle. Cut the rectangle from corner to corner to create two triangle shaped pieces of each color.
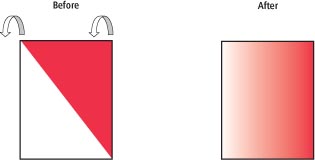
- Make a Skinner Blend: Using one triangle of each color, place the pieces side by side to create a new rectangle (see diagram at the end of the instructions for reference). Roll lightly with PolyRoller™ to join at seam. Fold top half over bottom half, keeping White edge on one side and Cherry Red edge on the opposite side. Pinch together lightly with fingers then pass through pasta machine with folded edge inserted first. Repeat this process about 20 times. When finished, color will fade from Cherry Red to White with graduating blended shades of the two colors at center.
- Rolled Beads: Using smallest triangle shape on template found in AMACO® Bead Making Tool Set, position widest end of the triangle template on lightest edge of the Skinner Blend and cut two pieces for beads shown closest to pendant. Reverse template to cut third triangle, with darker edge of clay now on widest end of triangle. This adds a slightly different variation of the same bead style when finished.
- Beginning at widest end, roll triangles around large mandrel from Bead Making Tool Set and set aside.
- Make another Skinner Blend using remaining White and Cherry Red triangles. Beginning on darkest (Cherry Red) end of sheet; roll clay to opposite (White) end. Roll lightly with palms to join the rolled layers. Cut excess clay at ends then set the “jelly roll” style cane aside.
- Pendant: Knead Black clay and roll through pasta machine set on thickest setting making a clay sheet. Cut sheet in half. Stack one half on top of the other then roll lightly to remove any air pockets. Repeat once more, creating a level sheet of clay that is approximately 5/16" thick.
- Place the thick clay sheet onto an index card then use AMACO® Flexible PolyBlade to cut curved side edges of the oblong pendant creating a piece approximately 1½" wide x 2¾" long. Wash hands to remove any residue from the Black clay before continuing.
- Polka Dots: Referring to photo, cut thin slices of the jellyroll cane and place them randomly on all sides of the black clay pendant. To unify the overall finished appearance, wrap some dots around outer edges to sides and back of pendant. The jellyroll can be reduced in size to create smaller “polka dots” by rolling with palms on a flat surface. For best results, cut slices as you go to create a variety of dot sizes, giving depth to your finished piece. Once all dots are in place, roll lightly with PolyRoller™ to smooth.
- Carefully insert wooden skewer through pendant, twisting with fingers as you gently work it through the thick clay to create hole for stringing onto necklace. Remove skewer and use pointed end to smooth openings on both sides of pendent, rounding them slightly. Replace skewer back through prepared hole leaving it in place during baking to hold hole shape. Place back onto index card or card stock for baking.
- Make a tiny ball of black clay and press with finger onto point at center of each rolled bead from steps 3 and 4. Cut a slice of the reduced jellyroll and press at center of the black clay referring to photo as a guide.
- Suspend beads during baking by placing mandrel onto AMACO® Professional Bead Baking Rack. If Bead Baking Rack is unavailable, you can also elevate beads by resting the mandrel on small balls of either scrap FIMO® polymer clay or aluminum foil.
- Bake for 40 minutes in preheated AMACO® Polymer Clay & Craft Oven or home oven set at 265ºF (130ºC). Remove from oven with hot pad and let cool. Remove mandrel and wooden skewer.
- Use wet sand paper found in Bead Making Tools set to sand any shiny portions on back side of pendant. Wipe with a damp cloth to remove dust. Refer to photo to string pendant to center of the rubber tubing necklace length. Tie an overhand knot on each side of pendant to hold in place.
- String the two matching rolled beads onto opposite sides of the pendant. Mix 2-part epoxy as directed by manufacturer. Use toothpick to apply directly onto tubing 1¼" from each side of pendant. Slide the rolled beads over epoxy; adhering them onto the tubing to hold position. Trim tubing ends to make even (if needed). Apply epoxy to each end then insert into opposite sides of remaining rolled bead to finish necklace. Lay flat until completely set.
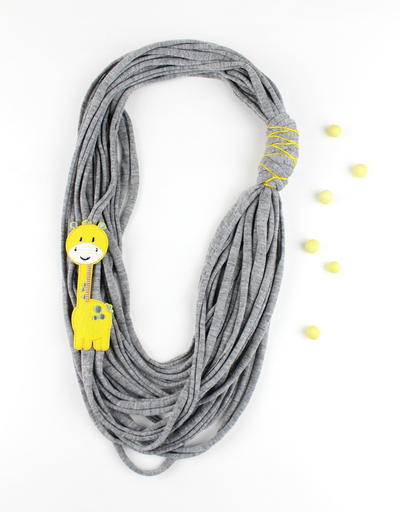
Read NextNo Sew Fabric Necklace