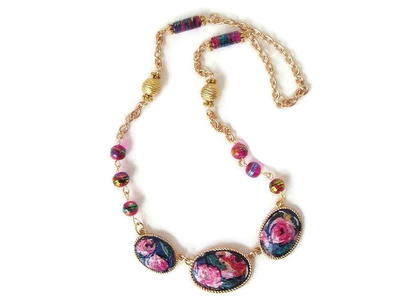
Natural Impressions Two Strand Necklace
Create a beaded necklace with antique hardware reminiscent of wood and stone, from AMACO.

Materials:
- FIMO® Soft Polymer Clay — White, Sahara, and Caramel
- AMACO® Professional System Bead Roller™ — sets #2 and #3
- AMACO® Bead piercing pins (included in package with Professional System Bead Rollers)
- AMACO® Professional System Bead Baking Rack™
- AMACO® Polymer Clay and Craft Oven (or standard home oven)
- AMACO® PolyBlade™
- Plaid® Folk Art® Down Home Brown antiquing medium
- Antique gold 2-strand toggle clasp
- Beadalon® 19 strand bronze bead stringing wire
- Bronze crimp beads
- 12 antique gold roundel metal spacers
- Antique gold metal spacers, assorted shapes and sizes
- Stone chip beads
- Seed beads, assorted metal tones
- Ruler (preferably with raised numbers)
- Plastic sandwich bag
- Paper towels
- Texturing materials, (used here were: rubberstamps, bead piercing pins, wooden skewer, and plastic drinking straw)
- Wire cutters
- Crimping pliers
Note- Stone chip beads can be purchased or you can make your own from marbling FIMO® scraps, then cutting randomly into thin slices. Pierce and bake.
Steps:
- Preheat oven to 265ºF (130ºC). Knead all clay colors to condition. Colors can be used alone or marbled to create a wider assortment of shades. Follow instructions included with bead rollers to measure exact amount of clay needed for each bead style. Referring to photo for reference, roll to create an assortment of beads. Insert bead piercing pin through each bead prior to removing from bead rollers. (TIP: Try inserting bead piercing pins through beads at an odd angle to create more visual interest in your finished design!)
- Add texture to create an interesting mix of beads. Some tools and techniques you may want to try:
With bead on piercing pin, roll lightly over rubberstamps, texture plates, coins, leaves, etc... for a light impression.
For deeper indentation, place bead (with piercing pin in place) onto a rubberstamp. Press a second rubberstamp on top; sandwiching the bead between the two stamps. Press to flatten the bead slightly; imprinting the stamp image into the bead. Remove. If needed stamp may be dampened with water to prevent clay from sticking.
Use blunt and/or sharp tip ends of wooden skewer or bead piercing pins to make indentation, holes or lay flat to press straight lines.
Create round holes through beads using wooden skewer or plastic drinking straw.
- With beads on piercing pins, place onto professional system bead baking rack and bake in oven preheated to 265ºF (130ºC) for 45 minutes. Remove from oven and let cool.
- Pour a small amount of Down Home Brown antiquing medium into sandwich bag. Remove beads from bead piercing pins and drop into the sandwich bag. Roll around until coated, then remove beads from bag a few at a time; placing them onto a clean paper towel. Wipe off excess antiquing medium immediately; leaving only a tint of the color on most of the beads. Indented or textured areas will retain more of the medium; creating contrast. Once antiqued; white beads take on an almost “bone-like” quality and coloration while darker shades, such as the Caramel used here take on a rich wood-toned appearance. Let dry flat, or for best results place back onto piercing pins to dry suspended on bead baking rack.
- Cut a 27" length of bead stringing wire. String two crimp beads onto wire, sliding them 1/2" from one end. Bring same wire end through a loop on one of the toggle clasp ends, then back through crimp beads. Crimp the crimp beads; securing wire to clasp. Slide on 3 roundel metal spacers then another crimp bead. Crimp the crimp bead close to roundels.
- String on another crimp bead. Crimp with crimping pliers to hold the bead 1" from the roundels at start of strand. Slide on a rolled clay bead, then another crimp bead. With clay bead held tightly between the two crimp beads, crimp the last crimp bead to hold in place on wire.
- Repeat step #6 to randomly add additional beads to strand, leaving at least 11/2" of bare wire at end.
- End strand by stringing on a crimp bead, three roundel spacers, and two additional crimp beads. Bring wire end through loop on second toggle clasp end, and then back through crimp beads and the spacers. Pull wire to adjust spacing between toggle clasp and last clay bead. Crimp the two crimp beads closest to toggle clasp. Slide roundel spacers close to toggle and crimp the remaining crimp bead to hold spacers in place. Trim excess at wire ends.
- Second Necklace Strand: Using a 30" length of bead stringing wire, repeat step #5 attaching wire to second loop on one of the toggle clasp ends.
- Fill all but 1/2" of the second wire strand with a random mix of rolled clay beads, seed beads, stone chips and an assortment of antique gold spacers. For an interesting twist, string seed beads or stone chips onto wire so that these smaller beads appear to be floating inside holes made with drinking straw in the larger clay beads shown here.
- Repeat step #8 to finish second strand.
Read NextCluster Drop Earrings