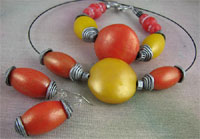
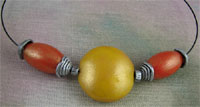
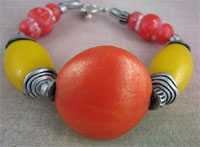
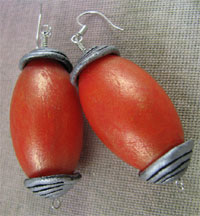
Indian Ocean Necklace, Bracelet and Earrings Set
Create vibrant yellow, orange and red beads for a chunky three-piece jewelry set from AMACO. Making polymer clay jewelry is fun and a great gift idea for family and friends. For a fun twist, check out this video for using shaving cream while making polymer clay beads like these.
Find this project and 45 other beading craft projects in the Beautiful Beads eBook.
Materials:
- Polymer clay - Black, Transparent Red, Transparent Orange, Transparent Yellow
- AMACO® Rub 'n Buff® - Pewter, Silver Leaf
- Plaid Blaze Old World Bronze
- Plaid Blaze White
- Earring wires
- Silver wire
- Beadalon Bead wire, crimp beads, toggle clasp
- Neck wire
Tools Needed:
- AMACO® Professional System Bead Rollers - Set 3
- AMACO® Professional System Bead Rollers - Set 6
- AMACO® Tube Bead Rollers- Set 2
- AMACO® Professional Bead Baking Rack
- AMACO® Flexible PolyBlade
- Paper towels
- Wire working tools
Steps:
- Mix a custom yellow color of clay using 16 parts of Transparent Yellow to 1 part Transparent Orange polymer clay.
Mix a custom orange color of clay using equal parts of Transparent Yellow, Transparent Orange and Transparent Red polymer clay.
Condition the two clay mixes as well as 1oz. Transparent Red and 1 oz. Black separately until the clays have a good working consistency.
- Place an oversized portion of the yellow clay mix in the Set 6 bead roller and rock the lid back and forth pressing down to make a large puff or lentil shape bead. Pierce with a beading pin and set on the bead baking rack.
Repeat and create a large orange bead using the same process.
- Using the Set 6 roller this time with the recommended amount of clay, roll four orange beads and two yellow beads. Use the pin guide in the bead rolling kit, pierce each bead with a beading pin and set on the bead baking rack.
Using the Transparent Red clay and the Set 3 bead roller, roll two red beads using the larger of the two forms. Use a clay knife to cut into the surface of the bead to texture it and make small surface holes using the tip of a bead pin. When the surface is distressed to your taste, pierce the bead with a beading pin and set on the bead baking rack.
- Using the Set 2 Tube Bead Roller on its smaller setting and black clay, roll out a long narrow tube bead. Use the smaller measuring guide, roll across the tube bead to mark it into sections. Cut the length of tube bead in two and set half aside. Cut the remainder of the tube bead into individual beads each one half the length you marked. Pierce with a bead pin and then press a second bead pin repeatedly around the edge of each bead to make a textured edge much like the edge of a coin.
Take the reserved length of tube bead and cut into small ¼ lengths. This time pierce the bead the other direction across the longest edge. Press a bead pin longwise into the edge of the bead four times around its circumference to dent its surface so it looks like a large grain of wheat.
Roll a long think snake of black clay and coil into small pointed coils to mimic bead caps. Press the coils together so the clay sticks to itself but do not smooth too much.
You will need twelve bead caps, eight small round beads and two larger grains of wheat shape beads.
- Cure all pieces following the manufacturer's instructions on the clay package.
- Paint all the large beads (except the red ones) with the Old World Bronze glaze. Allow the glaze to partially set and then rub any excess paint off the beads. Repeatedly glaze the surface until you get a pleasing transparent sheen.
Paint the two red beads with white glaze. Allow the paint to set slightly and then wipe the surface of the beads to remove the excess glaze.
Apply a very thin coat of Pewter Rub 'n Buff® to the black beads that will become your silver bead caps. The aim is to get the metal look onto the surface of the clay but not into the creases. Wipe any excess Rub 'n Buff® from the clay pieces and then add a small touch of Silver Leaf Rub 'n Buff® sparingly to the surface.
- Assemble the necklace by removing one wire end and thread the beads onto the necklace wire. You will need four bead caps, two small silver beads, two orange beads and the large yellow bead. These beads may need to be drilled to make a larger hole for the neck wire to pass through.
For the bracelet, assemble the beads on a length of Beadalon beading wire and affix the silver toggle to the ends using crimp beads. You will need the large orange bead, two yellow beads, two red beads, four bead caps, two grains of wheat shape beads and 6 small silver beads.
Assemble the earring pieces on a length of silver wire. Twist a loop in each end and attach one end to a silver earring wire. Each earring uses two bead caps and one large orange bead.
Read NextFashion Ribbon Medals