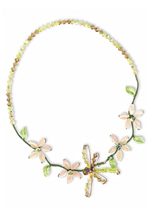
Dragonfly Garden Necklace
This is a fantasy creation using beads and wire to create a sculptural design that recalls the vines, flowers, and dragonflies of a summer garden.

Materials:
- 20 gauge natural ColourCraft wire
- 20 gauge forest green ColourCraft wire
- 5 - Twisted leaf A/B beads (hole drilled across the top of bead)
- 20 - Rose quartz diamond shape beads
- 33 - 6mm Swarovski jonquil bicone crystal beads
- 26 - 6mm Swarovski light Colorado topaz bicone crystal beads
- 21 - 6mm Czech glass peridot green A/B finish rondelle beads
- 1 - 8mm Czech glass faceted metallic bronze round bead
- Round Nose Pliers
- Chain Nose Pliers
- Flush Cutters
- Safety Goggles
- Bead Board
Steps:
Notes: To complete this project, you will need to be adept at wire wrapping, coiling, clasp making and working with wire and glass beads. Remember, this is all about patience, so give yourself plenty of time.
Try playing around with the wire and beads for a while to get a feel for the possibilities and restrictions of the materials. My experiments resulted in this lovely but delicate necklace - treat it gently and store and wear it with care. Using these techniques and ideas, you can create your own garden of designs.
- Getting Started: Begin by assembling your beads, tools and wire. Schedule plenty of distraction-free time: the basic techniques used in this project can take some practice to master, and these fragile glass beads can break under pressure. Use a bead board to arrange the beads for the back half of the necklace: bead boards are a great way to stay organized and keep to a pattern. Remember, always wear safety goggles or glasses.
- Left-hand Vine, Adding Leaves: Cut off a 2.5 ft. length of 20 gauge natural ColourCraft wire. This functions as the spine or core of your design. Cut two 2 in. lengths of 20 gauge green ColourCraft wire. Begin by wrapping from the left hand side of the natural wire approximately 4 in. down from the center. Remember, the final design will be asymmetrical. Use your hands and pliers to tightly coil the green Colourcraft wire around the core wire. Work down the strand and adjust the coil by pushing it up with round or chain nose pliers. After coiling approximately 7/8 in., attach the first leaf. Thread the green wire through the top of the leaf and tighten it while wrapping the green wire around the core wire once and continue coiling for several rotations. Adjust the leaf bead to the right side and tighten it by twisting it around one time. It should be elevated and to the right now. When the design is completed, the wrapped core wire will be adjusted to be more vine-like.
- Creating Flowers: Continue coiling down the core wire another approximately 7/8 in. It's time to add the first flower. Begin by creating the center of the flower: thread a Swarovski jonquil bicone bead with the green Colourcraft wire. Wrap the green wire around the core wire tightly. Adjust the crystal so that it is facing upwards, bicone perpendicular to the core wire. Thread a rose quartz bead from bottom to top, wrapping the green wire behind the bead and around your core wire. Tighten the bead and adjust it to point upwards like a petal. Add four more petals to the flower working clockwise, wrapping the wire around the core wire and adjusting with pliers or by hand as you go. Once the flower is complete, continue down the "vine" adding a left-pointing leaf and another flower. End by wrapping the green wire around from the last flower approximately 7/8 in. Do not trim the excess core wire and the green wire; the excess wire will be used in creating the clasp later (see step 12).
- Beaded Back of the Necklace: Thread on your beads for the back of the necklace, working from the right hand onto the core wire. You will need 21 jonquil crystal beads, 18 topaz crystal beads and 12 rondelle beads to complete this step. Follow this pattern: three jonquil crystals, one Czech rondelle, three topaz crystals, one Czech rondelle.
- Right-hand Vine: Construct the right hand wrapped section of your design. Repeat the wrapping and leaf/flower techniques described above in steps 2 and 3 in a pattern of leaf left, flower, leaf right, flower and final leaf right.
- Dragonfly Armature: Make the dragonfly. Cut a 4-5 in. length of 20 gauge ColourCraft wire. Bend it in half. Thread the faceted bronze bead down to the center of the wire and twist the wire once, leaving the bead horizontal: this is the dragonfly's head. Now you have two wires to work with.
- Dragonfly Wings: Thread 4 jonquil crystals and one topaz crystal onto one of the "dragonfly-body" wires. Fold this into a loop with the crystals on top to create the left-hand wing. Take your time here so as not to break the beads. Use your hands or pliers to form the wing shape. Then wrap the bottom of the wire around wire at the bottom of the head once tightening the wing and adjusting it upwards. Repeat this process for the right hand wing.
- More Dragonfly Wings: Now make the second set of wings in the same way, as the first but the bead pattern will be three topaz crystals.
- Finish the Dragonfly: You have two wires now. Wrap and tuck one behind the dragonfly and around the second wire. Trim excess wire from this strand using flush cutters. Tuck the tail into the wrapped wire.
- Finish the Dragonfly Body: Thread the remaining wire with 9 Czech rondelles, leaving approximately ½-7/8 in. of wire. Finish this off in a flat spiral using your hands or round or flat nose pliers. Make a small loop at the end of the wire and turn the wire on itself using your fingers to keep the spiral flat and taut.
- Attach the Dragonfly: Attach the completed dragonfly to the left hand bottom side of the necklace using a 2 in. length of 20 gauge natural ColourCraft wire by threading this wire through some of the multiple strands at the back of your dragonfly and securely wrapping the bug onto the core wire. Trim excess wire and tuck the tail under.
- Create the Clasp Hook: Fold the core wire on the left hand side over on itself approximately 1 in. from the dragonfly. Use 20 gauge green ColourCraft wire and work on the folded natural ColourCraft wire approximately ½ in. down from the top. Coil the green wire up to the bottom of the dragonfly, as you did in the top half of the necklace. Trim excess green wire and tuck in ends. Use round nose pliers to make a hook with the folded natural ColourCraft.
- Create the Clasp Eye: On the opposite or right hand side of the design, make a loop or eye to finish the clasp. Cut the exposed core wire to approximately 7/8 in. and fold it over on itself. Use another length of 20 gauge green ColourCraft wire to wrap around the folded core wire, working from the bottom up to the final leaf. Use round nose pliers to make the double natural exposed wire at the bottom into an eye.
- Train the Vine: The final step is to make the bottom half of the necklace appear more vine-like. Use your hands to make the coiled green wire resemble a vine by bending it carefully section by section. Be careful to be particularly gentle on the leaf wires. Adjust the dragonfly to conceal the clasp underneath.
Variations on a Theme: Once you have mastered these techniques, the possibilities are really endless. Make segmented designs with the vine effect working all the way around the necklace in sections, use other beads to create a whole garden full of flowers, add a butterfly or bee to the piece. Your vines can adorn candlesticks, vases, picture frames, etc. This is a fairly complicated process, but with practice is definitely worth the effort. Happy Beading!
Read NextNo Sew Fabric Necklace
Your Recently Viewed Projects
Thanks for your comment. Don't forget to share!
JennyBee1
Nov 11, 2011
@ashlyelsaabraham 3482737, For additional images, we suggest you try contacting the pattern designer directly for help. The designer is specified in the byline. --Editors of FaveCrafts
ashlyelsaabraham 3 482737
Nov 07, 2011
plz incudethe pictures of each stage of craft making , it will be more helpful to viewrs
Report Inappropriate Comment
Are you sure you would like to report this comment? It will be flagged for our moderators to take action.
Thank you for taking the time to improve the content on our site.