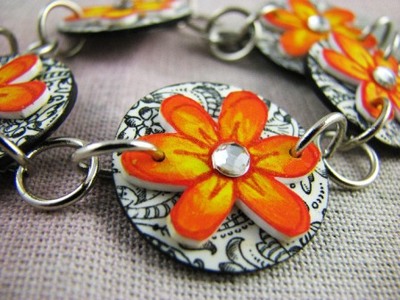
Brass Ring and Faux Stone Jewelry
Create a one-of-a-kind necklace and earrings from AMACO out of polymer clay.

Materials:
- FIMO® Soft Polymer Clay— Mandarin Orange, Indian Red, Sunflower, Translucent, Sahara, Peppermint, Black, Gold
- FIMO® Gloss Lacquer
- AMACO® PolyRoller
- AMACO® PolyBlade
- AMACO® Pasta Machine
- AMACO® Tube Bead Roller Set 1
- AMACO® Pro Bead Roller Set 2
- AMACO® Pro Bead Roller Set 7
- AMACO® Tri-Bead Roller
- AMACO® Bead Baking Rack
- AMACO® WireForm® Soft Metal Rods—Thin Brass and Copper
- AMACO® Craft Wire—Silver, 24 gauge
- Easy Metal—Gold leafing Sheets
- Shaving cream
- Piñata alcohol based inks— Burro Brown, Havana Brown
- Folk Art™ Acrylic Paint—Burnt Umber
- Jump rings
- Head pins
- Misc. silver spacer beads of choice
- Four silver spring beads
- Toggle clasp
- Earring wires
- Beadalon™ Round Nose Jewelry
- Pliers, Designer Flush cutters
- 100 grit sand paper
- Hammer
- Ceramic tile
- Heat gun
- Food chopper
- Drinking straw
Steps:
Shaving Cream Beads:
- Mix 4 parts Translucent FIMO® with 1 part Indian Red and Manadrin Orange.
- Create two round beads with Pro Bead Roller #2 by adding slightly larger amounts of clay than is called for in the measuring instructions. Place in oval slot. Place the lid on top and “smash and rock” the bead back and forth. This type of bead does not roll over. Pierce hole with piercing pins.
- Add shaving cream to ceramic tile. Add 4 drops of each piñata ink color. Mix with toothpick. Randomly apply shaving cream to bead. Heat with heat gun to melt shaving cream and lower ink to surface of the clay. This will produce random patterns in the clay. Do not touch. Be careful not to burn the clay as heat guns will get very hot.
Faux Coral Tube Beads:
- Using base mixture from shaving cream beads, create 5 tube beads with tube bead roller. Add distress marks with sand paper. Poke holes with piercing pin. Cut into desired lengths approximately 1/4" to 1/2" wide.
Faux Turquoise:
- Chop clay into small pieces with PolyBlade or in food processor. Gently press pieces together to form into a log 1/4" diameter. Allow some cracks to show in clay. Pierce with piercing pin. Cut into desired lengths approximately 1/4" to 1/2" wide.
Wooden Beads:
- Create two bi-cone beads with Sahara clay from the blunt end cavity of Pro Bead Roller Set 7. Pierce hole with piercing pin. Paint with acrylic paint allowing some of the base color clay to show through. You want this to be streaky.
Gold Beads:
- Using Gold clay, create several beads using the Tri-Bead Roller oval.
Donut Beads:
- Using mixture from shaving cream technique, create round balls from the Pro Bead Roller then flatten. Cut out hole with drinking straw. Texture with sand paper. Poke hole with piercing pins.
'Mokume Gane' Beads:
- Flatten each of the following colors of clay through pasta machine to thinnest setting: Copper, Gold, Translucent, Black. Stack colors, adding a layer of gold leaf in between each layer. Press through pasta machine on thickest setting. Cut stack in half and press through pasta machine again on thickest setting. With the back of a pencil eraser, or using a texture of choice, impress a design. Shave off thin sections and set aside. This reveals an underlying pattern. Hand form a black bead into a rectangle. Apply shavings to bead. Set in with PolyRoller. Pierce hole with pins.
- Square beads are made by rolling a ball and then flattening all sides. Poke hole with piercing pins.
- Place all beads onto baking rack and bake for 1 hour at 265ºF, 130ºC.
Copper Chain:
- While beads are baking, wrap copper rod around a magic marker. Cut loops with flush cutters to form jump rings. Interlock rings to create a chain. You will need two, approximately 4" long.
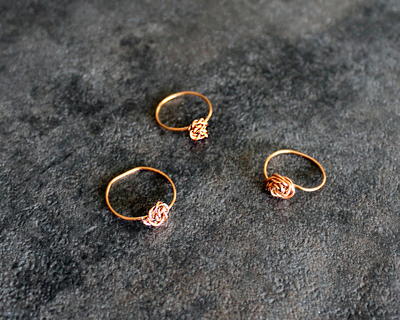
Brass Rings:
- Center focal ring: Create a loop at the end of wire. Wrap around PolyRoller two times. Secure by wrapping wire around original loop. Trim off excess. Wrap ring with silver craft wire then hammer flat. The silver wrapping will create loops to attach jump rings. The loop created in the process is at the bottom.
- Side rings: Create two more single loops by wrapping wire around a magic marker, pencil or anything of desired circumference. String on a silver spring bead. Align over bead so that one bead is opposite of where the ends meet and the other is over the ends, then hammer.
Finish Beads:
- Apply gloss varnish to shaving cream beads. Let dry. Thread craft wire through holes and loop on both ends. Apply acrylic paint to coral, turquoise and donut beads. Wipe off excess, allowing some paint to remain in cracks. Allow to dry. Apply gloss to ‘mokume gane’ beads.
Assembly:
- Using picture as a guide, lay out beads as desired and attach in a variety of ways with headpins, wire, jump rings and chains. Add spacer beads and accent beads as desired. Attach the copper chain to each end of this ensemble to finish and give extra length. Finish with toggle clasp.
Earrings:
- Place a headpin up through hole of ‘mokume gane’ bead. Add a donut bead. Create a loop with pliers. Cut off excess wire. Attach to earring loop or fish hook.
Read NextSummer Painted Driftwood Necklace
Your Recently Viewed Projects

Thanks for your comment. Don't forget to share!
Lucy H
Mar 04, 2010
Wow! This is a nice project. I am looking for a pattern for a bib-style display necklace. The project would be half sewing and half beading. Sometimes large faux gems are used too.
Stephen
Feb 26, 2010
Very nice it look's like you put some thought in to the piece. Colors are great very earthy. I also make one of a kind gem stone pieces. So i know how much time you put into it.
Report Inappropriate Comment
Are you sure you would like to report this comment? It will be flagged for our moderators to take action.
Thank you for taking the time to improve the content on our site.