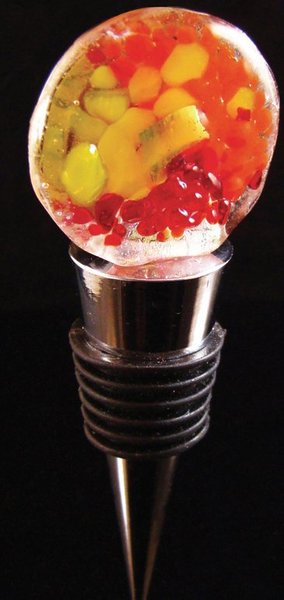
Autumn Bottle Stopper
Keep your drinks fresh with a bottle stopper. Create this beautiful hot glass piece using frit and sheet glass. This makes for a great gift to give as a housewarming gift.

Materials:
- Dichroic Fuseworks ™Scraps
- Clear Fuseworks™ Sheet Glass
- Silver Flat Bottle Stopper
- Red Fuseworks™ Frit
- Orange Fuseworks™ Frit
- Yellow Fuseworks™ Frit
- E6000® Glue
Steps:
Use a glass cutter to cut a 1 ¼” clear circle.
Scoring a Circle
- Circles can be scored freehand or with a circle cutter. To score freehand, use a marker and draw desired circle size on the glass surface.
- Line up the cutting wheel with the intended score line. Apply light to moderate pressure to the cutting wheel and push away, following the perimeter of the circle. Do not rescore or overlap score lines. Do not move your cutter back and forth on the glass. One even score is all it takes.
- Turn the glass over onto a piece of corrugated cardboard or towel with the score line facing down.
- Use your finger, press along the score line. You will see the score “run” or appear to crack ever so slightly.
- Turn the glass back over, with scored side up.
- Since the nature of a glass score is to travel in a straight line, score tangent lines from the outside curve of the circle to the glass edge. A tangent line should “just touch” the outside curve of the circle. Run each of these tangent score lines with a running pliers or hands. Circle should breakout smoothly.
- Clean glass using paper towel moistened with water. Completely dry the surface of the glass with a lint free cloth.
- Next, cut a 2” X 2” piece of kiln paper. Remove the lid from the Fuseworks™ Kiln. Place the kiln paper on the kiln base.
- Center the clear circle on the kiln paper. Use a small spoon to place red, yellow and orange frit on the circle in the desired design. Drop a few small scraps of dichroic glass on the frit.
- Carefully set the base with glass inside the microwave. Cover base and glass with kiln lid.
- Fuse using the chart below. PLEASE NOTE: All microwave and kiln combinations will have different firing patterns. Be sure to take careful notes and log all fusing times for future use.
- After the initial firings, open microwave and, using Hot Mitts, carefully lift the lid enough to inspect the fusing process. Add additional time in 30 second increments until desired results are achieved.
- Remove kiln from microwave using the Hot Mitts and place on a heat resistant surface. Cool the kiln for at least 30 minutes with the lid on. Removing the lid or peeking under the lid during the cooling will result in your piece cracking. Glass remains hot for a long time and should be handled with great caution.
- When cool, glue the glass to the bottle stopper using a glass adhesive such as E6000®. Allow to dry according to glue manufacturer’s directions.