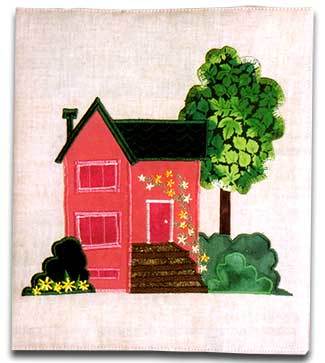
Phone Book or Album Cover
Sew a cute cover for a phone book or photo album featuring a house scene. This cover from Sulky of America makes a great house-warming gift or accent for your own home. The batting or fustible fleece adds depth and hides the color of the phone book. Find this cute phone book cover with 19 other sewing patterns in the Sewing for Beginners eBook.

Materials:
- Zig-Zag Sewing Machine
- Open-toe Appliqué Foot
- Cut one rectangle of main fabric; 13" high by 34" wide
- Cut one piece of lining, which could be the same fabric: 13" by 20"
- Cut one piece of batting or fusible fleece 13" x 20-3/8"
- Small pieces of an assortment of fabrics for appliqué
- Paper-Backed Fusible Web
- Sulky Tear-Easy, Totally Stable or Stiffy Stabilizer
- Sulky Decorative Threads of your choice
- Chalk Marker
- Fine-line, Permanent-Ink Marker
- Pattern from below
- General Sewing Supplies
- Pattern
Preparing the Fabric
- Following the pattern on the pattern sheet, mark the lines on your 13" x 34" main fabric with a chalk marker as indicated. Seam allowances are included in these measurements. The dotted lines at the top and bottom are 1" from the cut edges and should be 11" apart.
Note: The section marked "D" is the area for embellishment (the front of the book cover). The actual size of the finished cove is 9" x 11'.
Preparing the Appliqués
- Use a fine-line, permanent-ink marker to trace the house and shrub shapes from the pattern sheet onto the paper side of the fusible web. (The pattern is already reversed.)
- Fuse the web to the back of the desired fabrics. Cut out the shapes and fuse them in position onto Section "D". Make sure things are level.
- Place either Sulky Tear-Easy, Totally Stable or Stiffy Stabilizer behind the fabric in section "D". Only do the appliqué work in this area, remembering that the actual size of the finished cover is 9" x 11"; the rest of the fabric is seam allowance. Avoid these edges or your decorative stitching will disappear into the seams.
Set up the Machine for Satin Stitching
- Thread the top and bobbin with a Sulky 40 wt. Rayon to match the color of the fabric. Select a medium width zig-zag at whatever length setting produces a pleasing satin stitch on your machine.
TIP: You could also use Sulky Black or White Polyester Bobbin Thread or Sulky Polyester Invisible thread in the bobbin to avoid thread color changes.
- Go around each raw edge, starting with the background elements and working forward to the foreground. The trees are background, the house is midground, and the steps and shrub to the left are foreground.
- To make the trees more natural looking, use a Sulky 40 wt. Variegated Rayon Thread and a decorative type satin stitch like the "grass" stitch or "ragged edge" satin stitch, but others can be used with great results. Play with your stitches.
- Use a decorative stitch such as a leaf or vine-type design to stitch vines with Sulky UltraTwist Rayon #3041 going up the side of the house. To make bartack flowers on the vines and in the shrubbery, use Sulky 30 wt. Variegated Yellow #2117.
- Use a zig-zag at the widest width and set the length to zero (or lower the feed dogs).
- Stitch about 5 to 8 stitches in place, then stop with the needle in the fabric on the left side.
- Raise the presser foot, pivot the fabric about 1/5 of a turn and lower the foot. Stitch another 5 to 8 stitches, again leaving the needle in the fabric on the left. Each time the foot is raised, pivot 1/5 of a turn. Repeat 5 times.
- Varying the width of the stitch will produce larger or smaller flowers. Easy, fun flowers
Construct the Book Cover
- Once the embellishment is done, remove the stabilizer and press well. Hem the two short ends and stitch them down, making about a 1/4" turn under. Fuse the fleece to the wrong side of the cover, positioning it from the left of section "B" to the right of section "D". The batting covers the front, back and the spine of the book.
- Lay the book cover right side up on a flat surface and fold sections "A" and "E" to the fold lines. Lay the lining on top of this with the right side of the lining facing the right side of the book cover. Don't be alarmed by the raw edges of the lining, they will all be hidden shortly.
- Use a ruler to mark a horizontal straight line 1" down from the top edge, and one more 11" down from that, making sure the lines are square with the folded edges. Straight stitch with matching thread along these two lines. Turn the book cover right side out and press. Stitch along the marked spine lines.
- Insert your phone book and use it to call someone and tell them what a great job you did.
Read NextUpcycled Tablecloths Into Baskets
Your Recently Viewed Projects
Thanks for your comment. Don't forget to share!
Report Inappropriate Comment
Are you sure you would like to report this comment? It will be flagged for our moderators to take action.
Thank you for taking the time to improve the content on our site.