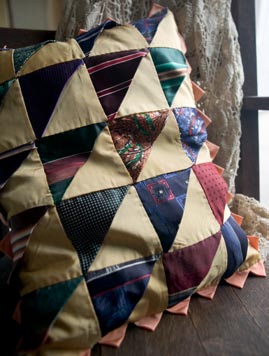
Necktie Pillow
Use old neck ties or thrift store finds to sew up this colorful pillow for home decorating. You will need 20 clean neckties for this fun pillow sewing craft designed by MaryJane Butters.
Find this project and more necktie crafts in 8 Necktie Crafts and Ways to Repurpose Neckties

Materials:
- 20 clean neckties
- ½ yard fabric for blocks and back
- ½ yard muslin fabric for facing
- ¼ yard fabric for prairie points
- 1 12" x 16" pillow form
PREPARING YOUR NECKTIES:
- Seam rip or cut the ties apart along seams.
- Place ties inside a pillow case (baste stitch top closed) or mesh bag for washing.
- Wash in cold water, gently cycle.
- Air dry.
- Press ties flat.
CUTTING:
Ties: Cut (20) 4" blocks
Blocks: Cut (20) 4" blocks
Back: Cut (2) 18" x 14 ½"
Prairie Points: Cut (36) 2 ¼" x 2 ¼"
Facing: Cut (2) 18" x 14 ½" and (1) 14 ½" x 18"
ASSEMBLING, STITCHING, AND FINISHING DETAILS
*Seam allowance: ¼" unless otherwise noted.
*RST = Right Sides Together
*WST = Wrong Sides Together
BLOCKS
- Fold tie pieces, WST, in half diagonally and press to make a triangle.
- Position tie triangles on top of right side of blocks along 2 edges. Stitch ties to blocks (1/8" seam allowance) along the 2 edges using a stitch length of approximately 9 stitches per inch. Stitch ties to blocks from corners to points.
- Stitch blocks together using a ¼" seam allowance (5 rows of 4 blocks).
- Press seam allowances to one side, alternating the direction of the seam allowances row by row (rows 1, 3, and 5, press seam allowance to the left; rows 2 and 4, press seam allowance to the right).
- Stitch rows together using a ¼" seam allowance.
- Press all new seam allowances to one side, all in the same direction.
- WST, pin pillow top to facing, aligning raw edges of pillow top and facing. Stitch in the ditch through both layers along 4 row seams (these are the last seams you stitched).
- Using a 1/8" seam allowance, baste stitch along the 4 sides.
BACK
- RST, using a ½" seam allowance, stitch facings to back fabric along 1 long edge. WST, press seam and topstitch folded edge.
PRAIRIE POINTS
- Fold fabric, WST, in half diagonally 2 times and press to make a triangle (there will be only 1 raw edge).
- RST, position and pin prairie points along the edges (raw edges to raw edges) of pillow top (10 per long sides and 8 per short sides).
- Using a ¼" seam allowance, baste stitch prairie points to pillow top.
BACK AND FRONT
- RST, position and pin back pieces to block top, aligning the raw edges (the finished edges of the back will overlap). Stitch block top to back using a ¼" seam allowance.
- Finish the raw edges to prevent fraying.
- Turn tie pillow right side out and insert pillow form.
Read NextRetro Chinese Hexagon DIY Pillow
Your Recently Viewed Projects

Thanks for your comment. Don't forget to share!
mulberrygalprinces s
Mar 05, 2016
A friend of mines husband died recently and she is torn about throwing away his belongings. I am thinking if she has enough of his ties perhaps I can make her this using them. That way she can still have something of his in the house yet it will be useful and decorative!
thackery
Jun 29, 2015
Here is a place to get crafting neckties online https//www.etsy.com/listing/223549503/neck == ties-for-crafting-in-large-priority?ref=shophomeac == tive1
Paula Diana
Aug 02, 2011
Hi everyone! I hope you all don't think I am too stupid after I tell you these things!br br I have read through this Necktie pillow pattern, and I don't get it! I need more pictures! Also, what is a prairie point?br br Help me please! This is so cool and my husband has so many ties that he has worn through the years, I would love to do this for us. I may even have the tie he wore when we got married at the court house twenty-three years ago!br br Thank you for any help you can give me on this! (Paula Diana)
strawberriefields
May 28, 2010
Hello Everyone, This is very nice!! But I have a hint, lots of times in crafting you need to wash fabric 1st. In this one why not just pin the bag shut with safety pins? I do this for all my projects. I also pin my yardage, fold the fabric raw edge to raw edge, pin that edge and wash. This also helps cut down on the fabric from becoming so tangled up, so less wrinkled.
Report Inappropriate Comment
Are you sure you would like to report this comment? It will be flagged for our moderators to take action.
Thank you for taking the time to improve the content on our site.