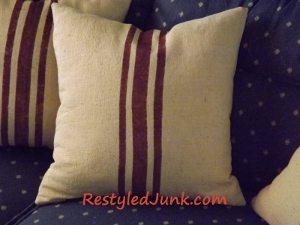
French Chateau Throw Pillows
Transform your space for less with these handmade Chateau Throw Pillows. You can turn the most urban room into a wilderness escape with country craft ideas, and this project really fits the bill. Unlike many pillow sewing patterns, you don't need expensive or hard-to-find supplies. Instead, use an old muslin drop cloth and decorate it with paint. The simple design is easy to create and duplicate. Beginners and experts alike will love creating homemade decorative throw pillows for a bed, chair or couch.

Materials:
- Old throw pillow
- Measuring tape
- White fabric (enough to cover your pillow)
- Scissors
- Straight pins
- Sewing machine
- Stuffing (optional)
- Hand sewing needle and thread
- Plain, natural seed sack, muslin or natural cloth drop cloth (same amount as lining)
- Marking pen
- 1/2-inch-wide tape (any sticky tape will work for this project)
- Plastic drop cloth
- Stencil brush
- Red paint
- Paper plate
Instructions:
- Measure your existing throw pillow from seam to seam, both horizontally and vertically. Add 1/2 inch to these measurements. I used a square throw pillow, but a rectangle could also be used.

- Using the throw pillow measurements, cut two pieces of white fabric for the new lining. If your white fabric has a right and wrong side, pin the fabric with the right sides together. Sew along three pinned sides using a 1/4-inch seam allowance. Sew 2 inches in on each end of the fourth side.

- Clip the corners to remove bulk and turn the lining right side out.
- Insert your throw pillow inside the new lining. If your pillow is in need of additional stuffing, take this opportunity to open a seam with a seam ripper and add new stuffing. Hand sew the pillow closed, and hand sew the lining closed.
- Cut two pieces (same dimensions as the lining) from a plain and natural seed sack, muslin or a natural cloth drop cloth for your faux grain sack pillow covers.

- Fold one cover piece in half to find the center. Using a marking pen, mark the center on the edge on both ends of the fold. Unfold the cover. Measure out 1/2 inch on each side of the marks on each marked edge. The space will be 1 inch between the outer marks. Position the cover with the marks on the top and bottom edges. Run 1/2-inch-wide tape down the cover from outside the top right mark to the outside of the bottom right mark. Repeat with more tape from the mark on the top left side to the mark on the bottom left side. To clarify, you will have a 1-inch stripe running down the center of the cover with the tape masking the outer edges.

- Place the masked cover on a plastic drop cloth. Dip a stencil brush into red paint. Pounce off the drippy excess onto a paper plate. Pounce over the masked center stripe of your cover. Allow the paint to dry.

- Measure 1/2 inch out from each edge of tape and apply another strip down the length of the cover.
- Stencil red paint over the 1/2-inch gap between the tape strips. Allow the paint to dry. Remove the tape.
- Repeat Steps 6 through 9 on the remaining pillow cover piece if you would like the back to also have the stripes.
- Place the pillow pieces together with the right sides facing each other and pin. Sew around the edges in the same way as the lining cover.
- Clip the corners, turn right side out, insert the throw pillow and hand sew the opening closed.