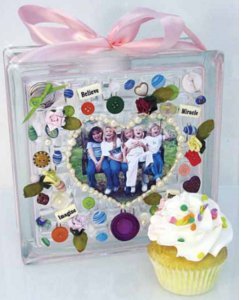
Best Friends Forever Glass Block
The amazing Best Friends Forever Glass Block by Jeanne Baruth with Diamond Tech makes a perfect keepsake, centerpiece, or gift. Glass block decorating is the latest crafting trend, and personalized glass blocks forge lasting memories.

Materials:
- One 7.5 x 7.5 KraftyBlok Original (GBLOCKS101)
- One Large KraftyBlok Stand (679746)
- An assortment of collage materials center around kids (puzzle pieces, small toys, buttons, beads, board game pieces, word blocks, scrabble pieces, etc)
- One 7-watt bulb with electrical cord
- E 6000® Glue or a clear silicone
- White school glue
- Photo 4x6
- Beads or Pearls
- 46” Satin Ribbon 1 1/2” wide
- Heart Template
- Scissors
- Sharpie Silver Marker
- Pencil
- Ruler
Instructions:
- Remove the labels from the KraftyBlok and clean all surfaces of the glass; dry thoroughly.
- Position the KraftyBlok on a work surface, with the 8” x 8” surface side up and the stopper opening facing towards you (Opening needs to be at the bottom of this project for the lighting mechanism).
- Place a ruler on a diagonal from the upper right and left hand corners. Make a tiny mark on the glass in center with a silver Sharpie. Where the marks intersect, is the center of the block.
- Select your favorite photo of your kids or yourself with your friends. Scan, resize to 4x6 (or larger if you prefer) and print. Allow ink to dry on photo.
- When dry, place a heart stencil over the image and draw an outline of the heart directly onto the photo. Using scissors cut out the heart pattern. Place the photo on KraftyBlok over the center mark and glue into place using a white school glue.
- Embellish image by gluing pearls or other beads around the perimeter of the picture.
- Now comes the fun part! Time to collage. Glue assorted buttons, puzzle pieces, game pieces, beads, coins, whatever fun items you have lying about the house. Using the E6000 or silicone glue add them randomly to the surface of the KraftyBlok around the photo. Allow glue to dry.
- Next, cut two 23” length of satin ribbon. On each length of ribbon, fold over one of the raw edges by 5/8” and place a bead of the white glue to hold ribbon in place. Allow to dry. When dry, place this finished edge of the ribbon near the opening of the KraftyBlok and glue. Once glue has set, guide the ribbon along the sides of the KraftyBlok until they meet at the top. Tie into a bow.
- Slide the finished KraftyBlok into the stand and insert a lighting mechanism through the opening in the bottom of the KraftyBlok Stand. Plug into an electrical outlet and enjoy this cheerful accent light.