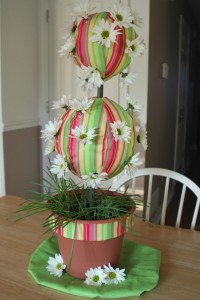
Easter Daisy and Fabric Topiary

If you like this project, then you'll love the free sewing patterns featured in the eBook, 21 Easy Sewing Projects: DIY Designs and Sewing Craft Ideas. Download a copy today - it's free!
Crafting geniuses Chica and Jo share this project for creating a fabric and daisy topiary, perfect for Easter decorating. The project cleverly uses Styrofoam balls at the base for the topiary. Use as a table centerpiece or place in your entryway to greet guests. Get started on this project now to allow time for the grass to sprout in the pot!
Materials:
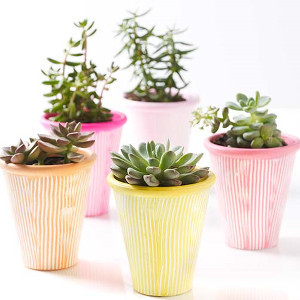
- 1 medium-sized flower pot
- 6 inch diameter Styrofoam ball
- 8 inch diameter Styrofoam ball
- Short tree branches for "trunk"
- Fabric to wrap balls and pot
- Fresh or silk daisies
- sewing machine
-
needle/thread
Instructions:
Prepare the base components
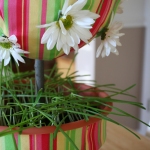
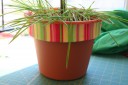
Before you can decorate your lovely topiary, you need to build it. Start with a medium-sized flower pot that you’ve filled with potting soil and planted with grass seed. Let it sit for a week or two until the bright green grass begins to sprout. If you’re in a hurry, try looking for small pots of live wheat grass for sale in grocery or home improvement stores. You can just pop the plant out of the container and plop it into place in your flower pot.
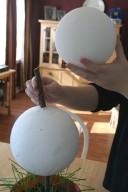
For the Styrofoam balls that make up the topiary, you’ll need one that is 6 inches in diameter and one that is 8 inches in diameter. Now get some short pieces of tree branches from the yard and use them to create the “trunk”. Use one piece to connect the top ball to the bottom one, and another daisy topiary piece to connect the bottom ball to the flower pot. Make sure the sticks are long enough to poke into the Styrofoam far enough to hold it securely.
This is also a good time to decorate the flower pot. Cut a long strip of your fabric and hem the edges. Wrap the band around the flower pot and secure with a pin (or use hot glue for a permanent bond).
Cut the fabric pieces
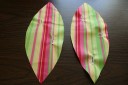
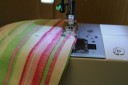
Now it’s time to cover the Styrofoam with your pretty fabric. In order to cover a round ball with flat fabric, you’ll need to do some clever sewing. To make it easier for you, we’ve created patterns to use for cutting out the fabric. Use our 8 inch pattern to cut 7 pieces of fabric for the 8 inch ball. Use our 6 inch pattern to cut 6 pieces of fabric for the 6 inch ball.

Sew the buttonholes
If you’re going to stick flowers in this topiary, they’ll need somewhere to go! You’ll accomplish this by dotting the fabric with cute buttonholes. Use your sewing machine to sew several buttonholes on each piece of fabric. To help with placement, look back at our patterns. For the 8″ pattern pieces, mark half of them with the “A” buttonholes (A1, A2, and A3), and half of them with the “B” buttonholes (B1 and B2). Do the same for the 6″ pattern pieces, marking half of them with the “A” and half with the “B” buttonholes.
Sew the covers together
Take the 7 pieces of fabric for the 8″ ball and sew them, right sides together, along both long sides, leaving a 3/8″ seam allowance. Be sure to alternate your “A” and “B” buttonhole pieces as you go. Sew all the seams together except the last one. You should have something resembling an inside-out ball now. Flip the fabric right side out and slip it carefully over the 8″ ball. Use a needle and thread to sew the remaining seam closed with a slip stitch.

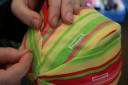
Repeat this process for the 6″ ball. When both balls are covered, place them back on the sticks in your topiary. Now you’re ready to decorate them with flowers!
Insert the flowers
The buttonholes in your fabric will give your flowers somewhere to enter the ball, but Styrofoam is a bit too firm for most flowers to go into without breaking. To make it easier to insert the flowers, start the hole by inserting the handle of a paint brush into the Styrofoam at each buttonhole, and make a nice space for the flower to go.
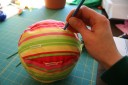
Then trim each of your daisies so that the stem is about 2 inches long, and attach each one to a wired wood pick. Wrap the wire around the flower, holding it in place. The pick will keep your flowers straight and strong, and allow you to push them into the Styrofoam with ease. Put one flower into each one buttonhole.

The finished topiary is adorable and would look great anywhere in the home. Fresh daisies will last a day or two, so if you’re doing this for a party, wait to assemble it until a few hours before guests are arriving for maximum freshness.
For more Easter crafts from our favorite craft bloggers, see the Crafts for Easter: Blogger Edition 2009 eBook.
Read NextSanta Claus Bottle Cover