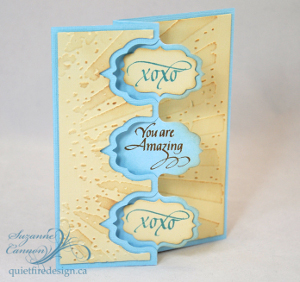
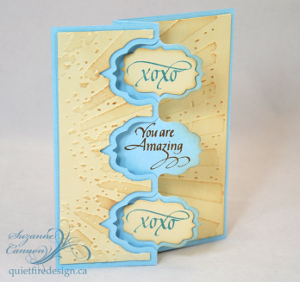
You Are Amazing Greeting Card
 Visit Suzanne at Quietfire Style.
Tell someone just how much you care in the prettiest way possible. Be sure to send a You Are Amazing Greeting Card to show someone your appreciation and gratitude. Handmade thank you card ideas can help you leave a lasting impression. Using dies and scrapbook paper, you can construct a one-of-a-kind care that looks amazing. You can also add your own message on the inside - be sure to include a thoughtful personalized sentiment.
You can find this project, as well as many other fabulous blogger projects, in our new eBook, The Best Blogger Craft Ideas 2014: Decoupage, Sewing, Jewelry Making, and More free eBook. Download your own free copy today!
Materials:
- Sizzix Stephanie Barnard Card, Triple Fancy Frame Flip-Its
- Ranger Distress Ink in Vintage Photo, Antique Linen and Broken China
- Quietfire Design stamp - You Are Amazing and Calligraphic Love Bits
- Core'dinations Cardstock
- Plaid Pop Dots
- Ranger Ink Blending Tool
- Sizzix Big Shot
- Sizzix Tim Holtz Texture Fades Embossing Folders, Rays
Instructions:
- Die cut one card (the largest die) from pale blue cardstock.
- Before folding, use Distress Vintage Photo ink to stamp You Are Amazing onto the middle frame as shown in the photo. Fold the card in half along the score line, then fold the front edge back along the score lines to display the frames.
- Die cut one rectangle and one shaped rectangle from pale cream cardstock.
- Align the straight side of the shaped rectangle with the left edge of the Rays embossing folder, emboss and remove. Align the rectangle with the right side of the Rays embossing folder and emboss.
- Use Distress Broken China Ink to stamp the flourished XOXO twice.
- Use the Ink Blending Tool to gently sponge Distress Antique ink around the edges of the pale cream die cuts and across the top of the rays, stroking on one direction only.
- Use Pop Dots to adhere the die cuts to the card base as shown in the photo.
Read Next64 Handmade Cards for Every Occasion
Your Recently Viewed Projects
Thanks for your comment. Don't forget to share!
Ask93 7929298
Aug 26, 2016
Although I find this to be a very pretty card, I am a little bit confused as to how one goes about making it. Do you have to have that specific die? Is it possible to make something similar with other dies? Can this be done with apper punches? I do like the colours chosen to make this card, and I do like the sentiment.
Kaylee
Aug 30, 2016
@Ask93 7929298 The products and die cuts are listed above in the materials section. I am sure you could find something comprable at your local craft store, as well. hope that helps! -Kaylee, Editor of Favecrafts
Report Inappropriate Comment
Are you sure you would like to report this comment? It will be flagged for our moderators to take action.
Thank you for taking the time to improve the content on our site.