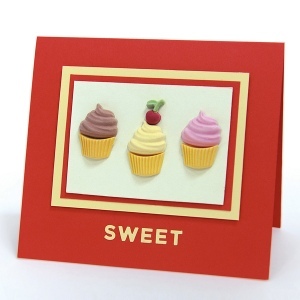
Cupcakes Are Sweet Card
Make this Cupcakes Are Sweet Card for someone sweet! This card craft from Martha Stewart works well for birthdays, holidays, and other special occasions. Use these card making tutorials to make a pretty, cupcake adorned card.
Materials:
- Essential Icons Mold & Clay Gift Pack
- Crafter's Clay Floral Crafting Kit
- Alphabet Punch Set
- Paper Trimmer
- Bone Folder
- 14X3 Craft Ruler
- Glue Writing Pen Fine Tip
- Permanent Adhesive Tab And Roll
- Dual Temperature Setting Glue Gun
- Foam adhesive
- Cardstock: red, pale yellow and off white cardstock
Instructions:
- Refer to color chart in Basic Color Set to mix desired colors.
- Pull the clay a few times until blended, then roll into a smooth ball.
- Press into cupcake mold.
- If necessary, use detailing tool to scrape excess from back of mold.
- Release clay by gently bending back the mold. After unmolding, use detailing tool to smooth any rough edges.
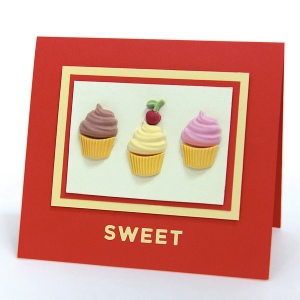
- Cut a 5 1/2 x 10in piece of red cardstock. Using ruler and bone folder, score in half to create a 5 1/2 x 5in card.
- Cut a 3 1/2 x 2 1/2in piece of off-white cardstock. Mat using red and pale yellow cardstock. Adhere to front of card using foam adhesive.
- Attach clay pieces to front of card as shown using hot glue gun.
- Punch sentiment from pale yellow cardstock using the Alphabet Punch Set. Adhere to card using a fine-tip glue pen.
Working with Crafter’s Clay
- Prevent clay from drying out while you work by placing clay on a damp paper towel and covering with another damp paper towel. When finished, store in an airtight plastic bag with a damp paper towel.
- Mix colors by pulling, like taffy. When mixing multiple colors into white, mix the colors together first, then mix the blended color into the white just until the color is even throughout.
- Clay may be shaped and molded several times, but will dry out if over-worked.
- Wash your hands before handling a different color to keep clay colors pure.
- Allow molded embellishments to dry before gluing clay to project. Items will dry within 24 hours, but may be handled sooner if done with care.
Molding Tips
- Always press a smooth surface into the mold. Any crease in the clay will appear on the final molded object.
- Push clay in from the outer edge of the mold for a clean finish.
- After unmolding, use detailing tool to smooth any rough edges
Read NextEasy Watercolor Greeting Cards