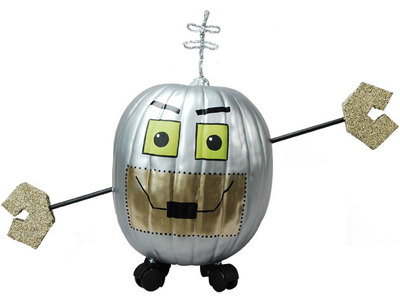
Robot Pumpkin
Your home can be invaded this Halloween by this space-age Robot Pumpkin painted with metallic paint. Cute Halloween projects make this spooky season so much more fun and exciting. Best of all, this project is kid-friendly because there aren't any sharp objects involved. Grab your paint and get creative - the more unexpected the look, the better. Painted Halloween pumpkins are always a fun activity on a chilly fall afternoon. Set some newspaper on the ground and begin creating your next great masterpiece. You'll love the look of this pumpkin so much you'll want to leave it out all year.

Materials:
- DecoArt Americana Acrylics DAO56 - Olive Green
- DecoArt Americana Acrylics DAO67 - Lamp (Ebony) Black
- DecoArt Dazzling Metallics DAO70 - Shimmering Silver
- DecoArt Dazzling Metallics DA202 - Champagne Gold
- DecoArt Americana Brushes DBF3506-B - Chisel Blender 6
- DecoArt Multi-Purpose Sealer DS17 - Multi-Purpose Sealer
- DecoArt Americana Spray Sealers DAS13 - Americana Matte Spray
- Styrofoam sheet, cut into 2 "c" shapes for hands
- 5/16" wood dowel
- 1" flat brush
- Round sponge pouncer
- Water container
- Palette or plastic plate
- Paper towels
- Silver foil chenille stems (2)
- Low-temp hot glue gun and glue sticks
- Casters or wheels, optional
- Punch or screwdriver, optional
- Large square-shaped foam pumpkin
Instructions:
- Prime pumpkin with Multi-Purpose Sealer.
- Paint entire pumpkin Shimmering Silver, dowel Lamp Black, and hands Champagne Gold.
- Use 1" flat brush and Champagne Gold to paint large rectangle for mouth area.
- Paint two small squares using Olive Green.
- Use foam pouncer and Lamp Black to stamp eye pupils inside squares.
- Use brush handle and Snow White to dot eye highlights.
- Use 6 chisel blender brush to paint Lamp Black eyebrows and mouth.
- Use brush handle end and Lamp Black to dot around edge of mouth area.
- Mist with Americana Matte Sealer Spray.
- To assemble: Punch holes for dowel as desired in pumpkin sides. Thread dowel through pumpkin. Push hands onto dowel ends and secure with glue. Punch hole in stem area for antenna. Insert antenna and secure with glue. Punch holes for wheels. Push wheels into place or adhere with glue.
Check out this project and more ideas in 17 Pumpkin Patterns: Free Projects for Halloween!
Your Recently Viewed Projects

Thanks for your comment. Don't forget to share!
Weberme
Oct 05, 2016
This is such a great idea for anyone that loves robots. A great way for a kid to make this easy Robot pumpkin that can last a longer while because it is not carved so they can admire it longer and I love that their is no sharp objects for them to get hurt on. Let your little one make on to take to school so he can feel like a genius too.
Report Inappropriate Comment
Are you sure you would like to report this comment? It will be flagged for our moderators to take action.
Thank you for taking the time to improve the content on our site.