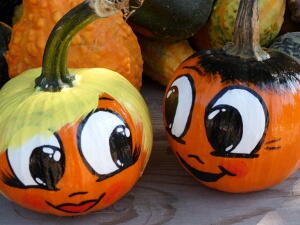
Painted Him and Her Pumpkins
With this easy tutorial on Painted Him and Her Pumpkins, you can learn how to decorate your pumpkins without any carving! No carve pumpkin decorating helps your pumpkins last longer and gives you more freedom for creativity! You could also use this technique on fake pumpkins so you can use your Halloween decoration year after year. This is a fun whimsical way to show off members of your family during the Halloween season!

Materials:
- Acrylic paint: black, white, red, and choice of hair color
- Paint brushes: liner, flat shader (any large brush will do), and an old or disposable brush
- Water
- Paper towel and paper plate
- ModPodge
- Pumpkin
Video:
Instructions:
How to Paint a Boy Face on a Pumpkin
-
The first step to painting is getting the right paint consistency. What we are looking for is an ink consistency in our paint, which is done by adding just a few drops of water and mixing it with the acrylic paint until it resembles the consistency of ink…not too thin and not too thick. We just need to apply the paint in even strokes instead of dragging like it would with too thick of paint or dripping like it would with too thin of paint.
-
Now it’s painting time. We’ll first work on the eyes. Make oval like arches and then paint lines at the base. To make the pupil, first decide which way he’d be looking and then paint another oval like arch and fill it in. Paint a couple eye brows and a just a few lashes to give the pumpkin a cutesy look. Then paint a nose, which is just a tiny arch, and a mouth. Let the paint dry before moving onto the next step.
-
Fill in the eyes with white. You can be a little sloppy with this step because you will be going over the black lines later. While the eyes are drying, you can work on the blush. Take a little dab of red paint on one of his cheeks, or both—whichever you prefer. Then take your finger and blend the red color out a bit. If you need to, add more red paint until the blush is visible enough for your liking. Let the paint dry before moving onto the next step.
-
Paint the whites of the eyes again to make them more opaque. Let dry.
-
Now it’s time for more precision work. Carefully redo all the black lines, covering up any imperfections you made with the white paint while also making the black lines more opaque. Let the paint dry before moving onto the next step.
-
To brighten up the face, add sparkle to the eyes by adding a dot or two in the upper corner of the direction of the eyes. I like to add quite a bit of sparkle, but do whatever you prefer.
-
Now it’s time to paint the hair. Take your flat shader brush and dip it into your hair color. I chose black. Start near the stem and paint with downward strokes—I sometimes go diagonal to give the hair a side-swept look. End your brush strokes just at the eyebrows. Go all the way around the pumpkin until he has a full head of hair.
- To seal your pumpkin, take your old brush—in this case I am using an old fan brush—and dip it into ModPodge. This step must be done after the paint has been thoroughly dried. Brush on the ModPodge until the whole pumpkin has been covered, except for the bottom.
How to Paint a Girl Face on a Pumpkin
-
Make oval like arches and then paint lines at the base. To make the pupil, first decide which way she would be looking and then paint another oval like arch and fill it in. Paint a couple eye brows and quite a few lashes. Then paint a nose, which is just a tiny arch, and lips.
-
Fill in her eyes with white and paint her lips red. Add a little blush to her cheeks by dabbing on a little bit of red and blending it out with your finger.
-
After the paint has dried, go over her eyes with white and lips with red to make them more opaque.
-
Now go over the black lines again to correct any mistakes and make the lines stand out more.
-
Add a little sparkle to her eyes by adding a few highlights.
- Now it’s time to paint her hair. I like to add bangs and swept the ends of the hair toward her face to frame it nicely. Paint all the way around the pumpkin, leaving the ends just before you reach the bottom of the pumpkin when it sits.
Here’s a quick tip. If you make a goof, just let the paint dry and then take a little bit of water on the brush and begin to erase your mistake. Then take a paper towel and wipe it away!
Read NextSpaghetti and Meatballs Costume