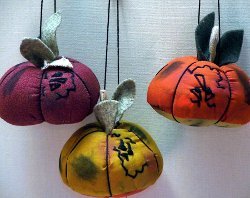
Colorful Pumpkin Ornament
Linda Walsh is here to teach us to make colorful pumpkin ornaments. Using felt, flannel and fabric you can create these wonderful Halloween crafts in no time. This is a great free sewing pattern and you can make a trio of them.

Materials:
- Felt Fabric (for leaves) - 2 different colors of green
- Flannel or Cotton Fabric (for stem) - Light Brown
- Upholstery Thread and Sewing Thread
- 1/8 Yard Fabric (for pumpkin #A)
- 1/8 Yard Fabric (for pumpkin #B)
- 1/8 Yard Fabric (for pumpkin #C)
- Poly-fil (for pumpkins)
- Blush
- DMC Embroidery Floss - Black
- Glue Sticks and Glue Gun
- Black Charcoal Pencils
- Instant Coffee
Instructions:
PUMPKINS:
You want to create the effect of rounded pumpkins. In order to do so you will be sewing the pumpkin-top in six sections. Mark the Points A, B, C, D, E, and F, where indicated in the pumpkin-top pattern (See Diagram #1a). With RST sew the left hand side of the pumpkin-top from the pumpkin bottom edge up to at Point A to the right hand side of the pumpkin-top from the pumpkin bottom edge to Point F (See Diagram #1a). With RST sew from Point B down and up to Point C (See Diagram #1b). With RST sew from Point D down and up to Point E (See Diagram #1c). With RST sew from the combined Points AF down and up to the combined Points BC (See Diagram #1d). With RST sew from the combined Points BC down and up to the combined Points DE (See Diagram #1e). With RST sew from the combined Points DE down and up to the combined Points AF (See Diagram #1f). You should now have a complete rounded pumpkin-top (See Diagram # 1f). Do the same for the other two pumpkins and then set them aside temporarily until the stems and leaves are finished.
STEMS AND LEAVES:
With RST sew the side edges and top of the stem leaving the stem open for turning where indicated in the stem pattern (See Diagram #2a). Turn the stem RSO (See Diagram #2a). Do the same for the other two stems.
Each pumpkin will have two leaves so cut six leaves out of the felt fabric for the leaves. Gather the bottom of each of the leaves tightly from Point A to Point B with upholstery thread and then stitch to secure (See Diagram #2b).
With RST stitch the bottom at Point A and Point B of one of the leaves to the bottom right hand side of one of the stems and stitch the bottom at Point A and Point B of another one of the leaves to the left hand bottom side of the stem with upholstery thread (See Diagram #2c). Do the same for the remaining stems and leaves and then set them aside temporarily.
PUMPKIN BOTTOM:
Mark the Points A, B, and G on the pumpkin bottoms where indicated in the pumpkin bottom pattern. With RST sew the pumpkin top edge of the pumpkin bottom to the pumpkin bottom edge of the pumpkin-top leaving the seam open between Points A and Point B where indicated in the pumpkin bottom pattern (See Diagram #3). Do the same with the other two pumpkins.
Stuff the pumpkins firmly with poly-fil (See Diagram #3). With WST turn the edges between Point A and B under 1/4” and then hand stitch the opening between Point A and Point B closed with upholstery thread (See Diagram #3). Do the same for the other two pumpkins.
PUMPKINS AND STEMS AND LEAVES:
Sew the bottom edges of the combined stem and leaves to the top center of the pumpkin where all the sections meet with upholstery thread (See Diagram #4).
Cut long piece of the black DMC Embroidery floss and knot one end. You are going to create a lined effect down the sides of the pumpkin along the side seams of the 6 sections with the black DMC Embroidery floss (See Diagram #4) .
Insert your needle at Point G and come out at Point A (See Diagram #4). Pull tightly to indent the bottom of the pumpkin and then run the black DMC Embroidery floss down the seam of section A and section B, pull snug, insert your needle at Point G, again, and come out at Point F (See Diagram #4). Pull tightly to indent the bottom of the pumpkin and then run the black DMC Embroidery floss down the seam of section A and section F, pull snug, insert your needle at Point G, again, and come out at Point E (See Diagram #4). Pull tightly to indent the bottom of the pumpkin and then run the black DMC Embroidery floss down the seam of section E and section F, pull snug, insert your needle at Point G, again, and come out at Point D (See Diagram #4). Pull tightly to indent the bottom of the pumpkin and then run the black DMC Embroidery floss down the seam of section E and section D, pull snug, insert your needle at Point G, again, and come out at Point C (See Diagram #4). Pull tightly to indent the bottom of the pumpkin and then run the black DMC Embroidery floss down the seam of section D and section C, pull snug, insert your needle at Point G, again, and come out at Point B (See Diagram #4). Pull tightly to indent the bottom of the pumpkin and then run the black DMC Embroidery floss down the seam of section C and section B, pull snug, insert your needle at Point G, again, and come out at Point A (See Diagram #4). Pull tightly then know to secure. The seams of each of the six sections should now have a line of black DMC Embroidery floss running down them (See Diagram #4). Do the same for the other two pumpkins.
FACE (A), (B), AND (C):
See Diagrams #5a, 5b, and 5c. You are going to embroider the faces with the black DMC Embroidery floss. Make sure that when you embroider the pumpkins face the beginning and ending knots of the DMC embroidery floss will be on the top of the pumpkin and hidden by the leaves and stem. The faces will be embroidered in one of the sections of the pumpkin (See Diagram #5a, 5b, and 5c). Pumpkin A’s face is straight up (See Diagram #5a). Pumpkin B’s face is upside down (See Diagram #5b) and Pumpkin C’s face is sideways (See Diagram #5c).
For each of the pumpkin faces backstitch the eyebrows, outline of the eyes, and nose with the black DMC Embroidery floss (See Diagram #5a). Straight stitch the mouth with the black DMC Embroidery floss (See Diagram #5a, 5b and 5c). Satin stitch the pupils with the black DMC Embroidery floss (See Diagram #5a, 5b and 5c). Blush all the cheeks.
Highlight and shadow all over the pumpkin-top and pumpkin bottom with the black charcoal pencil (See Diagram #5a, 5b and 5c).
DMC HANGER:
You are going to provide a hanger for hanging your pumpkin s using the black DMC Embroidery floss (See Diagram #6). Cut a piece of the black DMC Embroidery floss 14” long. Knot one end of the black DMC Embroidery floss and insert your needle on the right hand side of the top of the pumpkin at the leaves and stem (See Diagram #6). Pull tightly, leave enough slack for the hanger and then insert your needle on the left hand side of the pumpkin top at the leaves and stem, knot to secure and then tie off (See Diagram #6). Do the same for the other two pumpkins.
COFFEE STAINING:
Coffee stain all three of the pumpkins using instant coffee, tea, or coffee. I prefer instant coffee and prefer to stain the finished pumpkin after it is made. Just add 1 cup of boiling water to one teaspoon of instant coffee and mix well. Brush the instant coffee onto the pumpkin after it has been completely made with a kitchen basting brush. You can also add the instant coffee to a spray bottle and then spray the whole pumpkin. Let dry completely. If the pumpkin is not dark enough for your taste then brush or spray a second coat on the finished pumpkin. Let dry completely, again. I like to spray my pumpkins with Fabreze fabric freshener after they have dried to add a nice smell to them.


Notes:
-
All seam allowances are ¼” unless otherwise stated.
-
RST = Right Sides Together WST = Wrong Sides Together
-
RSO = Right Sides Out WSO = Wrong Sides Out
-
Clip all curves and corners.
-
Glue is hot glue unless otherwise noted.
-
Iron fabric pieces and seams as required. Seam edges should be ironed flat.
-
Trace all pattern pieces onto tracing paper or tissue paper, copy, or, use the enclosed pattern pieces directly.
-
Cut all fabric pieces outside of black mark lines as shown on the pattern.
-
Trim seams to finish with pinking shears.
-
The edges of the pattern pieces indicate the name of the other pattern piece it is to be sewn to except for the side seams, which are indicated as side seams or side edges, and the shoulder seams, which are indicated as shoulder seam or edge and sleeve edge.
-
Overlap all pattern pieces that require taping before cutting by approximately 1/4” or until the side lines match.
- When hand stitching is required use the upholstery thread.
Read NextOld Book Pages Pumpkin
Your Recently Viewed Projects
Thanks for your comment. Don't forget to share!
Report Inappropriate Comment
Are you sure you would like to report this comment? It will be flagged for our moderators to take action.
Thank you for taking the time to improve the content on our site.