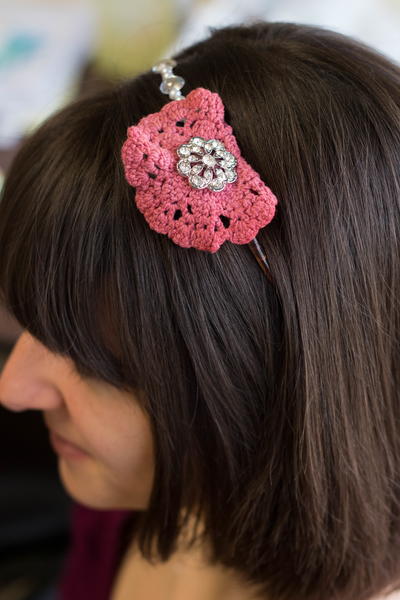
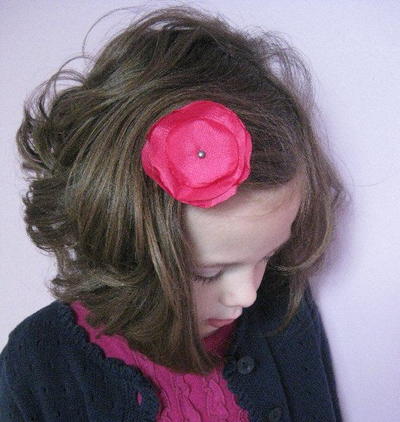
Make Your Own Crochet Headband
You can't go wrong with any crochet flower pattern! This Make Your Own Crochet Headband comes with an adorable flower tutorial that you won't be able to stop smiling when you see. The vibrancy of this summer headband is enough to thaw any remaining winter blues. Learning how to make headbands is an easy trick that pays off as a great gift idea for friends and family. Make Your Own Crochet Headband with this bold pattern, and you'll never want to find your winter gear again.

Materials:
- 5.00mm Crochet Hook
- 4.50mm Crochet Hook
- 2 Colours of 50g 8ply {DK} Yarn
- Scissors
- Tapestry/Wool Needle
- 2.5cm {1 inch} Yellow Button
Size:
- This headband fits all sizes.
Instructions:
Headband
- Start off by taking your 5.00mm crochet hook and making a Slip Knot with your blue yarn, then crochet 75 Chains. You can easily adjust this headband for a child by only chaining 61 chains.
- Row 1 Chain 2, skip 2 chains from your hook, then crochet Half Double Crochets all across into every chain.
- Row 2 Chain 2, half double crochet into every stitch across.
- Row 3 Chain 4, skip 2 stitches and crochet a half double crochet into the third stitch. Chain 2, skip 2 stitches and crochet a half double crochet into the third stitch. Repeat the last step all across.
- Row 4, 5 Chain 2, half double crochet into every stitch or chain across.
- When you've completed all the rows, connect the two ends of the band together to create a circle and Slip Stitch them together.
- Fasten off, and weave in any loose ends.
Flower
- Start off by taking your 4.50mm crochet hook and making a Slip Knot with your blue yarn, then crochet 7 Chains. Slip stitch your chains together to form a circle.
- Row 1 Chain 2, then crochet 15 Double Crochets into the circle you just made. Slip stitch into the top of chain 2.
- Row 2 Chain 8, then Slip Stitch into the next 2 stitches. Chain 8, then slip stitch into the next 2 stitches. Repeat the last step 6 times all around. You should have 8 sets of 8 chains now.
- Fasten off, and weave in any loose ends.
- Row 3 Now taking a your pink yarn, make a slip knot and push your crochet hook into the first stitch of your flower. Into every 8 Chain "Loop" you made on the previous round you need to crochet, 1 Slip Stitch, 2 Single Crochets, 1 Half Double Crochet, Chain 4, 1 Half Double Crochet, 2 Single Crochets, and then finish off with 1 Slip Stitch.
- Repeat into the next 8 Chain "Loops". Slip Stitch into the into the last stitch.
- Fasten off leaving a 30cm {12 Inch} tail of yarn.
- You might need to block your flower if it's petals are curling up instead of lying down flat. For a blocking tutorial, check out one of my other posts HERE!
- Thread your wool/tapestry needle onto your tail of yarn and work the flower over the slip stitched part of the headband. This will give the flower a good base while hiding the slip stitches. Then sew your yellow button in the middle of the flower.
- Fasten off, and weave in loose ends.