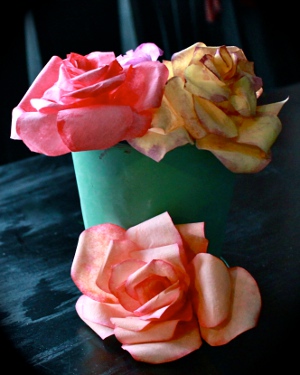
Watercolored Coffee Filter Roses
Turn plain coffee filters into beautiful roses with this Watercolored Coffee Filter Roses tutorial from Maureen Wilson. Perfect for putting in a vase or attaching to a wreath, these recycled crafts are sure to add a touch of Victorian style to your decor. This is also a beautiful craft to make for Mother's Day or an upcoming birthday. Create roses in like colors for a lovely ombre effect that's sure to impress at your next family or friend gathering.
Materials:
- Free pattern for Coffee Filter Roses
- Posterboard (optional)
- Scissors
- Floral wire, 20 gage
- Cone coffee filters (4 per rose)
- Green floral tape
- Sakura Koi® Watercolors (tube)
- Paintbrush
- Bamboo skewer
Video:
Instructions:
-
First print out my free two-page Free pattern for Coffee Filter Roses. If you plan on making a lot of roses, I recommend mounting the shapes on posterboard or cardstock so they're more durable.
-
Cut out the shapes and lay them out on four coffee filters as shown on the template. Trace around the petal shapes. You might want to number them… add the numbers down towards the base of the petal so they won't show.
-
I like to cut four filters at once to save time. Be certain that all of your filters are facing the right direction. I like to put my cut pieces in numbered cups for easy assembly. You could also use plastic baggies. I also like to pre-cut about 7 pieces of floral tape, each about 2.5 inches long.
-
Now it's time to assemble our rose. Start with piece #1. Poke a wire down between the right-hand petals. When you have about 5 inches of wire poking out the top, loop the wire tip around and poke it back down through the bottom. Pinch the loop slightly and tug down. This loop will keep the petals from sliding up and down the stem.
-
Fold the petal inward and roll to coil around the wire. Then wrap the end of the wire loop around the base of the petal to secure.
-
Piece #2 is added like the first. Poke the wire down between the right petals. Arrange the petal so that it fills in empty spaces between the first petal. Roll and secure with a piece of floral tape. When applying the tape, pull and stretch it to get a good, tight hold around the base.
-
Piece #3 is added just like #2.
-
Piece #4 needs to be separated first. Gently tear along the bottom of the petal to make a flat strip. Then wrap this around the rose and secure with tape.
-
Next get two #5 pieces and two #6 pieces (since these pieces weren't cut on the fold, you'll have double the amount of the previous pieces). Fan out the four pieces like you would a hand of cards. Place the rose in the center and wrap the petals around the rose. Secure the base with tape.
-
Repeat with two #7 pieces and two #8 pieces.
-
If you'd like, you can wrap the entire stem in tape for a more realistic look.
-
Starting with the outer petals, fan out the petals, bending gently backward from the base.
-
Now comes the really fun part: painting your roses! I recommend using Sakura's Koi® watercolors that come in tubes. Your base color will need to be really watered down, and Koi® tube watercolors allow you to get the perfect consistency.
-
Blend a dollop of color with about a tablespoon of water. Paint the petals, starting from the center and working outward.
-
Add a second color while the rose is still wet. This color needs to be more concentrated than the first, so add water with a brush rather than pouring it. Run the tip of the brush along the edge of each petal to deposit the color.
-
Have fun experimenting with different color combinations. Here's another tip: I found it's really fast to simply dip the whole rose in the base color… it takes more paint, but less time.
-
Allow the roses to dry for about three hours. It's best to hang these to dry so the petals have good form. You can bend the wire over a towel rack. If you're in a hurry, you can use a blowdryer set on low.
- Once your rose is dry, you'll need to shape the petals a bit. Place a skewer behind each petal and roll backward to curl.
Read NextGold DIY Mason Jar Flower Vase
Your Recently Viewed Projects
Thanks for your comment. Don't forget to share!
sandycrafter 67931 22
Nov 18, 2013
I can not get the printed instructions. The Video was very good but will have to review when making the roses. I am sign in and still can not print off instructions. Sandy
hlipsey 9411839
Nov 25, 2012
The roses or great but printed 3 pages --no shapes or pattern to form rose petals. Helen Lipsey
staceyd123 6940053
Nov 25, 2012
I made these for my dear friend's wedding 3 years ago, she was able to keep all of the roses as a momento of her and her husband's special day and I loved being a part of it!
hlipsey 9411839
Nov 25, 2012
I want to make the roses but I printed 3 pages and no pattern for petals. I have searched for template as it instructed Helen Lipsey
Report Inappropriate Comment
Are you sure you would like to report this comment? It will be flagged for our moderators to take action.
Thank you for taking the time to improve the content on our site.