This project was submitted by one of our readers, just like you.
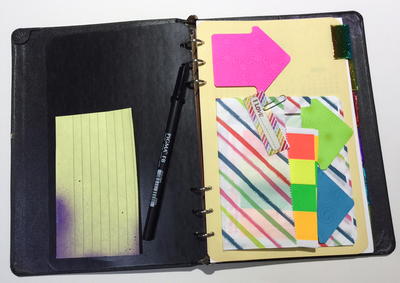
Vintage DIY Planner
Make an old planner brand new again with this recycled craft idea that is actually useful.

Vintage DIY Planner
In the Designer's Words: "I have been wanting to start using a planner for some time, though I haven't really found one that spoke to me. While volunteering at my local artist salvage center, I came across a vintage ledger - complete with a six ring mini-binder, unused grid pages and tabbed dividers. A match made in creative heaven! This ledger has been recycled into an amazing purple-liscious planner with some supplies from my craft stash, Testors One Coat Lacquer and iCraft Deco-Foil. This is an easy project - though consideration should be taken for use of spray paint and time allotted for drying. Project can be completed in an evening and will continue to evolve over time as entries and journaling added."
Use this brilliant and beautiful recycled craft idea to make your very own planner. Using an old leather planner or binder, this DIY idea is stunning and surprisingly cheap to make. The Vintage DIY Planner is the perfect DIY gift for the organization buff in your life; because it allows them to insert some bright and beautiful into their all too structured life. This idea is perfect for college students who need to keep track of assignments and extra-curricular activities, as well.
Estimated Cost$11-$20
Time to CompleteIn an evening
Materials List
- Vintage Ledger
- Testors One Coat Lacquer - 1842 Purple-liscious
- iCraft Easy Cut Adhesive
- iCraft Easy Tear Tape
- iCraft Deco-Foil - Rainbow
- The Crafters Workshop Dylusions Chequered Dots Stencil
- Mini Guillotine Cutter
- Downloaded planner page inserts
- 1/8" hole punch
- Scissors
Instructions
-
Gather all tools and supplies. Remove contents of ledger and mask off inside with a sheet of tissue leaving pocket exposed.
-
Mask off edges of stencil to protect exposed binder pocket and spray checkered border with Testors Purple-licious One Coat Lacquer. Remove stencil and let dry.
-
Flip ledger cover over and completely spray with Testors Purple-licious One Coat Lacquer. Set aside to dry.
-
Alter tabbed dividers by cutting strips of iCraft Easy Cut Adhesive sheets to width of tabs. Trim to size and apply over tab, folding around to backside. Burnish down with bone folder.
-
Using mini guillotine cutter, cut strip of iCraft Rainbow Deco-Foil about 1/4" wider than tabs.
-
Remove adhesive backing on tab and align Deco-Foil strip with edge of tab and wrap around backside, completely covering exposed adhesive. Gently burnish and peel away foil backing. Repeat process with remaining tabs continuing with same strip of Deco-Foil (required two strips of foil to complete all tabs).
-
Cut downloadable planner pages to size and punch holes for six ring binder configuration.
-
Add fun pockets with mini bag folded over, edges adhered and mounted to dividers using iCraft Easy-Tear Tape.
-
Cut section of iCraft Easy Cut Adhesive to size of title block on ledger cover. Remove backing and apply, burnish down then apply Rainbow Deco-Foil.
-
Replace contents into binder, adding ephemera, clips, stickers and other planner goodies desired.
-
Transformation complete and it's time to plan more crafty goodness!
Why You'll Love This Recycled Craft
1. Personalization: One of the top reasons to make the Vintage DIY Planner is the opportunity to personalize and customize your planner to fit your unique style and needs. By upcycling an old binder or planner, you can create a one-of-a-kind organizational tool that reflects your personality and creativity.
2. Eco-Friendly: By recycling an old ledger or binder, you are not only saving money, but you are also reducing waste and helping to protect the environment. This craft project promotes sustainability and shows that you can create something beautiful and useful from materials that would have otherwise been discarded.
3. Organization: The Vintage DIY Planner is not only a fun and creative project, but it is also a practical tool for staying organized and on top of your schedule. With tabbed dividers, grid pages, and plenty of space for journaling and planning, this planner is perfect for keeping track of appointments, deadlines, to-do lists, and more. Plus, the process of decorating and personalizing your planner can help inspire and motivate you to stay on track with your goals and tasks.

Read NextToilet Paper Roll Butterflies
![Pill Bottle Crafts: Reuse Pill Bottles [15 Ideas]](http://irepo.primecp.com/2017/06/334076/PILL-BOTTLE-CRAFTS-Header_Category-CategoryPageDefault_ID-2274135.jpg?v=2274135)