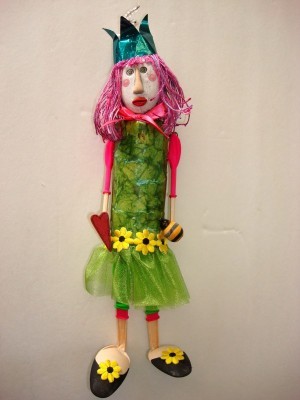
Recycled Glue Muse Doll
Need a little artistic inspiration? Look no further than this adorable Recycled Glue Muse Doll from Heidi Borchers. To start off, all you'll need is an empty glue bottle. This craft is perfect for the earth-conscious crafter.

Materials:
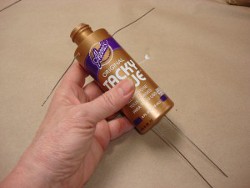
- Glue bottle empty 4 oz size (Hint: leave bottle upside down over night….transfer any excess glue into another bottle before beginning this project)
- Glue (I used Aleene’s Tacky Glue)
- Wire - 18 gauge 2 pieces 10” long and 1 piece 6” long
- Drill and 1/16” drill bit
- Decoupage glue (I used Aleene’s Collage Pauge)
- Brush- 1/2” flat
- Wax paper
- Needle nose pliers
- Paper- rice paper, or scrapbook type
- Plastic spoons- 4
- Candle
- Balloons- small water balloon size
- Acrylic paint- flesh, black
- Head (from ShopCool2Craft.com - available unpainted or painted)
- Colored foil (for crown)
- Yarn or embroidery floss (for hair)
- Miscellaneous items- daisy trim, organdy fabric (for skirt), ribbon (for bow), Wood heart and bee (for hands to hold)
- Paper towels
Instructions:
- Drill two holes for legs at bottom of the glue container.
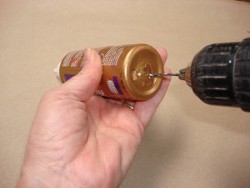
- Insert the 2 - 10” wires into the leg holes and up through the top of the bottle. Using the pliers twist the tops of two the wires that come up through the top of bottle.
- Drill holes for the arms about ½” from top edge of bottle. Insert 6” wire through one side and out through the other.
- Insert wire through glue nozzle. Twist the end of wire into a swirl with pliers to hold it inside the nozzle.
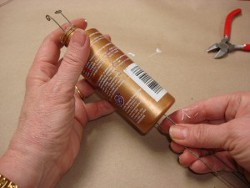
- Tear pieces of the paper into small pieces (1” to 2”). Brush the collage glue onto the bottle and onto the back of the paper. Place paper into the wet glue, then brush a coat of the glue over the paper.
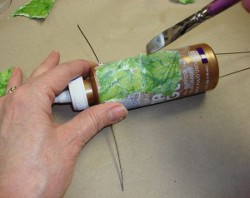
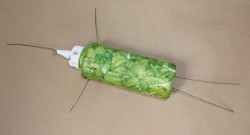
- Continue until the entire bottle is covered.
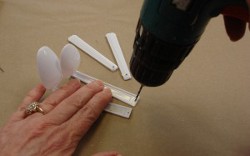
- To shape the legs, hold spoon over the candle (not in the flame) until it just starts to soften. When soft, immediately shape spoon into leg by bending. The spoon bowl is the foot/shoe. The handle is the leg. Repeat for other leg. For arms heat each spoon over candle and cut with scissors to remove the bowl from the handle.

- Drill the top edge of the spoon handle for legs and arms.
- Carefully attach to balloons on the legs for leggings and on the arms for sleeves. Trim the wires for the legs and the arms to about 1”. Create loop in end of each wire and attach the legs to the glue bottle body by inserting the wires into the drilled hole at top of legs. Bend the wire to hold the legs on. Repeat with arms.
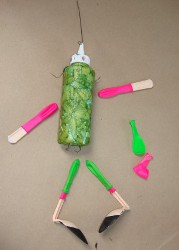
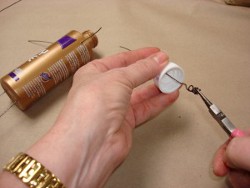
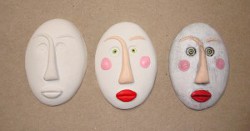
- For the head, after painting details (or you can purchase details pre-painted) apply a wash of black acrylic paint over head and immediately wipe off excess paint with a paper towel.
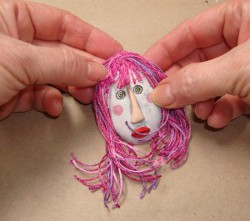
- To create hair, wrap the yarn around four fingers about 25 times. Tie off with extra piece of the yarn. Cut the loop area. Glue the hair to the top of head. Cut small pieces for bangs and glue into place.
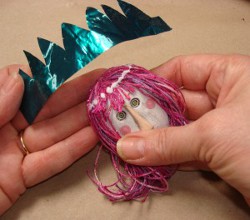
- Cut crown from foil and glue onto head.
- Glue the finishing touches onto the Glue Muse. Shoes can be painted on with the black acrylic paint, a ribbon bow glued at the neck, the skirt is made from organdy fabric gathered with sewing machine. Glue daisy trim onto the skirt and the shoes, a wood heart and bee are glued to the arms.
For a complete video tutorial of this project, check out How to Make a Glue Bottle Muse Doll.
Read NextQueenly Playing Cards
Your Recently Viewed Projects
Thanks for your comment. Don't forget to share!
cheetahgirl
May 05, 2012
dogwild, awesome comment! or you could use velcro and have a set of clothes to play with. that is so cool and so earth-friendly! could keep a kid entertained for a long time...
dixie dweller
Sep 14, 2011
I like this idea--seems like you could also use the spoon part for the head, or sculpt one from poly clay, or use a poly clay mold for your head...that's what's so fun about these crafts--the possibilities are endless! Have never heard of using balloons for trimming a doll and adding "clothing"---that's really creative! Maybe you could even use a balloon to make a stocking cap if you were making a Winter doll!
Report Inappropriate Comment
Are you sure you would like to report this comment? It will be flagged for our moderators to take action.
Thank you for taking the time to improve the content on our site.

![Pill Bottle Crafts: Reuse Pill Bottles [15 Ideas]](http://irepo.primecp.com/2017/06/334076/PILL-BOTTLE-CRAFTS-Header_Category-CategoryPageDefault_ID-2274135.jpg?v=2274135)