Paper Plate Gratitude Flowers
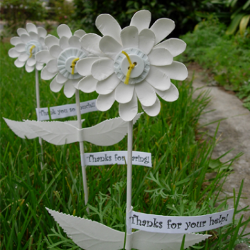
Use a plain paper plate, buttons from your stash and a small piece of embroidery floss to create your own Paper Plate Gratitude Flowers from Heidi Borchers. Paper flowers are a great way to decorate your space during even the coldest winter months.
These cute and adorable recycled craft ideas are the perfect Earth Day activity for elementary school students. Use this DIY craft to tell kids all about Earth Day and why we recycle. Making projects out of paper plates allows you to save the Earth and get creative at the same time. Kids will love creating these paper flower ideas for their classroom windowsill. These would double as adorable Mother’s Day DIY gifts, as well.

Looking for more recycling crafts for kids? Check out our collection of 53 Recycle Crafts for Kids.
Materials:
- Aleene’s Original Tacky Glue in the Gold Bottle
- White fluted paper plates
- Scissors
- Pinking shears
- Stylus embossing tool
- Wooden skewer (one per flower)
- Acrylic paint – white
- Paint brush
- Printed thank you sentiments
- Buttons – white – multiple sizes
- Embroidery floss – yellow
- Craft foam sheet (for use when embossing)
- Clothespins
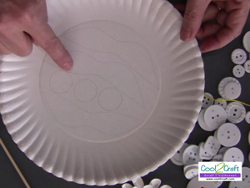
Instructions:
- Trace patterns onto center of paper plate.
- To create the flower petals, use the fluted edge by cutting each flute to round the edge.

- Then cut down each side to create petal. Cut leaves and flower center along pattern lines.
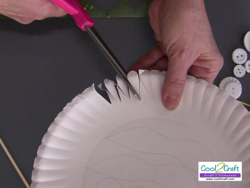
- Cut approximately 20 petals for each flower. Apply Aleene’s Original Tacky Glue to flower center.
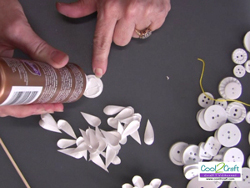
- Glue outside row of petals to flower center. To create center row of petals, cut to shorten each petal. Apply glue to back of petal and glue in place over back row of petals.
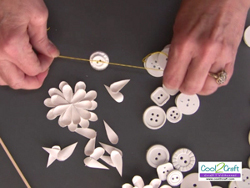
- Apply glue to end of embroidery floss. Rub between fingers to create “needle” on end of floss. Stack two buttons. Insert floss through top of one side, underneath and back up other button hole. Tie floss in knot. Cut to approximately 1/4″.
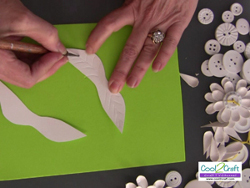
- Place cut leaves on craft foam. Draw leaf line and veins in each petal with embossing tool. Gently fold up at leaf line to add dimension to your leaves.
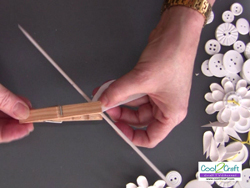
- Paint wooden skewer white. Let dry. Press center of leaves over skewer.
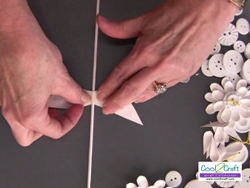
- Apply line of glue between leaves and skewer. Fold and secure with clothespin.
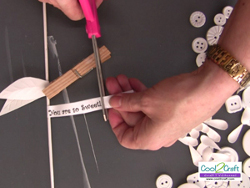
- Print sentiments on printer (right flush). Cut into strips.
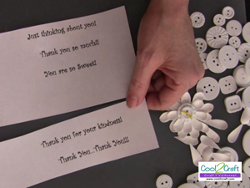
- Apply glue to back of strip. Fold over wooden stem and align layers. Cut off excess paper.
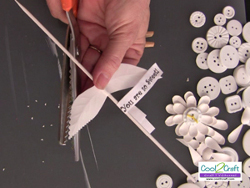
- Cut along outside edge of leaves with pinking shears. Double cut with shears to create smaller zig zag pattern. Glue back of flower to stem. Let dry.
For a comprehensive video tutorial, check out How to Make Paper Plate Flowers.
Read NextRecycled Cans DIY Candle Holder
Your Recently Viewed Projects

Thanks for your comment. Don't forget to share!
mulberrygalprinces s
May 27, 2018
These are the cutest little things ever. And they are very easy to make. The materials are also very inexpensive so it's my kind of project. I am thinking of different words to use right now. I really want to get started on this as soon as possible. Thank you for sharing this.
carnashun
Aug 07, 2014
ABSOLUTELY ADORABLE! What happens when the paper plates get wet?
FaveCrafts Editor JL
Aug 07, 2014
Hi there, We have contacted the designer with your question and will update the project as soon as we have more information. Thanks!
FaveCrafts Editor JL
Aug 11, 2014
Hi there, We spoke to the designer, Heidi Borchers, and she said - "These paper plate flowers are not intended for outside use..sorry the photo is misleading, as it was taken on the grass. They are for indoor use only. They are cute when they are put into a clay pot ( with a piece of Styrofoam to hold in place) or a fun colorful vase. " Thanks!
jmandrews 7125451
May 08, 2012
Couldn't find the pattern at first, then saw them in the middle of the first plate. real cute.
carrie75019 734823 9
Mar 19, 2012
In the instructions, it says to "trace patterns" on to the plate. Where are the patterns?
Report Inappropriate Comment
Are you sure you would like to report this comment? It will be flagged for our moderators to take action.
Thank you for taking the time to improve the content on our site.