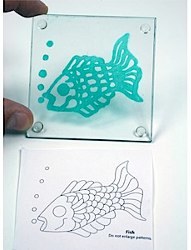
Painted Fish Coaster
This decorative coaster from Etchworld Armour is created using Etch cream with a needle tip applicator and a design from a clip-art book. A picture from a coloring book is just as cute! Have fun making these fun painted fish coasters!

Materials:
- 15-0150 Armour Etch Cream
- 14- Clip-Art design
- 60-3910 Square Coaster Set
- 61-3330 Rub N Buff 5pk- (We used Emerald green)
- 61-4162 Needle Tip Applicator bottle
- Paper clip or embroidery needle
- Cotton swab
- Popsicle stick or coffee stirrer
- 08-9777 Scissors
- Liner detail paintbrush (optional)
- 08-9415 Masking tape
Instructions:
- Tape a copy of your clip-art design to the underside of the coaster with design showing through the front.
- With the popsicle stick, load the Needle tip applicator bottle with Etch cream.
- Snip off the smallest amount of the tip you can from the applicator bottle. If the cream won’t come out the tip, snip a tiny bit more off the end until the cream makes a nice line. You want as fine a line as you can get without the Etch cream clogging the tip. Keep an opened paper clip or embroidery needle handy to handle clogs as you are working.
- Outline the design first, then go back and fill in details. You will have to work quickly, the Etch Cream should be removed within 5 minutes or so. You may have to eliminate some lines to keep the design simple or you can make finer lines with a liner paintbrush (do not wet with water) by dragging etch cream from the applicator bottle lines. Remember, Etch cream is not paint, so you cannot correct mistakes, so think before you create a line! Practice on scrap glass first!
- Rinse off Etch Cream under running water without touching the design until most of the cream is removed. Wash off any remaining cream with a wet paper towel while water is still running. Dry coaster.
- Place a little Green Rub N Buff on the end of a cotton swap and smear all over the etching.
- Take a soft paper towel and wipe off the excess Rub N Buff, flip towel and buff to a luster. The Rub N Buff will on stick to the etching.
Read NextHow to Make Boring Glass Stunning
Your Recently Viewed Projects

Thanks for your comment. Don't forget to share!
Hannah
Aug 24, 2017
I have tried making painted coasters. I sometimes use glow in the dark glue to make it light up on the table at night. My kids love these coasters.
Gran D
Feb 11, 2010
If your design is more intricate, do it in several steps. Wash in between and do not use the Rub N Buff until all steps are complete. I would suggest making a template with differnt coloured lines for each pass so that you can keep track easily of what you are doing. Gran D
BeckySue
Mar 11, 2016
Those are some really helpful tips! I've never worked with glass or etching, so this project seems a little daunting to me. However, I really like the look. I just have to think of where I can take advantage of this now.
Weberme
Aug 10, 2016
I agree with you Becky Sue this is beautiful but looks real hard. The tips are helpful but the etching technique seems a little hard but I guess I can try. Have you tried this yet? The only other thing I can think of putting this on would be a large piece of glass to use as a centerpiece.
Report Inappropriate Comment
Are you sure you would like to report this comment? It will be flagged for our moderators to take action.
Thank you for taking the time to improve the content on our site.