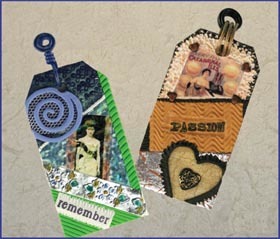
Mini Artist Trading Tags
By Lisa Pavelka for AMACO
Follow this simple guide to create unique artist trading tags to make your luggage stand out or give as gifts.
Materials:
- American Art Clay Co., Inc. (AMACO®):
- Pasta Machine
- PolyBlade
- PolyRoller
- WireForm
- Metal Mesh
- ArtEmboss® Peel ‘n Stick
- Metal Accent Sheets Fun Wire™
- Easy Metal Leaf
- FIMO® Soft Polymer Clay – At Least Three Colors, Including White
- FIMO® Decorating Gel
- Lisa Pavelka:
- Poly Bonder Glue
- Texture Stamps
- Waterslide Collage Transfers
- Ranger Industries:
- Perfect Pearls Powders
- Adirondack Pens
- Ink Pads
- Fiskars:
- Craft Knife, Scissors
- Decorative Edger
- JustRite Stampers:
- Rubber Stamps
- JHB International:
- Decorative Findings
- Beacon Adhesives
- Zip Dry Paper Glue
- 33/4' x 17/8" Manila Shipping Tags
- Craft Knife
- Needle Tool or Toothpick
- Ball Tip Stylus
- 4" x 4" Smooth Ceramic Work/Baking Tile
- Baby Wipes
Steps:
- Condition each color of clay (starting from lightest to darkest) by rolling through the largest setting of the pasta machine a few times or kneading by hand for a minute.
- Create a rough layout totaling three panels of clay to complete the tag. This can be a cutting template that is traced onto a piece of deli wrap or tissue paper if desired. See Example A.
- Roll 1/8 block of each color of conditioned clay on the 5th largest setting of the pasta machine. Set the white clay aside for later. Embellish the other two colors first. Steps 4 through 8 are just a few ideas of ways to decorate/embellish your clay panels.
- Texture the clay by rolling it over a texture stamp. Apply a small amount of automotive protectant spray (Armor All or STP Son of A Gun) to both sides of the clay as a release agent. Place the clay down over the stamp and roll over it firmly with one pass of the acrylic rod.
- Roll a clay sheet on the 4th largest setting of the pasta machine, apply Easy Metal Leaf over the top and burnish onto the clay with your finger. Gently stretch with your hands, pulling in all directions to create a crackle effect.
- Stipple the clay with the end of a ball tip stylus, needle tool, retracted ball point pen, or any other tool that will create an interesting texture.
- Mark diagonal or straight lines (either vertically or horizontally) across the entire surface of the clay sheet every 1/8, 1/16 or 1/32 inches to create dimensional stripes.
- After texturing the clay surface, dust the raised areas with Perfect Pearls powder using the tip of your finger.
- Trim all three clay panels to fit together as desired (refer to color photo). Don’t worry about trimming the sides just yet. Assemble the clay sheets by butting them against each other as closely as possible, directly on the tile surface.
- Cut a waterslide transfer to fit within the framework of the white clay panel. Place it face-down over the clay and burnish with your fingertip. Add a few drops of water to the paper backing. Spread the water until the entire backing is saturated. Allow the water to sit for 30 seconds. Blot the excess water from the transfer backing with a baby wipe. Slide off the paper backing and wipe the residue off of the transfer with the baby wipe. If air bubbles appear, gently push them out towards the edges of the transfer.
- Imprint one or more word panels (on white or lightly colored clay) using the JustRite pre-inked stamps. The clay should be rolled out quite thin (7th largest setting of the pasta machine or thinner). Allow the ink to dry for several minutes. Trim as desired and press anywhere you like on the clay. Tip: Place a small piece of deli wrap over the top of the stamped clay when pressing this onto the clay panels to avoid smearing the ink. The ink will heat set permanently when baked in the oven.
- Cut a decorative shape from WireForm®. Secure this to the clay using Poly Bonder and clay to anchor it.
- Add decorative borders or frames around embellishments and transfers using clay or strips cut from Metal Accent Sheets. These sheets can be tinted prior to baking using The Adirondack Pens by Ranger.
- When the panels are decorated to your liking, center the Manila Tag over the assembled clay panels. Use this as a template to cut around the outside edges of the clay. Remove excess clay from the tile. If you have overhanging edges of WireForm®, Metal Accent Sheets, or waterslide transfers that can’t be cut with a clay blade or craft knife, don’t attempt to trim these yet. Trim around these areas as closely as possible with the craft knife. Trim these away to leave a line flush with the rest of the card after baking, using scissors. Bake the clay on the tile at 265ºF for 35 minutes.
- While the tile is baking, you may wish to decorate the back of the Manila tag with rubber stamps, inks, etc. Once the clay has cooled, carefully slide the clay blade under the clay to lift it from the tile. The panels may come off in one piece, but don’t worry if they come apart. Glue the clay panel(s) to the tag using the Zip Dry glue. Turn the tag over so that the manila backing is face-up. Trim the clay through the hang hole using the craft knife.
- Create a decorative hanger using FunWire™, thread through the hole and enjoy!
Read NextBasket Hostess Gift Ideas