Sizzix Gift Cube
Cheap Sizzix projects don't get cuter than this! A Sizzix Gift Cube from Theresa Cifali is a great way to wrap and present gifts.

Materials:
#656739 Sizzix Bigz XL Die - Cube, Twist, 3-D by Karen Burniston
Sizzix Big Shot cutting machine
Sizzix Accessory - cutting pad, extended
Sizzix Accessory - premium crease pad, extended
Die Cuts With a View cardstock
ATG Tape Runner
Paper Trimmer
Xacto knife and mat
Family Treasure's Scalloped edged scissors
1/16th" hole punch
PPA
Golden's Fluid Matte Medium
Baby Feet paper, Stemma
Pastel colored card stock, Bazzill
Pale green satin ribbon - 1/8"
Yellow organza ribbon - 3/4"
Plaid's Folk Art Paint in light blue, jamaican sea, lemonade and baby pink
Doodlebug Design Sugar Coating lily white glitter
Stickles
Tissue paper
Candy
Instructions:
- The first thing I did was assemble the box.

- I worked a little bit backwards. If I hadn't put the cube together first, I probably would have covered the individual pieces with paper first. Since I didn't do that, I had to work a little bit backwards. Now a note to all....if you are going to use your diecut as a pop up, will want to do your assembly with really super strong glue! As I knew my box would be stationary, I used my ATG tape runner to put the actual box together.

- I covered the top tabs first. I used PPA to apply the paper to the cube. I have found that once the glue dries, it adds a little stability.

- Then I covered the sides also using PPA. I didn't cover the bottom, but of course, if you'd like to on yours that's just fine! I also chose to cut away the part of the tab that looks like a wing.

- Next, I used 1/8" pale green ribbon to finish off the top edges of the box. It hid any black sticking out and gave it a cleaner look.

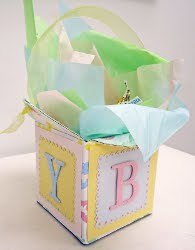
- I used my pastel colored solid papers to adhere to the sides of the cube. The first layer I cut 3"x3" and taped them to the sides of the box. I cut another set the same size and trimmed the edges with my Scalloped edged scissor. How did I get that so straight? I layered the scalloped pieces on top of each square. Plus I made sure to have a different color combination on each side.

- Don't those Stickle dots look great? Now my favorite part of the cube is the letters. I used chip board letters that spelled out B A B Y. I painted each letter a different color with acrylic paint and let them dry really well. Then I applied a thin coat of Golden's Fluid Matte Medium to the front of the letters and then dipped those into that Lily White Glitter. It is a super fine glitter and the paint color shows right through it. Love it! Then I glued one letter to the center of each paper panel.

- Finally, I punched two tiny holes using my 1/16th" hole punch into the tip of the triangular side tabs. I threaded the organza ribbon through each side and tied a simple knot. The hole is so tiny that the big knot I made will not go through it. Plus the layers of paper, glue and the ribbon lining should keep anything from ripping. I mean, I wouldn't load this thing up with change...but for it's intended purpose here, it is perfect.

- I threw in some tissue paper in baby colors to bring it all together. Then I filled my baby favor up with candy.
Read NextToilet Paper Roll Boxes
Your Recently Viewed Projects
Thanks for your comment. Don't forget to share!
Report Inappropriate Comment
Are you sure you would like to report this comment? It will be flagged for our moderators to take action.
Thank you for taking the time to improve the content on our site.