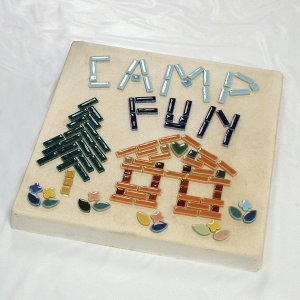
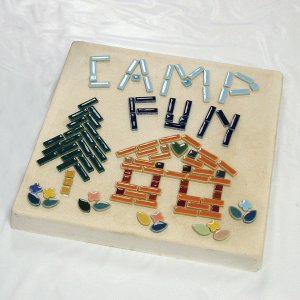
Fun at Camp Mosaic
This fun Fun at Camp Mosaic from Diamond Tech is great for the whole family to do together. You could even do simple mosaic patterns like this at a kids' camp during the summer! Kids will love creating their own camp mosaic and these stones look great indoors and out!
Materials:
- 1 Premade Cement Stepping Stone 12” x 12”
- 3 packages Jennifer's Mosaics Assorted Ceramic Rectangles
- 1 package Jennifer's Mosaics Assorted Leaf Tiles
- 1 package Jennifer's Mosaics Assorted Ceramic Hearts
- 1 package Jennifer's Mosaics Assorted Ceramic Flower
- 1 package Jennifer's Mosaics Assorted Ceramic 3/8” Tiles
- Elmer's™ Mosaic Adhesive
- Carbon paper and pencil
- Ruler
- Camp Fun pattern
Instructions:
- Begin with a clean dry pre-made stepping stone or create one yourself using the instructions found on a stepping stone form available in most craft stores.
- Determine the center of the stepping stone by measuring in 6” from the top and 6” from the bottom, mark lightly with a pencil. To find the pattern center, fold pattern in half; then fold in half again. Unfold pattern, where the two folds meet is the center of the pattern, align the centers of the pattern and the stone, tape into position to prevent movement.
- Place carbon paper between the pattern and the surface of the stepping stone and trace the pattern onto the stepping stone.
- Start at the top of the stone, place light and dark blue ceramic rectangles and 3/8” squares onto the pattern to spell out the words “CAMP FUN”. When happy with the look, glue into place.
- Next, arrange green rectangles onto the stepping stone to form a tree following the pattern. Add three 3/8” light brown square tiles to the base of the tree to create the trunk. Lift each tile and apply a thin layer of glue to the back. Firmly press each ceramic tile onto the stepping stone.
- Follow this same procedure when creating the cabin. Place brown rectangles and burgundy 3/8” square tiles onto the stone following the pattern. Lift each tile and apply a thin layer of glue to the back. Firmly press each tiles onto the stepping stone and allow to dry.
- Create a field of flowers at the base of the stone by randomly gluing ceramic flowers and leaves in this area. Lift and glue into place.
- Allow glue to thoroughly dry following manufacturer’s instruction before placing outside.
Read NextDIY String Hanging Planter