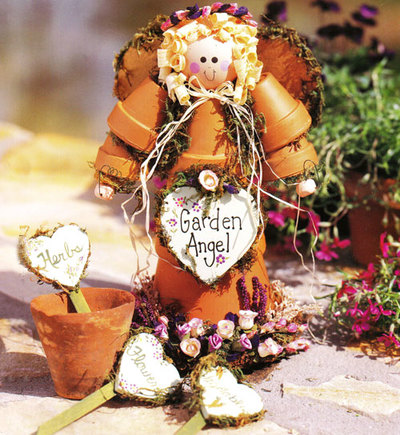
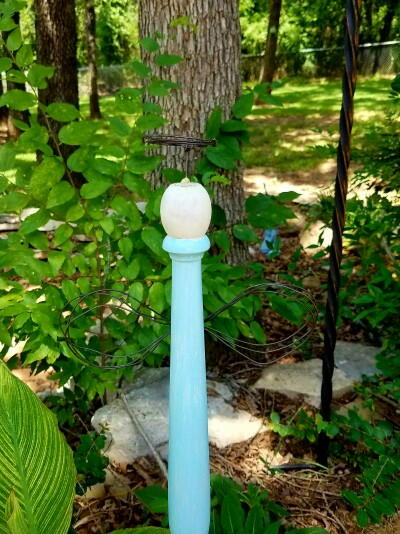
Clay Pot Garden Angel
Use small clay pots to create a cheerful angel for your garden. Matching plant markers create a whimsical feel in any garden.

Materials:
- Aleene’s Super Thick Tacky Glue
- Paintbrushes: ½” flat, fine tip
- Green moss
- Clay pots: 1 (4” diameter), 1 (3-1/4” diameter), 1 (2-3/4” diameter), 2 (1-3/4” diameter), 2 (1-1/2” diameter)
- 4 (1” x 1-1/2”) pieces of Styrofoam
- 2 wooden clothespins (the old-fashioned typewith round tips)
- Drill with 1/8” bit
- 2” diameter wooden ball
- Acrylic paint: blush, black, medium fuchsia, gold, soft sage, assorted colors
- Wood shavings
- Raffia
- Wooden hearts: 1(6”), 1 (2-1/2”)
- Florist’s wire
- Small dried or silk flowers
- Florist tape
- Pattern
For 1 plant poke:
- 1 wooden craft stick
- 1 (2”) wooden heart
- Acrylic paint: dusty sage, soft sage, assorted colors
Instructions (for angel):
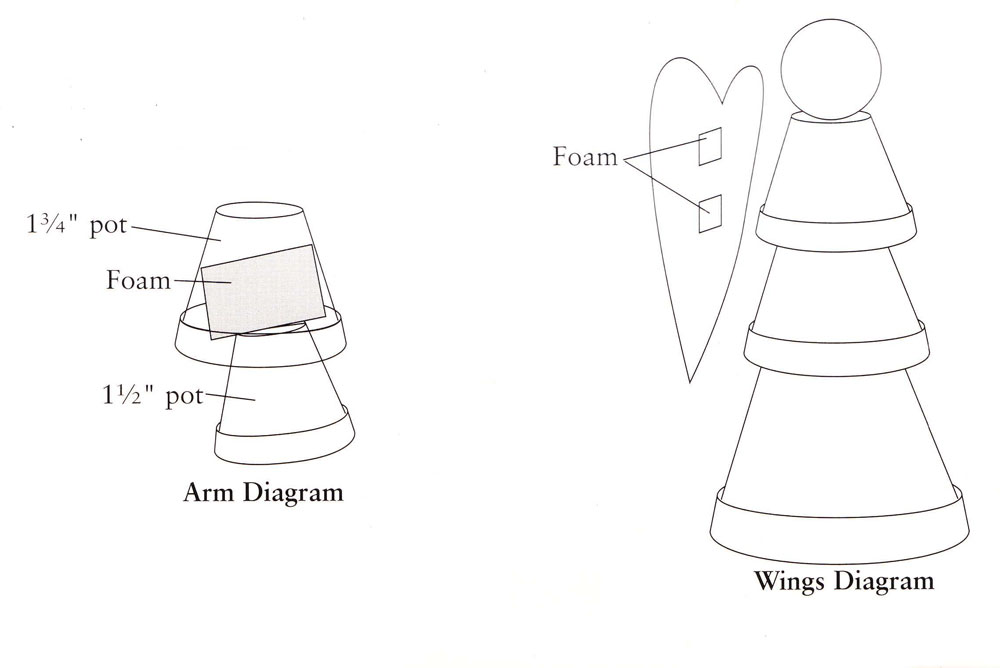
- To form body, apply glue around edge at bottom of 4” pot. Place 3-1/4” pot on top of 4” pot and press into glue. In same manner, glue 2-3/4” pot on top of 3-1/4” pot. Let dry. For each arm, glue 1 piece of Styrofoam inside 1 (1-3/4”) pot. Apply glue to bottom of 1 (1-1/2”) pot. Press 1-3/4” pot with Styrofoam onto glue-covered 1-1/2” pot (see Arm Diagram). Let dry. Referring to photo, glue 1 arm to each side of body. Let dry.
- Cut off bottom of each clothespin to leave 2” length. Drill 1 hole from side to side through rounded end of each clothespin. Paint clothespins and wooden ball blush. Let dry. With rounded end extending beyond pot, glue 1 clothespin inside each 1-1/2” pot for hand. Let dry. Glue ball in place on body for head. Glue wood shavings to top of head for hair. Paint facial features on face with black and medium fuchsia. Let dry. Tie raffia in bow. Glue bow in place at neck. Let dry.
- Paint 6” heart gold. Let dry. Glue 1 Styrofoam piece to heart about 1-1/4” from top. Glue remaining Styrofoam piece to heart about 1” below. Let dry. Apply glue to surface of each foam piece. Referring to Wings Diagram, glue wings to back of angel. Let dry.
- Drill 1 hole from front to back through each side of 2-1/2” heart. Paint heart soft sage. Let dry. Referring to photo, paint “Garden Angel” and flowers on heart as desired. Let dry. Referring to photo, center and glue 2-1/2” heart to angel at waist. Let dry.
- Referring to photo, glue moss and flowers to angel as desired. Thread florist’s wire through holes in 2-1/2” heart, leaving tails of equal length on each side of heart. Wrap wire tails around pencil to coil. Thread 1 end of wire through hole in each clothespin hand.
- For halo, cut 1 (4”) length of florist’s wire. Bend wire to form semicircle. Using florist tape, attach flowers to wire. Place halo on head.
Instructions for 1 plant poke:
- Cut 1 (4-1/2” length from craft stick, shaping cut end to a point. Paint stick dusty sage and heart soft sage. Let dry. Paint desired word and design on heart (see photo) Let dry. Glue rounded end of craft stick to back of heart. Let dry.
- Heidi’s Designer Tip: Clay pots can be a little challenging to glue so for best hold, be sure that you use a generous amount of glue in each step and let your glue dry completely.
Read NextDawn Powerwash Refill Recipe
Your Recently Viewed Projects

Thanks for your comment. Don't forget to share!
Donnajs
Feb 18, 2012
Adorable! I love this idea and can't wait to get started making some for myself and friends and family
Member 17896
Jun 04, 2010
Hi I usually just copy and paste all into WORD. That way it can be printed the way I want it.
Phaedra
Dec 01, 2009
I have a question. The pattern for the Clay Pot Garden angel, why can't it be printed off so we know exactly what she is suppose to look like? Or can yu tell me how to go about printing it off? Since I joined this site, I now have a note book full of idea's and "How To's"! Just have to live to be 940 years old to do them! Wishing everyone at Fave Crafts a Very Merry Christmas. Phaedra
Report Inappropriate Comment
Are you sure you would like to report this comment? It will be flagged for our moderators to take action.
Thank you for taking the time to improve the content on our site.


